I Am... The Ultimate Kale Salad
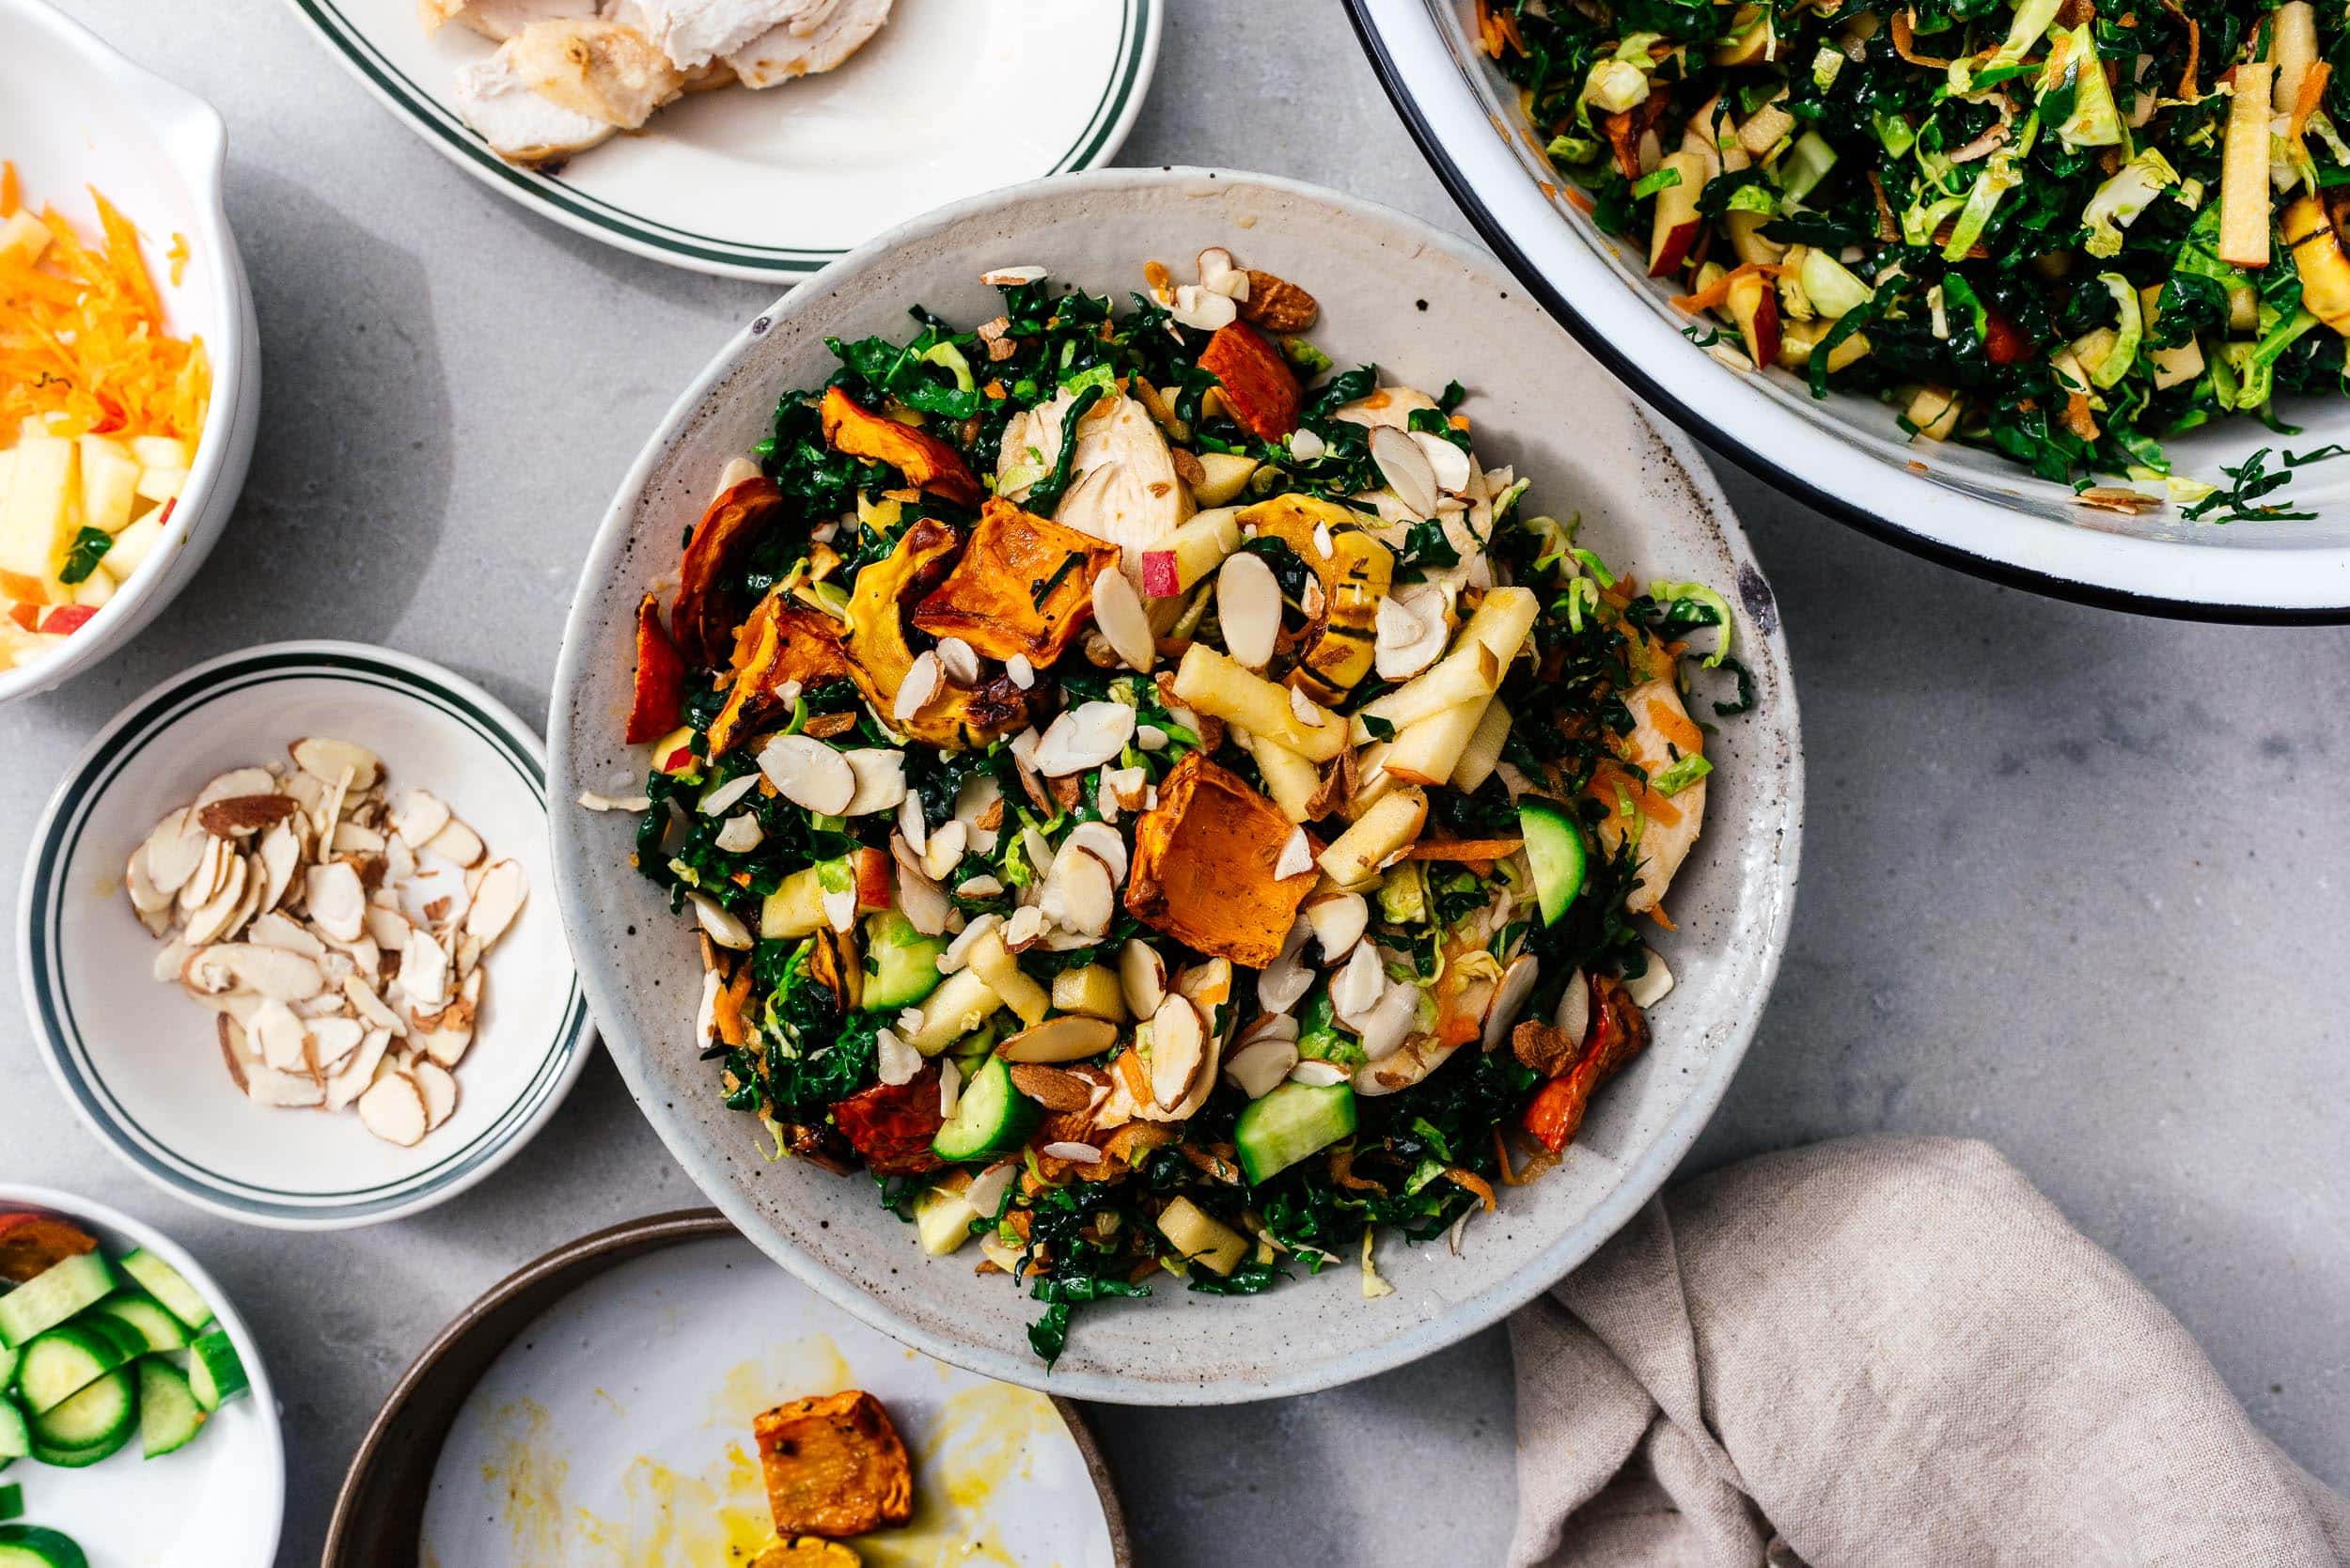
I have been living on this kale salad. It’s so pretty and festive and it just gets me in my fall feels. It has all the textures and flavors and is full of healthy stuff! It’s the perfect side for Thanksgiving or any special fall/winter meal. Heck, I eat it as a meal in itself all the time.
Why this kale salad is the best
I love how you can make this salad ahead of time, with dressing, and it just gets better and better. The kale and shredded Brussels sprouts stay hearty and hold up to the dressing and nothing wilts or gets limp and sad. The apples add a bit of sweetness and crunch, the cucumbers add crisp cool freshness, the carrots add color, and the sliced almonds are the nutty kiss on top. Even better is when you add chicken breast and roasted squash. Seriously, so good!The dressing
The dressing is a really simple but addictive mix of Japanese rice vinegar, soy, mirin, a touch of sugar and toasted sesame oil. It’s light and tangy and full of umami. It lets the salad ingredients shine while still bringing the flavor.What kind of kale for salad
My favorite kind of kale for kale salad is Tuscan kale, also known as dinosaur kale or Lacianto kale. It’s flat and a deep, dark green. It’s thinner and more tender than the classic curly kale you see and it tastes amazing raw. You can also use curly kale for this salad, but dinosaur kale is my kale of choice.How to prep kale
- Wash the kale and throughly dry.
- Use a pairing knife to cut out the center stems or simply tear the leaves off the stem. The stems are tough - you can discard them.
- Roll the leaves up into a tight roll and slice thinly, into ribbons.
- Your kale is ready for salad!
How to shave brussels sprouts for salad
I love brussels sprouts in salad - they’re just like tiny cabbages. To shred sprouts, easily, wash, trim the ends off, cut them in half, place them cut side down on the cutting board and thinly slice cross-wise to create shaved sprouts.How to make kale salad
- Make the dressing in a bowl or liquid measuring cup. Sometimes I like to use my milk frother to really emulsify the dressing.
- Toss together all the ingredients in a large bowl, but save some apples, cucumber, carrots, and almonds for garnish.
- Dress the salad according to taste - you might not need all the dressing. I tend to dress my salads on the lighter side, I usually make a half portion of dressing. This salad is all about you so dress accordingly!
- Finish up by garnishing the top of the salad with the reserved toppings and enjoy!
What to serve alongside kale salad
I like this salad as a meal but it makes an excellent side dish for proteins such as:- weeknight steak
- Italian style pork chops
- slow roasted salmon
- honey garlic mustard chicken thighs
- crispy oven baked tofu
- honeynut squash
The Ultimate Kale Salad
This kale salad is all the fall feels.
- 1/4 cup rice vinegar (Japanese preferred)
- 2 tbsp soy sauce
- 2 tbsp mirin
- 2 tbsp neutral oil
- 1 tbsp sugar
- 1 tbsp toasted sesame oil
- 2 bunches kale (thinly shredded, approx 8 cups, dinosaur/tuscan/lacinato preferred)
- 1 lb Brussels sprouts (shredded, approx 6 cups)
- 1 cucumber (sliced)
- 1 apple (cut into matchsticks, Fuji preferred)
- 1 carrot (shredded)
- 1/4 cup sliced almonds
- roasted chicken breast (sliced, optional)
- roasted squash (cubed, optional)
In a liquid measuring cup or bowl, whisk together the dressing ingredients, taste, and adjust.
Toss together the shredded kale, sprouts, cucumber, fuji apple, and carrots in a large bowl. Dress evenly to taste and top with sliced almonds.
Optionally top with roasted chicken breast and roasted squash! Enjoy!
I Am... Air Fryer Squash
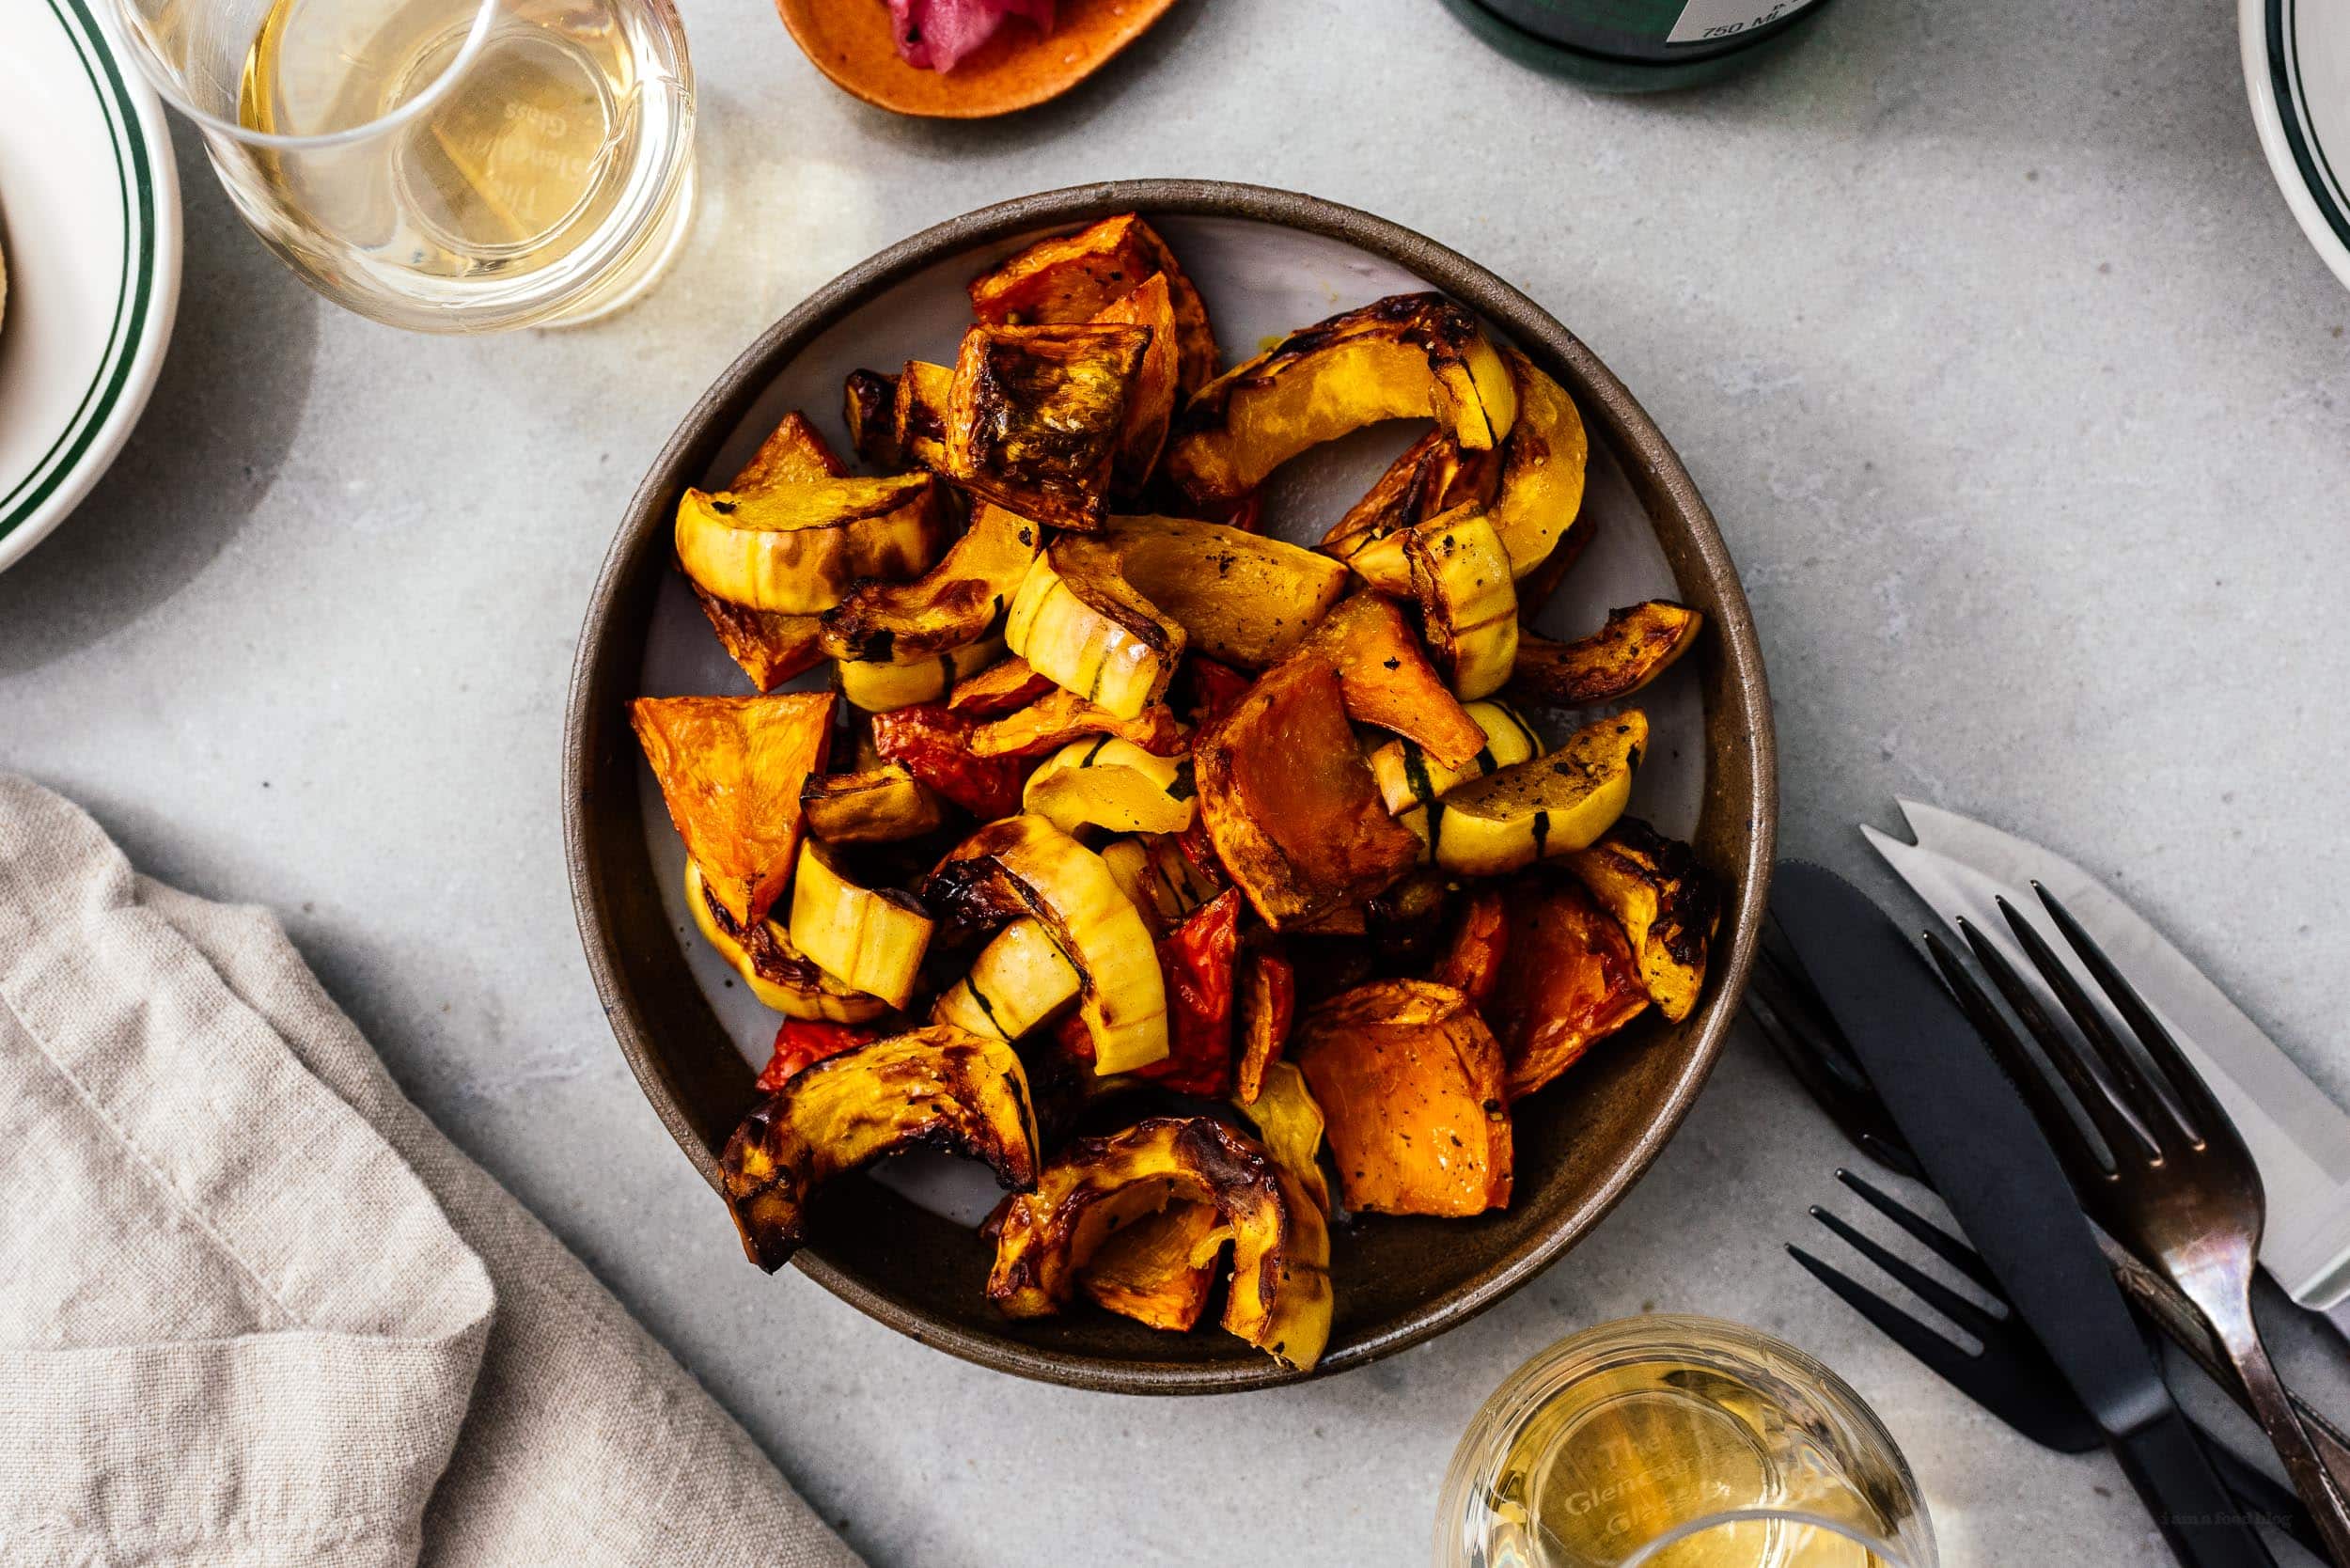
If you love roasted squash it’s time to turn to the air fryer because roasted air fryer squash is AMAZING. Super crisp and tender squash in just a fraction of the time it takes to do in the oven.
It's gourd season!
Come fall, I’m all about the squash. It’s so hearty, delicious, filling, and nutritious. My favorite of all the fall/winter squashes are delicata and honeynut. But I also LOVE kabocha, butternut, buttercup, and acorn. I recently just tried red kuri, a small squash that looks kind of like pumpkin. All the squashes are just so perfect, especially when roasted in the air fryer. They turn golden brown, perfectly caramelized, sweet, salty, with the best buttery texture. It’s a must have fall dish. If I’m being honest, it’s an anytime of the year dish for me but when squash is in season, it’s definitely a daily thing. This is my go to roasted squash recipe. It’s super easy, with only 4 ingredients: squash, olive oil, salt and pepper. The prep takes hardly any time at all and it’s good enough to enjoy on its own, as a side dish, or in other recipes. Meal prep a bunch of roasted squash at the beginning of the week and you’ll have deliciousness on hand for days.How to prep squash
This depends on which squash you choose. Technically, all squash skin is edible. Still, that doesn’t mean that all squash skin tastes amazing. Sometimes the textural difference between the skin and the squash is too much. Generally, I tend to peel butternut and kabocha because their skins are a little tough. Honeynut, acorn, and delicata have tender, easy to chew skin so you don’t need to peel them. If you need to peel your squash, the easiest way is to use a vegetable peeler.How to cut squash
Get a large, heavy knife and a solid cutting board and chop off the stem then slice the squash in half, vertically. If the squash is super hard, you can pop it in the microwave for 1-2 minutes, which will soften it slightly. Use a spoon to scoop out the seeds and any pulp and then dice or slice the squash into evenly sized pieces.How to air fry squash
- Toss the cut squash with a generous drizzle of olive oil and salt and freshly ground pepper.
- Add the squash to the air fryer basket and air fry at 400°F for 12-15 minutes or until crisp and golden brown, shaking halfway.
- Let cool slightly and enjoy!
How long to air fry squash
I find that 12-15 minutes at 400°F is perfect! The high heat caramelizes the outsides and the timing is perfect for soft and tender insides.What air fryer do you have?
If you’re wondering which kind of air-fryer we have, it’s this style. It’s quiet and easy to clean and fairly wide. We love it.How to use roasted squash
Golden brown, caramelized air fried squash is delicious on its own or as a simple, hearty side dish. If you have any extra on had, there are tons of ways to use roasted squash. Here are some of my favorites:- in salads
- blended, in soups
- blended as dips
- in curries
- in omelettes
- with quiche or frittatas
- in savory tarts
- in tacos, burritos, or quesadillas
- with pasta (especially mac and cheese!)
- on pizza
- on toast
Air Fryer Squash
Super crisp and tender squash in just a fraction of the time it takes to do in the oven.
- air fryer
- 1 medium squash (eg. delicata, honeynut, butternut, buttercup, kabocha, red kuri, acorn)
- 1-2 tbsp olive oil
- salt and freshly ground pepper
Wash and dry your squash. If desired, peel. Then trim, de-seed, and cube your squash.
Toss with a generous drizzle of olive oil and season with salt and freshly ground pepper.
Add the squash to the insert of the air fryer and air fry for 12- 15 mins at 400°F, shaking halfway, or until tender and golden brown. Enjoy!
I Am... Yaki Imo: Roasted Japanese Sweet Potatoes
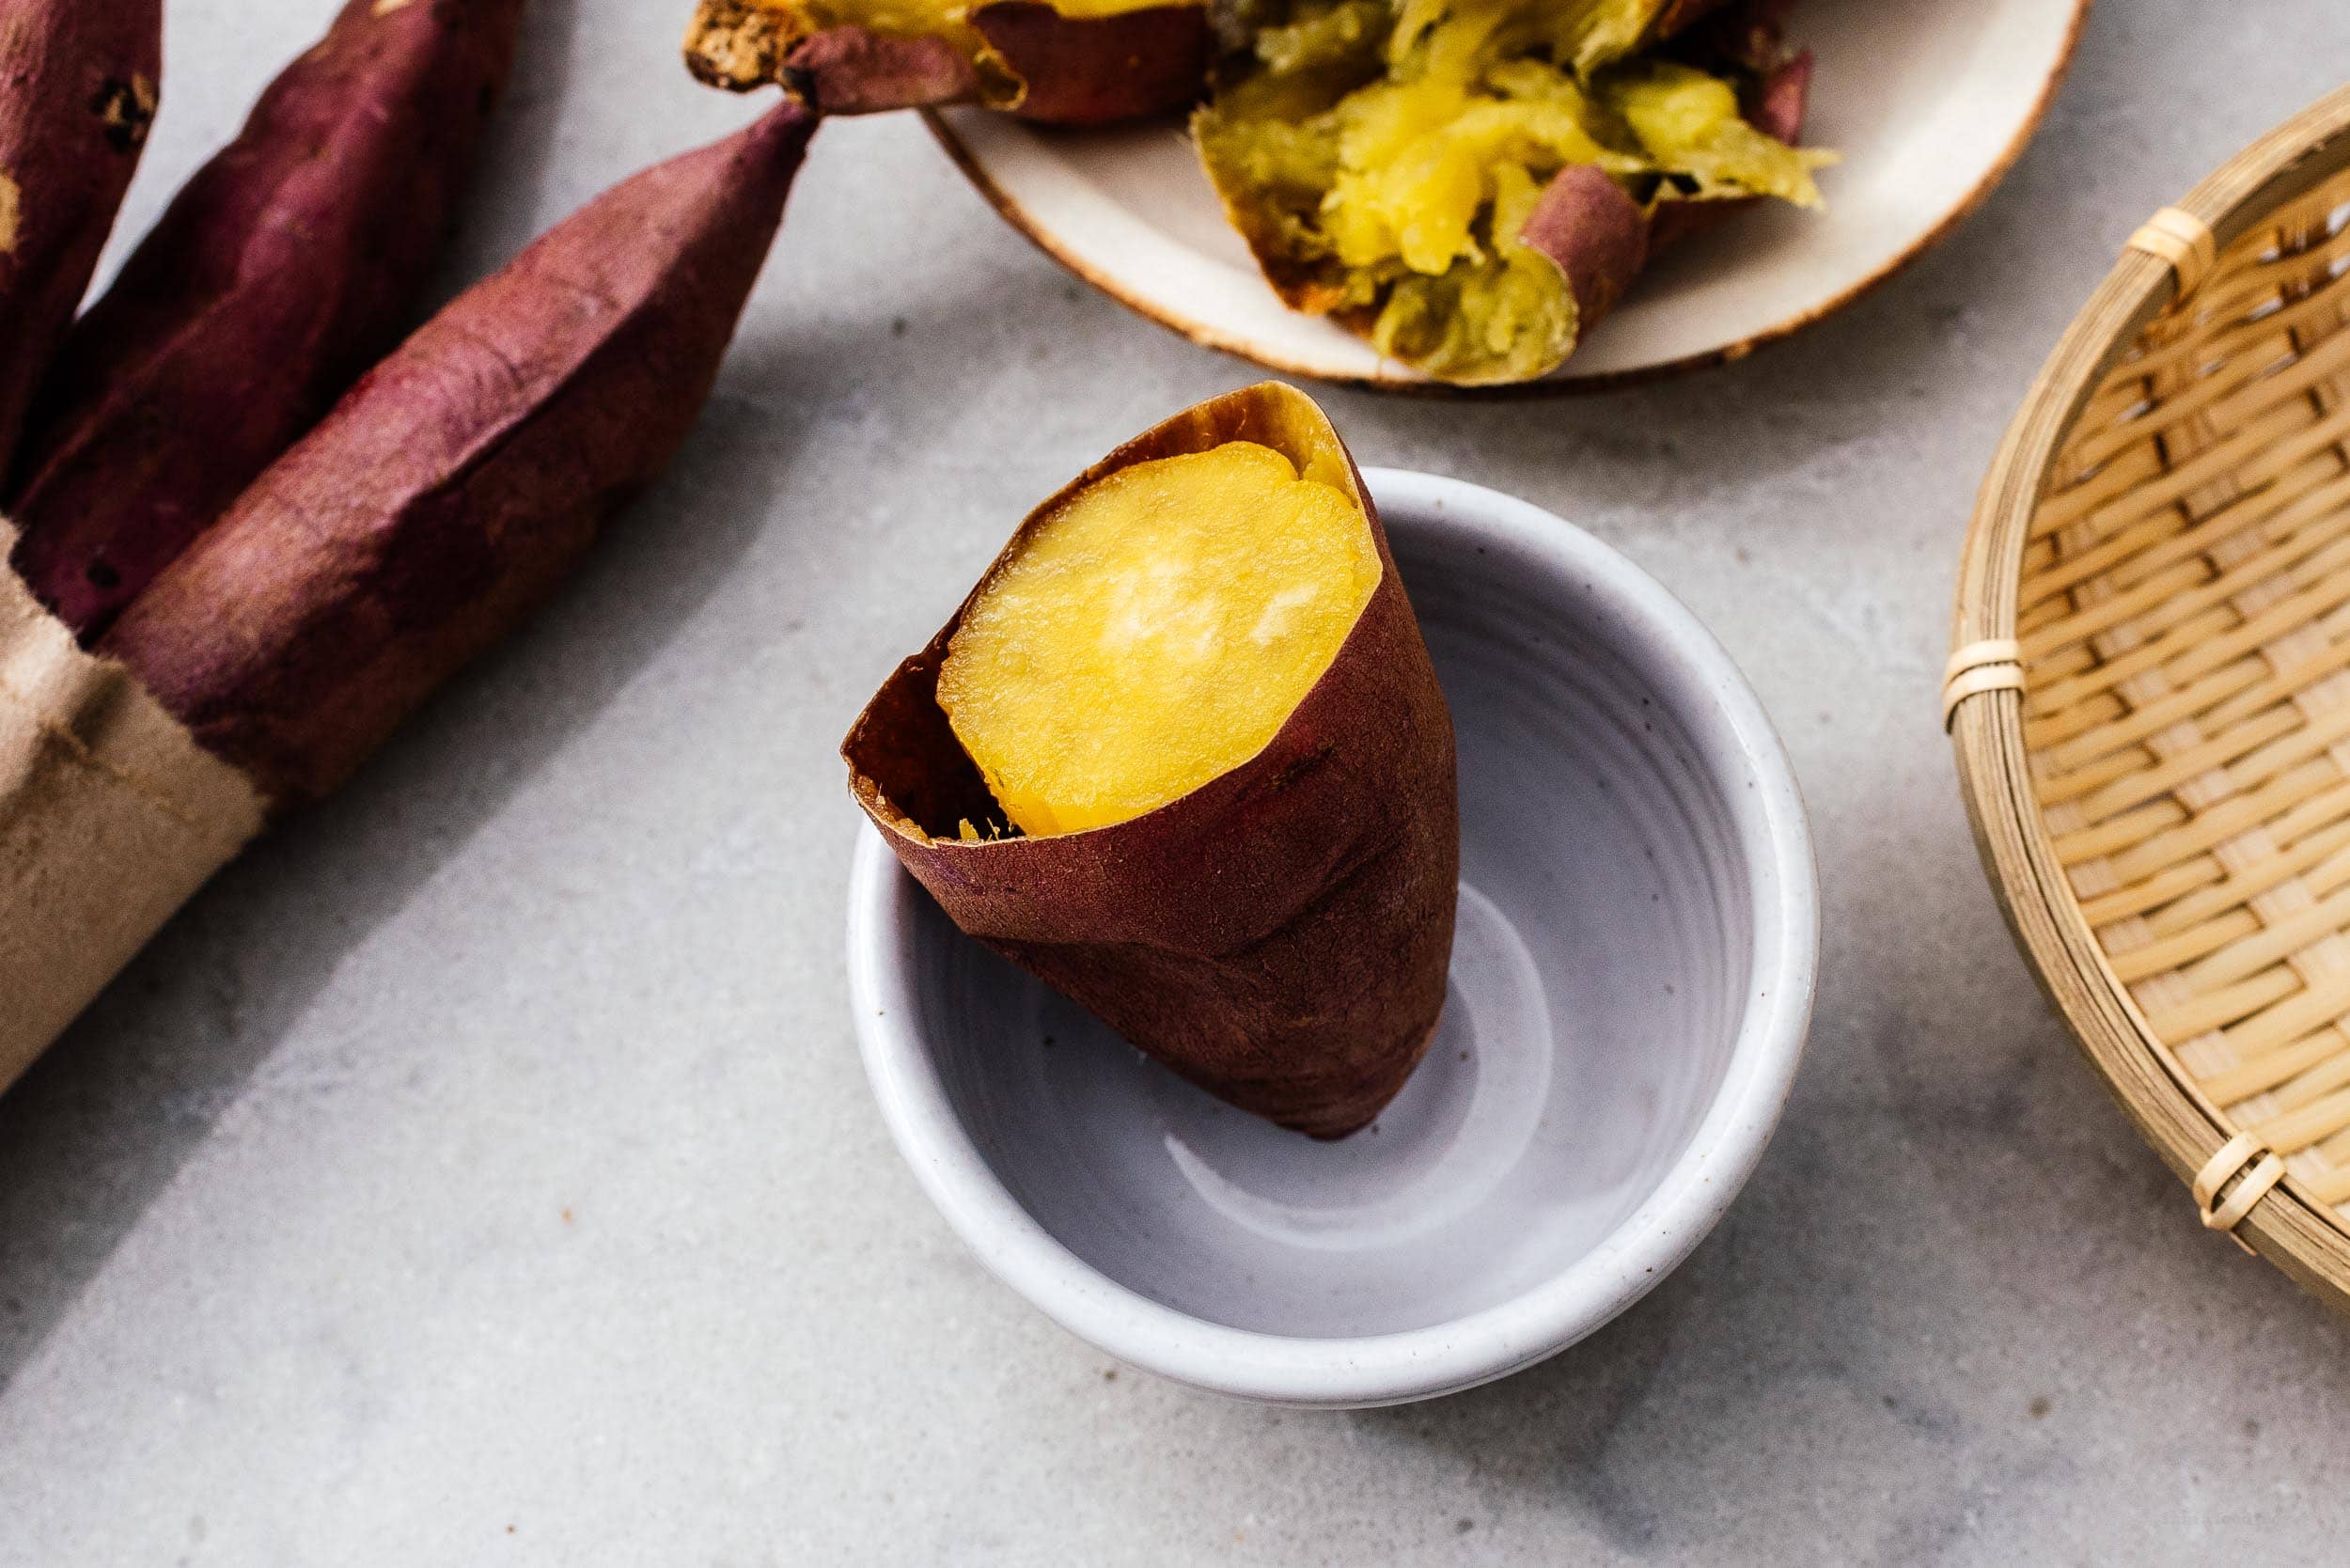
Baked Japanese sweet potatoes are the best sweet potato you’ll ever eat: nutrious, creamy, and sweet.
What is yaki imo?
Yaki imo is a baked Japanese sweet potato! Yaki imo translates to baked (or roasted) potato. Most people in Japan, when they’re referring to yaki imo, they’re talking about Satsuma imo, which are Japanese sweet potatoes, named after the Satsuma region on Kyushu island. Satsuma imo have dusty pinkish-purple skin and pale cream insides. When they’re roasted, the insides turn a beautiful golden yellow. They’re quite a bit smaller than your usual orange sweet potatoes. If you’ve seen the sweet potato emoji, you know exactly what a satsuma imo looks like: 🍠 . They’re super sweet and delicious, incredible and satisfying.What is the best way to cook a Japanese sweet potato?
Baking! It’s the absolute best way: the subtle sweet and toasty aroma that will fill your house is absolutely irresistible.Types of sweet potatoes
In Japan, there are hundreds of varieties of Satsuma imo, each with different sweetness levels, textures, and skins. Here in North America, the sweet potatoes we usually see are orange skinned sweet potatoes. Orange sweet potatoes are completely different, both in looks, taste, and texture. Japanese sweet potatoes start out their lives with pale creamy insides that turns golden after being cooked. They’re also a lot starchier, fluffier, and a bit more dry than orange sweet potatoes. When you bake them, their incredible sweetness caramelizes and condenses into a slightly, sweet, soft texture.Where to buy Japanese sweet potatoes
They sell Japanese variety sweet potatoes at Asian grocery stores, Whole Foods, Trader Joe’s, and farmer’s markets. Sometimes speciality stores will actually import in potatoes that have been grown in Japan, but usually what you’ll find are the Japanese variety of sweet potato that’s been grown in North America. If you have the chance and see imported Japanese sweet potatoes that have been grown in Kagoshima, please get them! I just did a side by side taste test and they are SO MUCH BETTER. Creamier, softer, sweeter, and more custard-y. I found imported Kagoshima Honey Potato Beniharuka and they were amazing. They were labeled as small and were very slender. I would have preferred the medium size, but even having access to Japanese grown potatoes is amazing so I’m not complaining! Pro tip: If you live near an Asian grocery store such as H-Mart or a Japanese grocery store, they may sell yaki imo. They keep roasted sweet potatoes in brown bags in a heated box and sell them as snacks. If you don’t have time to roast your own, you can grab some ready to go.How to choose good sweet potatoes
Choose firm, smooth skinned potatoes that are dense and not too big. The smaller potatoes are sweeter and have the bonus of not taking as long to bake!How to store
Keep your raw sweet potatoes in a cool, dry, dark space for up to 4 weeks.How to bake Japanese sweet potatoes
Making yaki imo at home is incredibly easy: simply bake and allow the starch in the potatoes to break down and caramelize, becoming soft and sweet. Start off by scrubbing and drying your sweet potatoes. If desired, use a fork to lightly poke a couple of holes in the potatoes. Place them on a wire rack and bake in the oven, naked and without foil, until the skins are crisp and the insides are very tender and soft.Baking at different temperatures will give you different potato textures.
325°F. Bake for 1-1.5 hours depending on size for a super sweet fluffy cake-like texture. 375°F. Bake for 1-1.15 hours depending on size for a super sweet tender custard inside and crisp caramelized outside. I personally like baking at 375° which makes the outsides super crisp and caramelized with a very tender, very sweet, buttery dessert, custard-like texture.Stove top yaki imo
If you don’t have an oven, you can also make yaki imo on the stove top. Place the sweet potatoes in a cast iron pan and cover the potatoes and cook over low, turning every 20 minutes until they’re soft and cooked through, about 1 hour and 15 minutes.Nutritional information and health benefits
Japanese sweet potatoes are super healthy complex carbs. They’ll fuel you with energy and keep you full because they’re high in dietary fiber. They’re also rich in Vitamin A, C, and B6. Because they’re so satisfying, they make a great snack, side, or main.How to eat yaki imo
Just like that! Enjoy them warm out of the oven after they’ve rested a bit. You can hold them, peel the skin, and eat them, or you can eat the skins too. Sometimes I like to use a spoon to scoop out the insides then eat the crispy skin at the end when I’m done scooping out the creamy middles. Seriously SO GOOD.How to store cooked roasted sweet potatoes
If you have any extra yaki imo left over, wrap them up and place them in air tight container in the fridge. You can enjoy them straight from the fridge or reheat them in the microwave for a warm potato. I love yaki imo so much. We’ve even been to Kagoshima, where satsuma imo are from to enjoy super local sweet potatoes. I love them so much that I have a favorite yaki imo shop in Ginza. It’s called Tsubo Yaki-imo. They sell Japanese sweet potatoes that roast in traditional pots. They are absolutely amazing. Lots of people buy them for omiyage and their imo is one of the things I miss most about Japan. If you love Japanese sweet potatoes and are ever in Tokyo, please go! Until travel opens again, I hope you find some Japanese sweet potatoes and roast them at home. You’ll love them, trust me!The Best Yaki Imo Recipe
The best sweet potato you’ll ever eat: nutrious, creamy, and sweet.
- 6 Japanese sweet potatoes
Heat the oven to 325°F or 375°F depending on sweet potato texture preference. Wash and dry the Japanese sweet potatoes. Lightly prick the surface with a fork, if desired. I find that the potatoes don’t need it.
325°F for 1-1.5 hours depending on size for a super sweet fluffy cake-like texture or 375°F for 1-1.15 hours depending on size for a super sweet tender custard-y inside and crisp caramelized outside.
Let rest for 10 minutes then enjoy warm! You can either peel the skins and eat the insides or you can enjoy the skins too.
I Am... 10 Best Simmer Pot Recipes
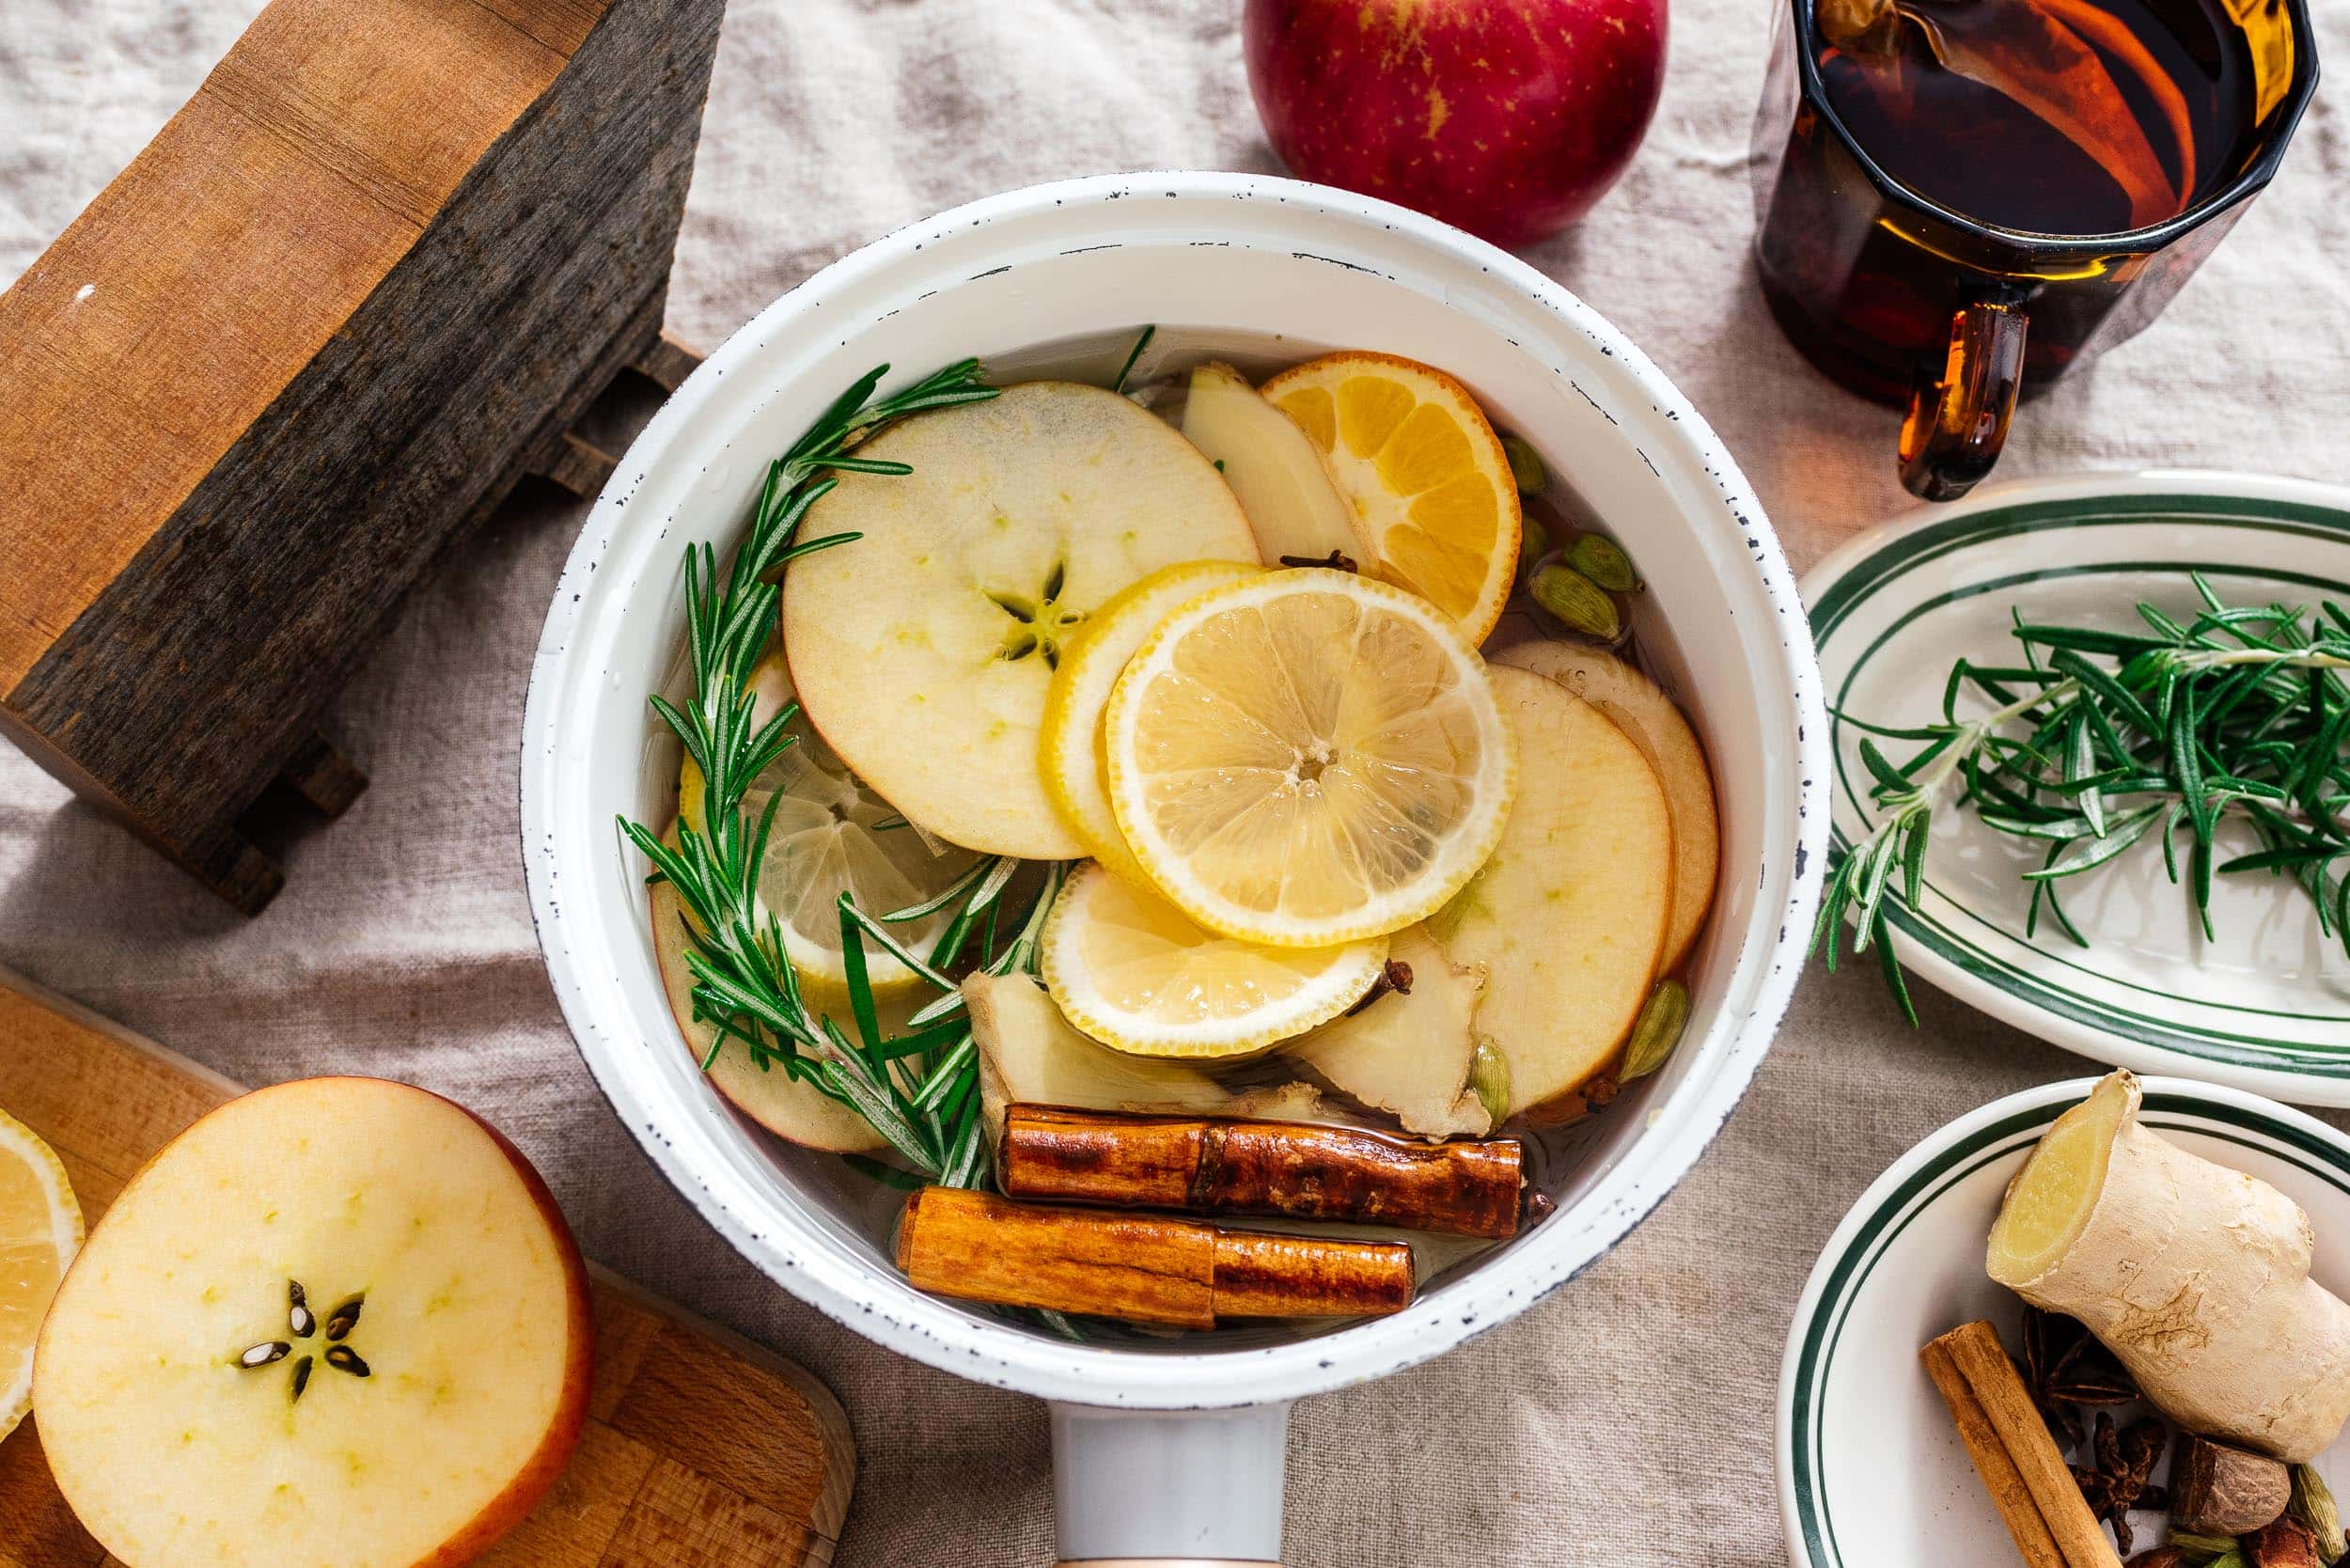
We are deep into cozy season and I am here for it with 10 of my best simmer pot recipes. What is a simmer pot you ask?! It’s the absolute best way to make your home smell warm and inviting. All you do is bring a small pot of fruit and spices to a simmer – your house will fill with the most amazing smells.
Cottage core
Give me all the cottage core feels because in another life I would definitely be living out in the woods, wearing a long flowy dress with my chickens happy outside. Of course all my food would come from my garden and everything would be just so. Freshly baked sourdough and soup would be on the menu and everything would smell amazing because of my simmer pot! Ever since fall hit, I’ve been doing a different simmer pot everyday and it’s been so nice! It really adds something to the feels of home and having a pot simmering and steaming on the stove is so cozy. Usually I drive Mike nuts with lighting expensive candles, but I haven’t been giving in to my candle addiction as much because I’ve been all about the simmer pots.What is a simmer pot?
A simmer pot is an alternative to scented candles, completely all natural and beautiful smelling. All you do is simmer a pot of spices on the stove and your home fills up with the smells of a cozy fall day. Things like cinnamon sticks, apples, oranges, cloves, vanilla, star anise, and nutmeg makes it feel like you have the sweetest smelling home ever.What can I use for a simmer pot?
Anything you love the smell of! You can use whole fruits or you can save your fruit peels in the freezer until you have enough. Warming spices smell amazing and vanilla is a delicious touch.How to make a simmer pot
Fill a small saucepan with water and add your simmer pot ingredients, bring to a boil, then turn the heat down to a simmer. Add water every 30 minutes or so. The beauty of simmer pots is that they are an art, not a science. You don’t need definitely recipes and your house will still smell amazing. I’ve included my favorite combinations below!Crock pot simmer pot
If you don’t want to use your stove, you can easily use your slow cooker on low or simmer. Just fill it most of the way up, add the ingredients, turn the heat up until it stems, then turn the heat down.Apple cinnamon
- apples, cut in half, sliced or just peels
- 1-2 sticks cinnamon
- 2 tsp vanilla extract
Lemon bar
- 1 lemon, cut in half, sliced, or just peels
- 1 knob fresh ginger
- 2 tsp almond extract
Citrus vanilla
- 1 lemon, cut in half, sliced, or just peels
- 1 orange, cut in half, sliced, or just peels
- 2 tsp vanilla extract
Cranberry orange
- 1/2 cup fresh cranberries
- 1 orange, cut in half, sliced, or just peels
- 1 cinnamon stick
- 2 springs fresh rosemary
Pumpkin spice simmer pot
- pumpkin peels (if you have them)
- 2 sticks cinnamon
- 1 whole nutmeg
- 1 knob fresh ginger
- 5-6 whole cloves
Chai spice
- 1 knob fresh ginger
- 2 tsp fennel seeds
- 5 whole cardamom pods
- 5 whole cloves
- 1 stick cinnamon
- 2 star anise
- 1 tsp whole black peppercorns
Gingerbread
- 1 knob fresh ginger
- 1-2 sticks cinnamon
- 5 whole cloves
- 1 whole nutmeg
- 5 whole cardamom pods
- 2 whole star anise
Christmas clementine
- clementines, sliced in half (or clementine peels)
- cedar sprigs
- bay leaves
- fresh rosemary
Festive forest
- cedar sprigs
- spruce sprigs
- eucalyptus sprigs
Warm woods
- cedar sprigs
- pear, sliced or halved
- smoked wood chips (you can find these at outdoor/garden stores)
Simmer Pot Recipe
A simmer pot is the absolute best way to make your home smell warm and inviting.
- 1-2 cups aromatics
- 2-3 cups water
Add the simmer pot ingredient into a pot filled with 2-3 cups water. Heat over low heat until steaming and simmering. Add water when the water level gets low.
Enjoy the warming, cozy smells!
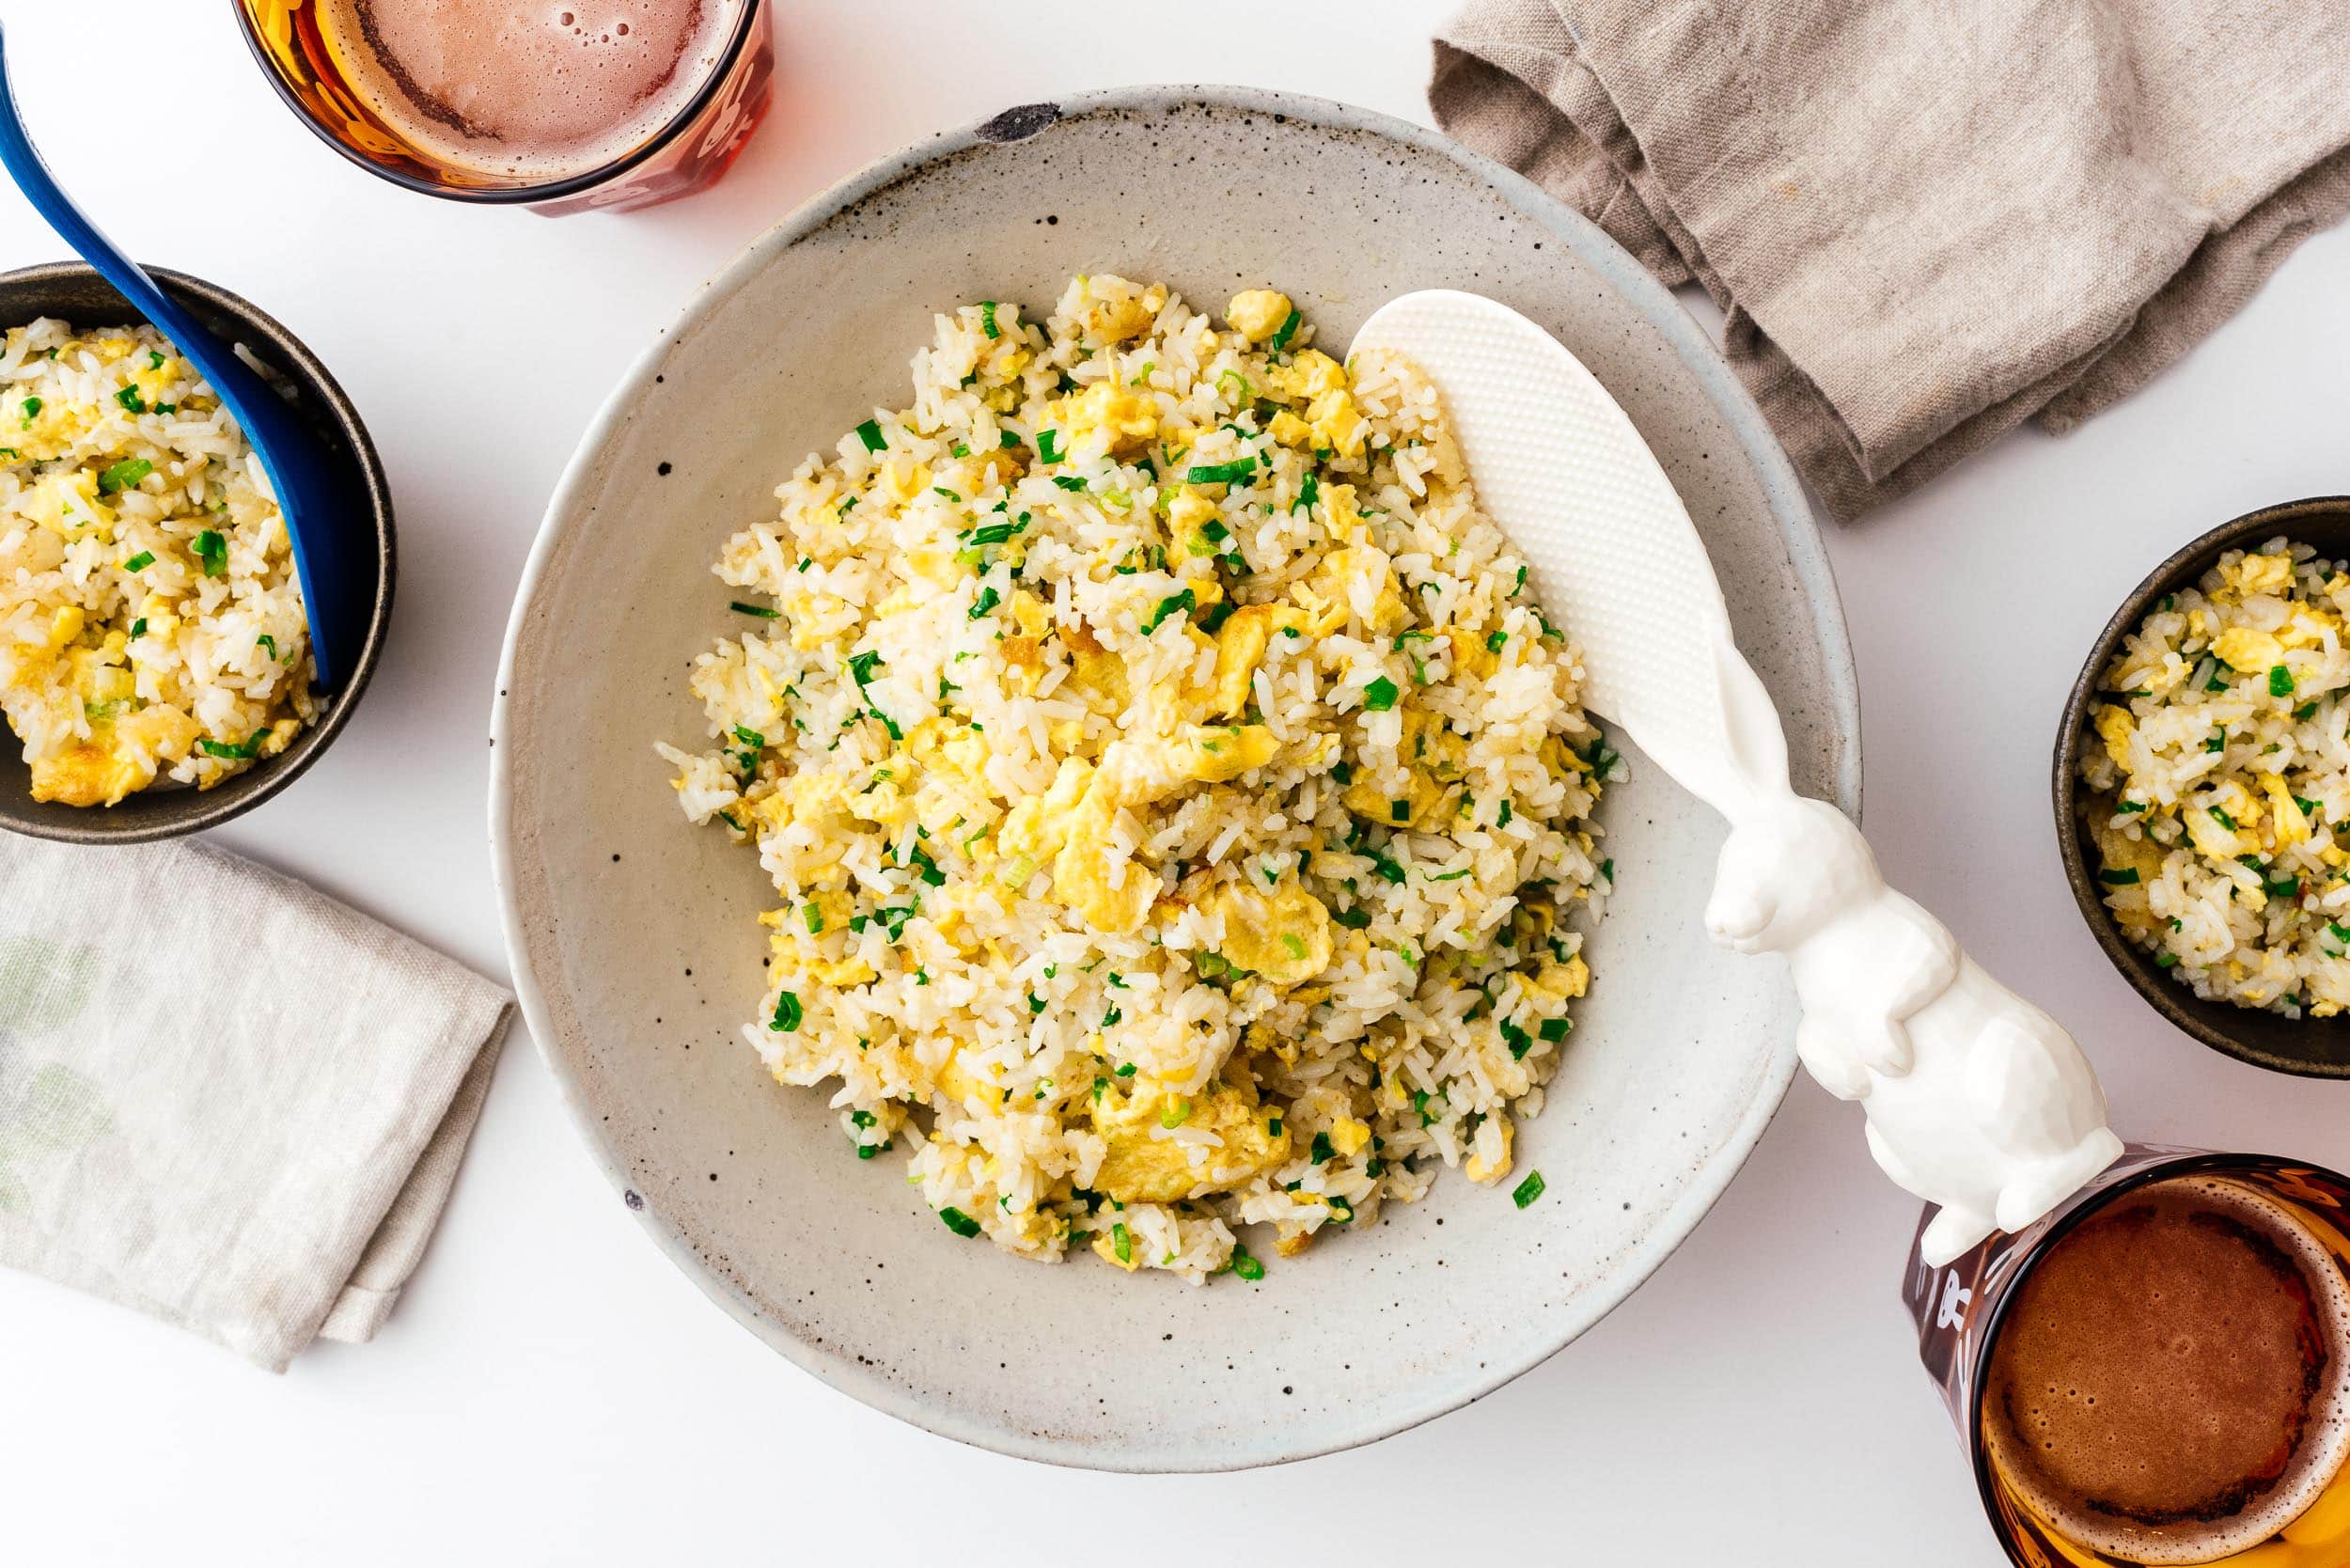
I Am... Egg Fried Rice
Egg fried rice is my favorite. It’s kind of silly, because it’s the most basic of all fried rice, but there’s something about eggs and rice that just go together. I love egg fried rice so much that when Mike and I hit up Din Tai Fung, we’ll order the shrimp fried rice and I’ll give Mike all the shrimp so I can just enjoy the egg fried rice because it’s so good! Are you guys fans of Din Tai Fung? It’s a Taiwanese dumpling house that’s been around since the 70s and is a beloved institution for a reason. I love their xiao long bao, their green beans, and of course, their fried rice! Egg fried rice is delicious in it’s simplicity: soft scrambled eggs, perfectly crisp and fluffy rice, all accented by aromatic green onions. I season my egg fried rice with garlic and ginger and just a hint of white pepper. Simple comfort food at it’s best! I could eat egg fried rice all day everyday and never tire of it. If you love egg fried rice too, read on for all the tips and tricks to making the best egg fried rice of your life.
How to make egg fried rice
At its core, fried rice is a dish of rice that’s been fried. It’s that simple. But like most simple things, it can be both elevated and basic. There are a couple of keys to good fried rice, the most important being the rice you use, the amount/control of heat, and the seasonings.To start, for fried rice, you need rice.
Give your rice good wash and cook it according to your favorite method. Our classic rice ratio is 1:1.25 rice to water. It comes out fluffy and perfect every time. After I cook the rice, I make sure to fluff it up, separating the grains. Then I pop it in the fridge.When it’s time to cook, I prep all the ingredients.
Slice up the green onions, lightly beat the eggs, and make a simple seasoning.For seasoning
I mix up a bit of chicken stock (you can use water if you don’t eat chicken) with oil, garlic power, ginger powder, salt, white pepper, and a bit of sugar. Using garlic and ginger powder gives you all the flavor without chopping or tiny bits. I love garlic and ginger powder because it’s simply garlic and ginger, dehydrated and ground up.Stirring the seasoning mix into cold rice has several benefits.
It seasons the rice, breaks it up so that all the grains are separate, and hydrates everything so you don’t have dry rice kernels. The heat of frying the rice evaporates the chicken stock and you’re left with flavor coating each rice grain. The oil in the seasoning mix also helps you not use as much oil when frying. It’s genius! I can say that because Mike invented it. I love this method so much. Trust me, it works!Once you’re done seasoning the rice, it’s time to fry.
Heat up a bit of oil in a wok and add the whites and light green parts of your green onions. Stir briefly then add the lightly beaten eggs. You want to fry your eggs so that they’re just set. When they’re done, remove them from the wok.Crisp the rice.
Add a tiny bit more oil, turn the heat on high and add all the rice and cook, stirring occasionally until the rice is hot, toasty, and crisp. You don’t need to move the rice around too much, the goal is to let it crisp up. When it’s hot and toasty, add the eggs back in and mix everything up. Stir in the green parts of the green onion and it’s time to eat!Egg fried rice ingredients
- rice: cold, day old rice is best, but if you have to use fresh rice because you’re desperate, you can do it: be sure to spread it out and try to cool it down so it’s not hot and steamy. More on what kind of rice you want below.
- eggs: this is an ultra luxurious egg fried rice with a 1 cup of rice to 1 egg ratio. You can use less eggs if you like but the fluffy eggs are the best part!
- green onions: Slice up two big bunches of green onions, keeping the greens and whites/light green parts separate.
- seasoning: We’ll be using chicken stock, ginger, garlic, and white pepper to season. There’s also just the tiniest bit of sugar - it adds contrast and accents the rice so you get the barest hint of sweetness. Note: if you don’t eat chicken, you can use a bit of water with an extra pinch of salt.
What kind of rice do I use for fried rice?
To be honest, you can use any kind of rice for fried rice! At home we mostly use Koshihikari or Kokuho Rose, but growing up, fried rice was day old jasmine rice. Now, I totally prefer fried rice made from Japanese rice. The kernels are so plump and chewy. If you haven’t tried it, please do, it’s a whole new world of fried rice, especially if you’re looking to make a Din Tai Fung fried rice copycat. Din Tai Fung uses Nishiki rice, a Californian grown medium grain rice that is super similar to Kokuho Rose or Calrose. You can easily use your favorite rice - the key is to use cold/day old rice. Make sure you break the rice up before you add it to the wok by adding the seasoning and gently squeezing and breaking into loose individual kernels. Each grain of rice should be firm, fluffy, and distinct. Using day old, cold rice stops it from clumping up and sticking to the pan.Do I need a wok for fried rice?
The answer is yes and no. You don’t NEED a wok, but if you have one, use it! A wok, with its different heat zones, due to its cute and round shape, is ideal for frying and tossing, perfect for fried rice. If you use a wok, you’re going to get some wok hei, that essential smokey essence you get when you get when you use a wok over hot heat. Chinese people are crazy about wok hei, which means “wok breath” and if you want that authentic fried rice flavor, a wok is how you’re going to get it. A good carbon steel wok is usually not too expensive and will last you a lifetime. If you have a gas stove, you’ll want a wok that is perfectly round on the bottom. If you are on electric or induction, you need to get a flat-bottomed wok. In either case, it’s best to get a pre-seasoned one so you don’t need to remove the handle and season it yourself. If you don’t have a wok, using a cast iron or non-stick pan is perfectly acceptable, just make sure it it’s big enough and remember that with non-stick, don’t turn up the heat as much. Of the multiple kinds of non-stick pans out there, a ceramic/non-teflon coating is your best bet.How much oil do I need for fried rice?
If you want delicious, restaurant quality fried rice, you’re going to need oil. Hot oil helps the rice move around and distributes heat and flavor. Fried rice shouldn’t be oily, but it does have oil in it! Having said that, please don’t go overboard, no one likes super oily fried rice.What to add to egg fried rice
I LOVE the simplicity of egg fried rice, but the beauty of it is that you can essentially add anything to it to customize it for your very own. Go the classic Din Tai Fung route and top with with some plump and juicy shrimp, or add in cubes of bbq pork, or diced chicken. Pictured: ham and egg fried rice.What to serve with egg fried rice
- green and crisp garlicky gailan
- quick and easy homemade char siu
- home style classic Chinese tomato eggs
- juicy Taiwanese popcorn chicken
Egg Fried Rice
If you love egg fried rice, read on for all the tips and tricks to making the best egg fried rice of your life.
- Wok
- 1/4 cup chicken stock (no sodium preferred)
- 1 tsp salt
- 2 tsp ground ginger
- 2 tsp garlic powder
- 1/2 tsp ground white pepper (optional)
- 1/2 tsp sugar
- 4 tbsp neutral oil (divided)
- 2 bunches green onions (sliced)
- 6 large eggs (lightly beaten)
- 6 cup rice (cooked, day old jasmine preferred)
In a small bowl or liquid measuring cup, whisk together the chicken stock, salt, ground ginger, garlic powder, white pepper, sugar, and 1 tablespoon oil. Mix the sauce into the cold rice, breaking up the rice, until you coat all the the grains of rice. Set aside.
In a bowl, whisk together the eggs with a pinch of salt.
Heat up 1 tbsp of oil in a wok or frying pan and add the white parts of the green onion, and fry for 30 seconds.
Add the eggs to the hot wok and scrabble the eggs until mostly set, but slightly runny. Remove from the word and set aside.
Heat up 1 tablespoon of oil to the wok and add the rice, stirring occasionally, until the rice is crispy and hot.
Add the eggs back into the wok, mixing and breaking up so everything is evenly distributed.
Add the remaining green onions, toss, and enjoy hot!
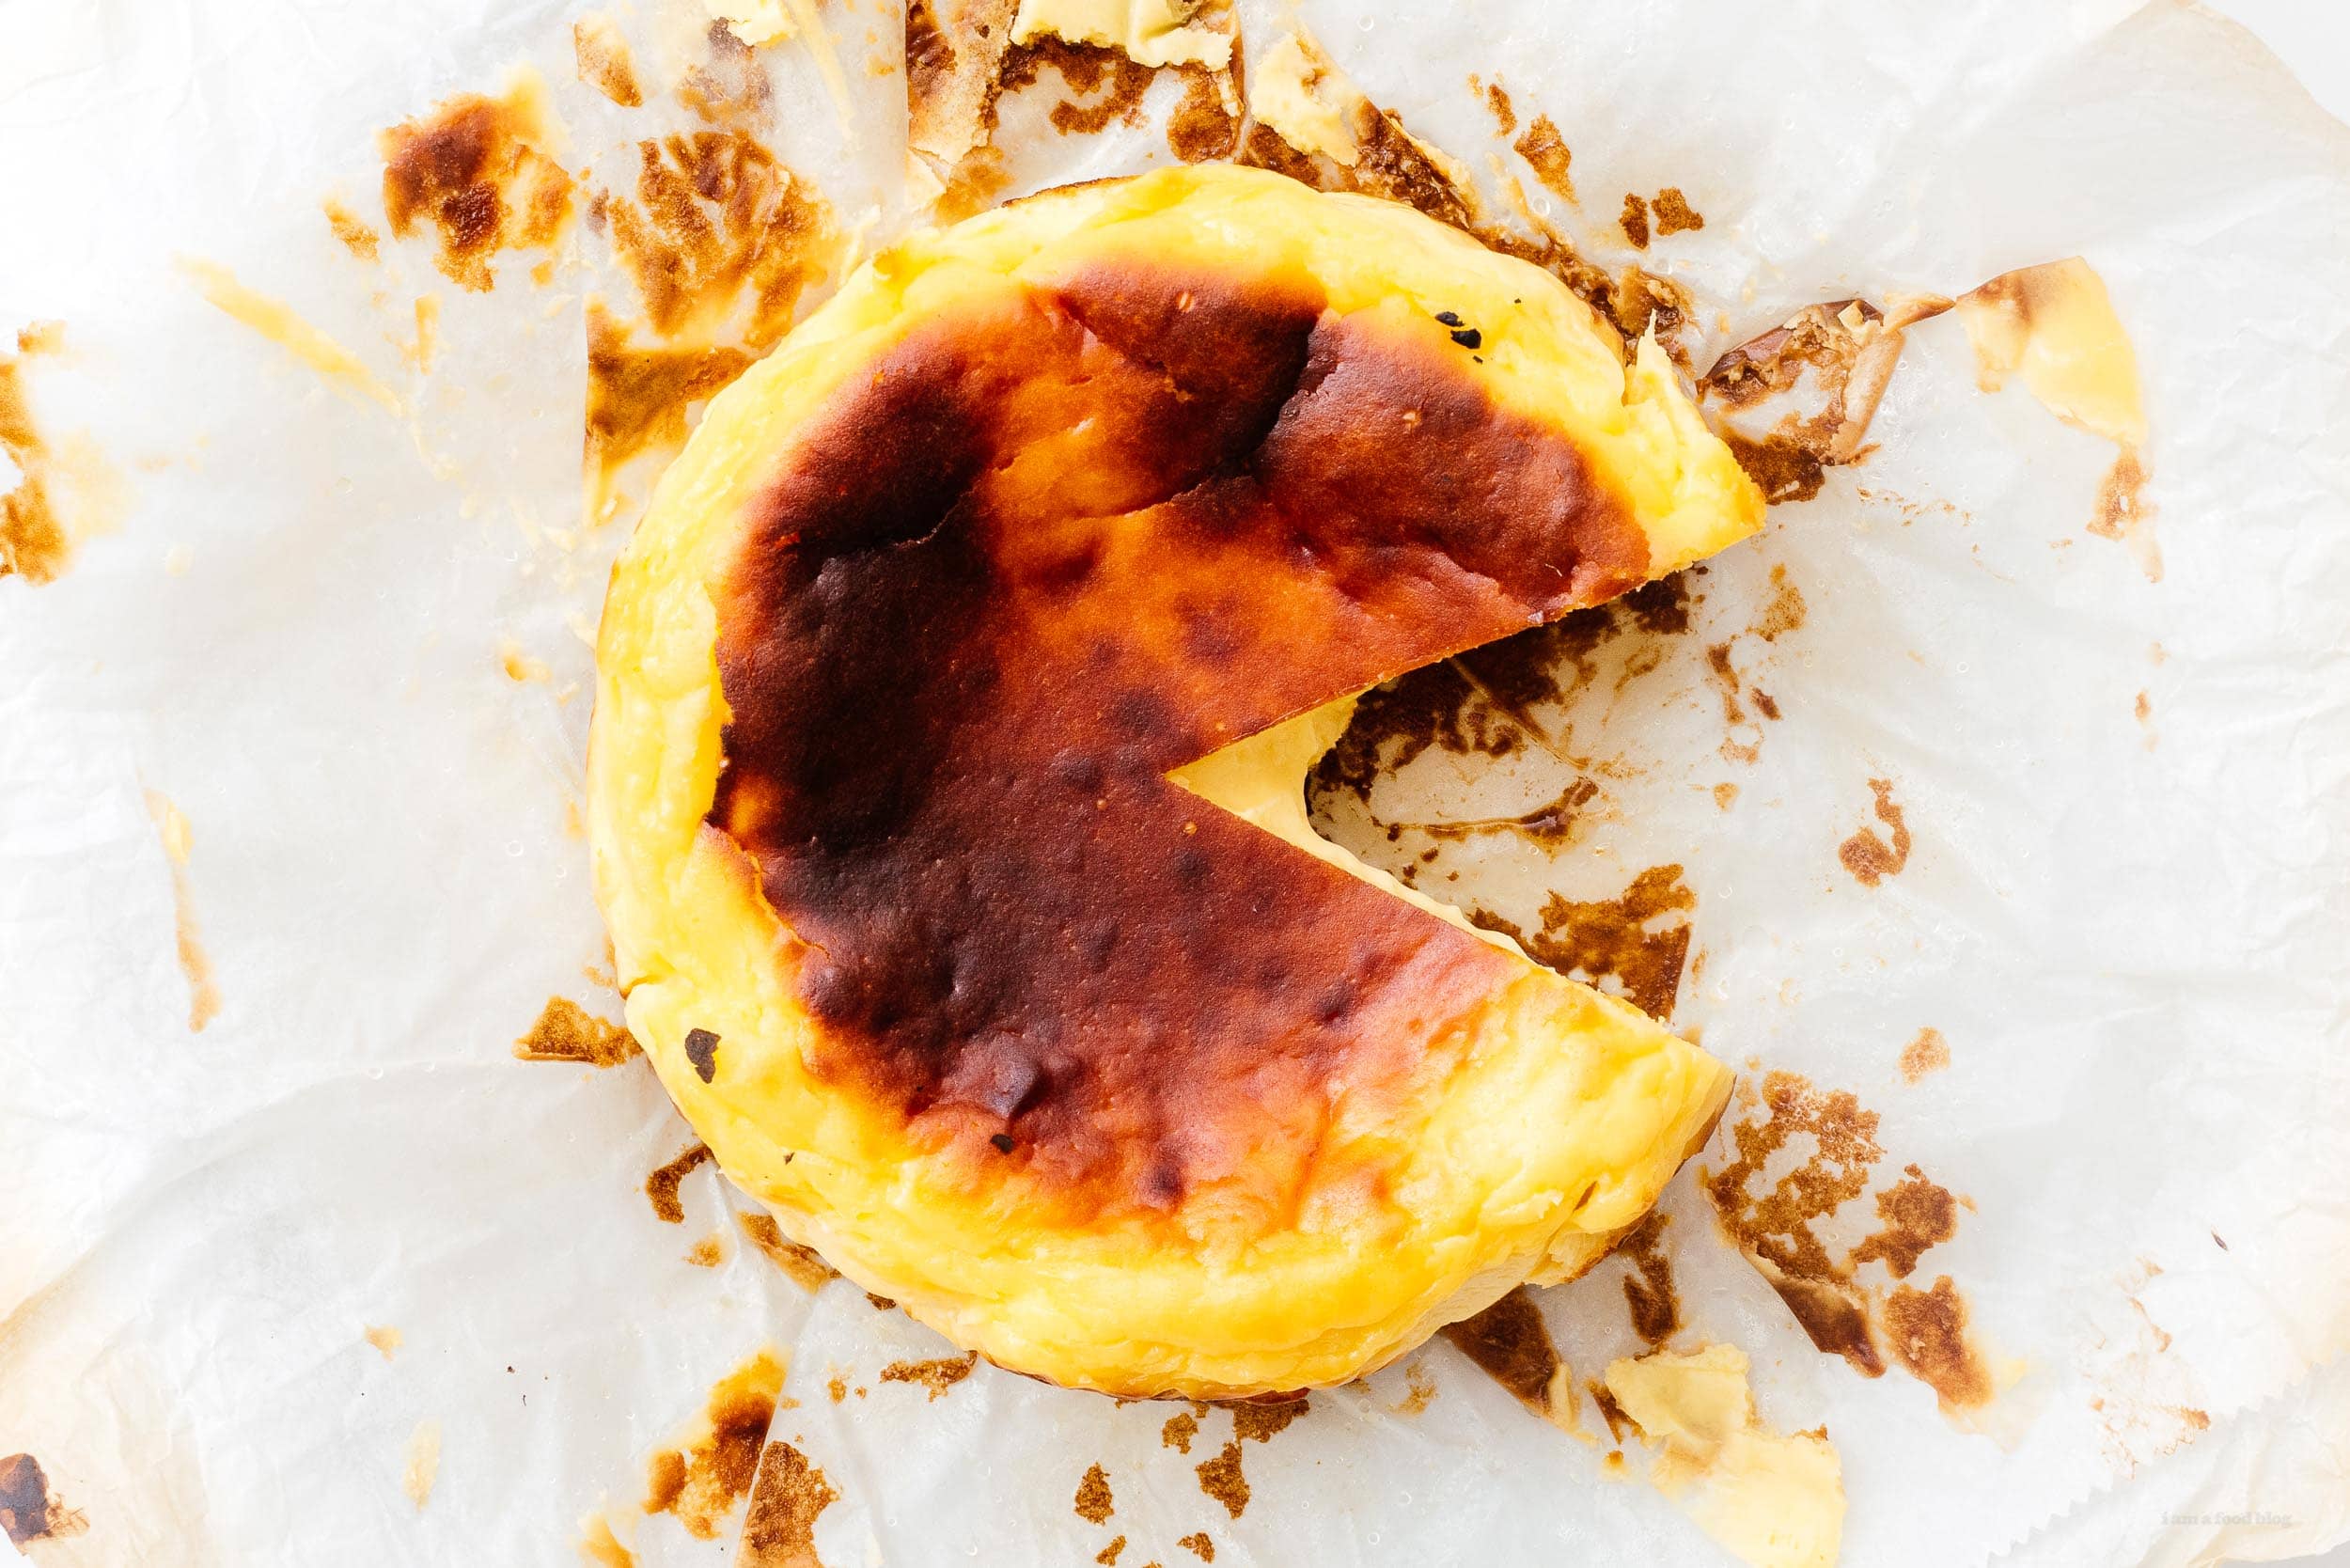
I Am... Basque Cheesecake Recipe
Basque cheesecake is the easiest cheesecake ever: creamy and sweet with a burnished burnt top that contrasts with the insides just right. Basque cheesecake is the best combination of taste and texture. The edges of the cheesecake are slightly firmer with a lingering tongue coating smoothness that gives way to a supple molten cream center that barely holds together. The contrast is what gets me every time – a soft and cake tender shell surrounding a velvety smoothness that barely holds its shape, like the most decadent slice of triple cream brie. Confession: I don’t know if I’m proud to admit this or not, but I ate an entire cheesecake. By myself. Okay, Mike had one tiny slice, but I absolutely ate the rest of it. And the truth is, this isn’t even the first time I’ve eaten a whole cheesecake. Cheesecake is my jam. I love it so much. It can be dense like New York style, or fluffy, like Japanese. To be honest, it doesn’t really matter, there’s just something about cheesecake that is so addictive. I don’t like to make cheesecake much because it’s so dangerous to me. But when I do make it - more often than I’d like to admit, I will always, always make a Basque burnt cheesecake. They’re glorious: a creamy, lightly sweetened cheesecake with a deeply burnished almost burn top that contrasts beautifully with the insides.
What is Basque cheesecake?
Basque cheesecake is somewhat new. It was invented in San Sebastian (a seriously good food city – Mike and I are dying to go back) in the 70s, back when they first got Philadelphia cream cheese. They did a bunch of experiments and the one cheesecake they kept coming back to was a crustless, burnished cake that was light yet dense and full of cream cheese flavor. The restaurant that invented it is called La Vina and while there are plenty of recipes online that claim they have the recipe, I went with an amalgamation of a bunch of different ones because after I went down the Instagram cheesecake hole, I discovered that the Japanese version of Basque cheesecake looks even more amazing because they have the slightest bit of ooze in the middle. You might be skeptical of the burnt top, but when you taste this, all those thoughts will fly out of your heat. The top reminds me of the very slight bitterness of the brûlée on creme brûlée. The actual cake is lightly sweet, with a good amount of cream cheesiness and is just the right amount of dense. Basque cheesecake is incredibly addictive.Are you convinced?
If you aren’t, here are a couple reasons why you should make a Basque burnt cheesecake- because you love cheesecake
- you want to make a cheesecake without a springform pan or a finicky water bath
- it's a cheesecake recipe without a lot of ingredients: this one has only 4!
- you saw Basque cheesecake on the socials and you’ve been interested but haven’t made the leap
- you can make it in the air fryer!
Cheesecake Ingredients
One of the reasons I love this cheesecake so much is that it only has 4 (only four!) ingredients:- Cream cheese. My favorite cream cheese is Philly cream cheese, of course. Make sure you temper it at room temp so it it silky smooth and creamy without any lumps
- Sugar. Not too much sugar, just enough so it’s lightly sweet and delicious. I’ve only ever used granulated sugar, but I think brown sugar would add a hint of depth and caramel flavor.
- Eggs. You’ll need 4 large eggs to stabilize and hold the cake together. Make sure you get some nice, high quality eggs.
- Heavy Cream. Heavy cream is what makes this cake SO smooth and rich. You might also know heavy cream as whipping cream. Either will work as long as it has over 36% milk fat.
How to make Basque cheesecake
- Cream. Cream together the cream cheese and sugar. It’s best if your cream cheese is ultra soft. I like to leave it out at room temp for as long as possible before creaming so it blends up completely lump free. If you have a stand mixer, use the paddle attachment and remember to scrape down the sides.
- Mix. Add the eggs, one at a time, mixing in completely without adding too much air. If you’re using a stand mixer, add the eggs and beat with the paddle on low.
- Stir. Slowly pour in the cream and stir until combined.
- Bake. Pour the batter into a parchment paper lined pan and bake in a super hot oven so the top gets nice and burnt while the inside stays creamy.
The best (and easiest) cheesecake I’ve ever made
Seriously guys, this is my best cheesecake ever. Usually it only takes me a couple of days to finish the entire cake, which is bad news. The good news is that Basque burnt cheesecakes are incredibly easy to make. There are no water baths, you don’t have to use a finicky springform pan, you can just squish your parchment paper in rustic style, and somehow, magically, you don’t have to worry about cheesecake cracks. All you need to do is remember to have everything at room temp so the cream cheese mixes up nice and smooth.Basque cheesecake FAQ
Can I make this in the air fryer?
Yes, you can absolutely make air fryer basque cheesecake, especially since it’s made in a 6 inch pan. To air fry, preheat your air fryer at 400°F then bake the cheesecake for 20-25 minutes, depending on if you want a runny or set center.What kind of pan should I use for Basque cheesecake?
The best pan is one that has tall sides so your cheesecake can be burnished and brown on the top with just the slightest bit of jiggle in the middle. I like to use 6 inch rounds that are at least 3 inches in height [https://amzn.to/3aYt4Tp](https://amzn.to/3aYt4Tp) . I’ve also baked Basque cheesecake in loaf pans and it comes out really nice when you slice it up. The best part about Basque cheesecake is that you don’t need to use a springform pan and you don’t need a finicky water bath. Take advantage of that and use any pan you have. The deeper and smaller the pan, the more likely you will have a jiggly ooze-y cheesecake. The larger and more shallow your pan, the more likely you’ll have a firm cheesecake.How to line the pan for Basque cheesecake
Measure out a piece of parchment paper larger than you cake pan, scrunch it up into a ball, then flatten it out. That will make it easier to line and push the parchment into the edges of the pan. If you’re worried, you can double line the pan.Which cream cheese for basque cheesecake
They always, always, use Philadelphia cream cheese for Basque cheesecake in San Sebastián. Really, it’s the only cream cheese I use too. Let it sit out on your countertop to come to a soft and squish temperature so your cheesecake batter ends up super smooth.Baking time
This depends on how creamy and jiggly you want the middle of your cheesecake to be. For a runny, creamy, just set center bake for 20 minutes. For just a bit creamy, go for 25 minutes, and for set, 30 minutes. Burnt top: To the the burnished top while still have a runny center, turn on the broiler and keep a close eye on it while it browns. It only takes a couple of seconds.Do I need to chill Basque cheesecake?
It’s best to let it cool completely: The cheesecake will continue to set and bake after you take it out of the oven, so leave it in the pan and let it cool completely before removing and serving. If you like a cold cheesecake you can pop it into the fridge and serve it once it’s completely cold. For a still runny center, after it’s completely cool, remove from the pan and slice without placing in the fridge.What to serve with Basque cheesecake:
NOTHING! It’s truly perfect as is, just sweet enough with so much flavor. Serve this up confidently just on it’s own or with a little nonchalant dollop of softly whipped cream. Some summer ripe berries wouldn’t be remiss, but I like it best on it’s own with nothing to distract from the glorious richness. The perfect accompaniment is a cup of coffee, hot and black, to highlight the sweetness.Basque Cheesecake
The easiest, creamiest, best cheesecake you’ll ever make, period.
- 2 bricks cream cheese (room temp, 8oz bricks)
- 3/4 cup sugar (5.2 oz/150 g)
- 4 large eggs
- 3/4 cup heavy cream (6.3oz/180 g)
Heat the oven to 430°F. (If you have convection mode, set the oven to convection.) Line a 6 inch round 3 inch tall cake pan with parchment paper with an overhang of 2 inches. I like to double line it just to make sure it pops out of the pan easily.
In a stand mixer, or by hand, beat the cream cheese with the sugar until smooth, making sure the sugar is completely incorporated, and the mixture is light, fluffy, and lump free. Be sure to scrape the bowl down.
Add the eggs, one at a time, making sure the batter is smooth and incorporated before adding another egg. Scrape down the sides of the bowl, as needed.
Slowly pour in the cream, mixing until just combined.
Pour the batter into the prepared tin and bake for 25-30 minutes. The top should be a dark amber and the middle should still wobble and jiggle. If you want the top to be more caramelized, leave it a bit longer, but know that the center will not be as gooey.
Remove from the oven and let cool in the pan on a wire rack at room temp until completely cool. Remove the cake from the tin and slice at room temperature for a gooey, lava-like cheesecake. If desired, place in the fridge to cool which will result in a soft and creamy cheesecake without the ooze. Enjoy!
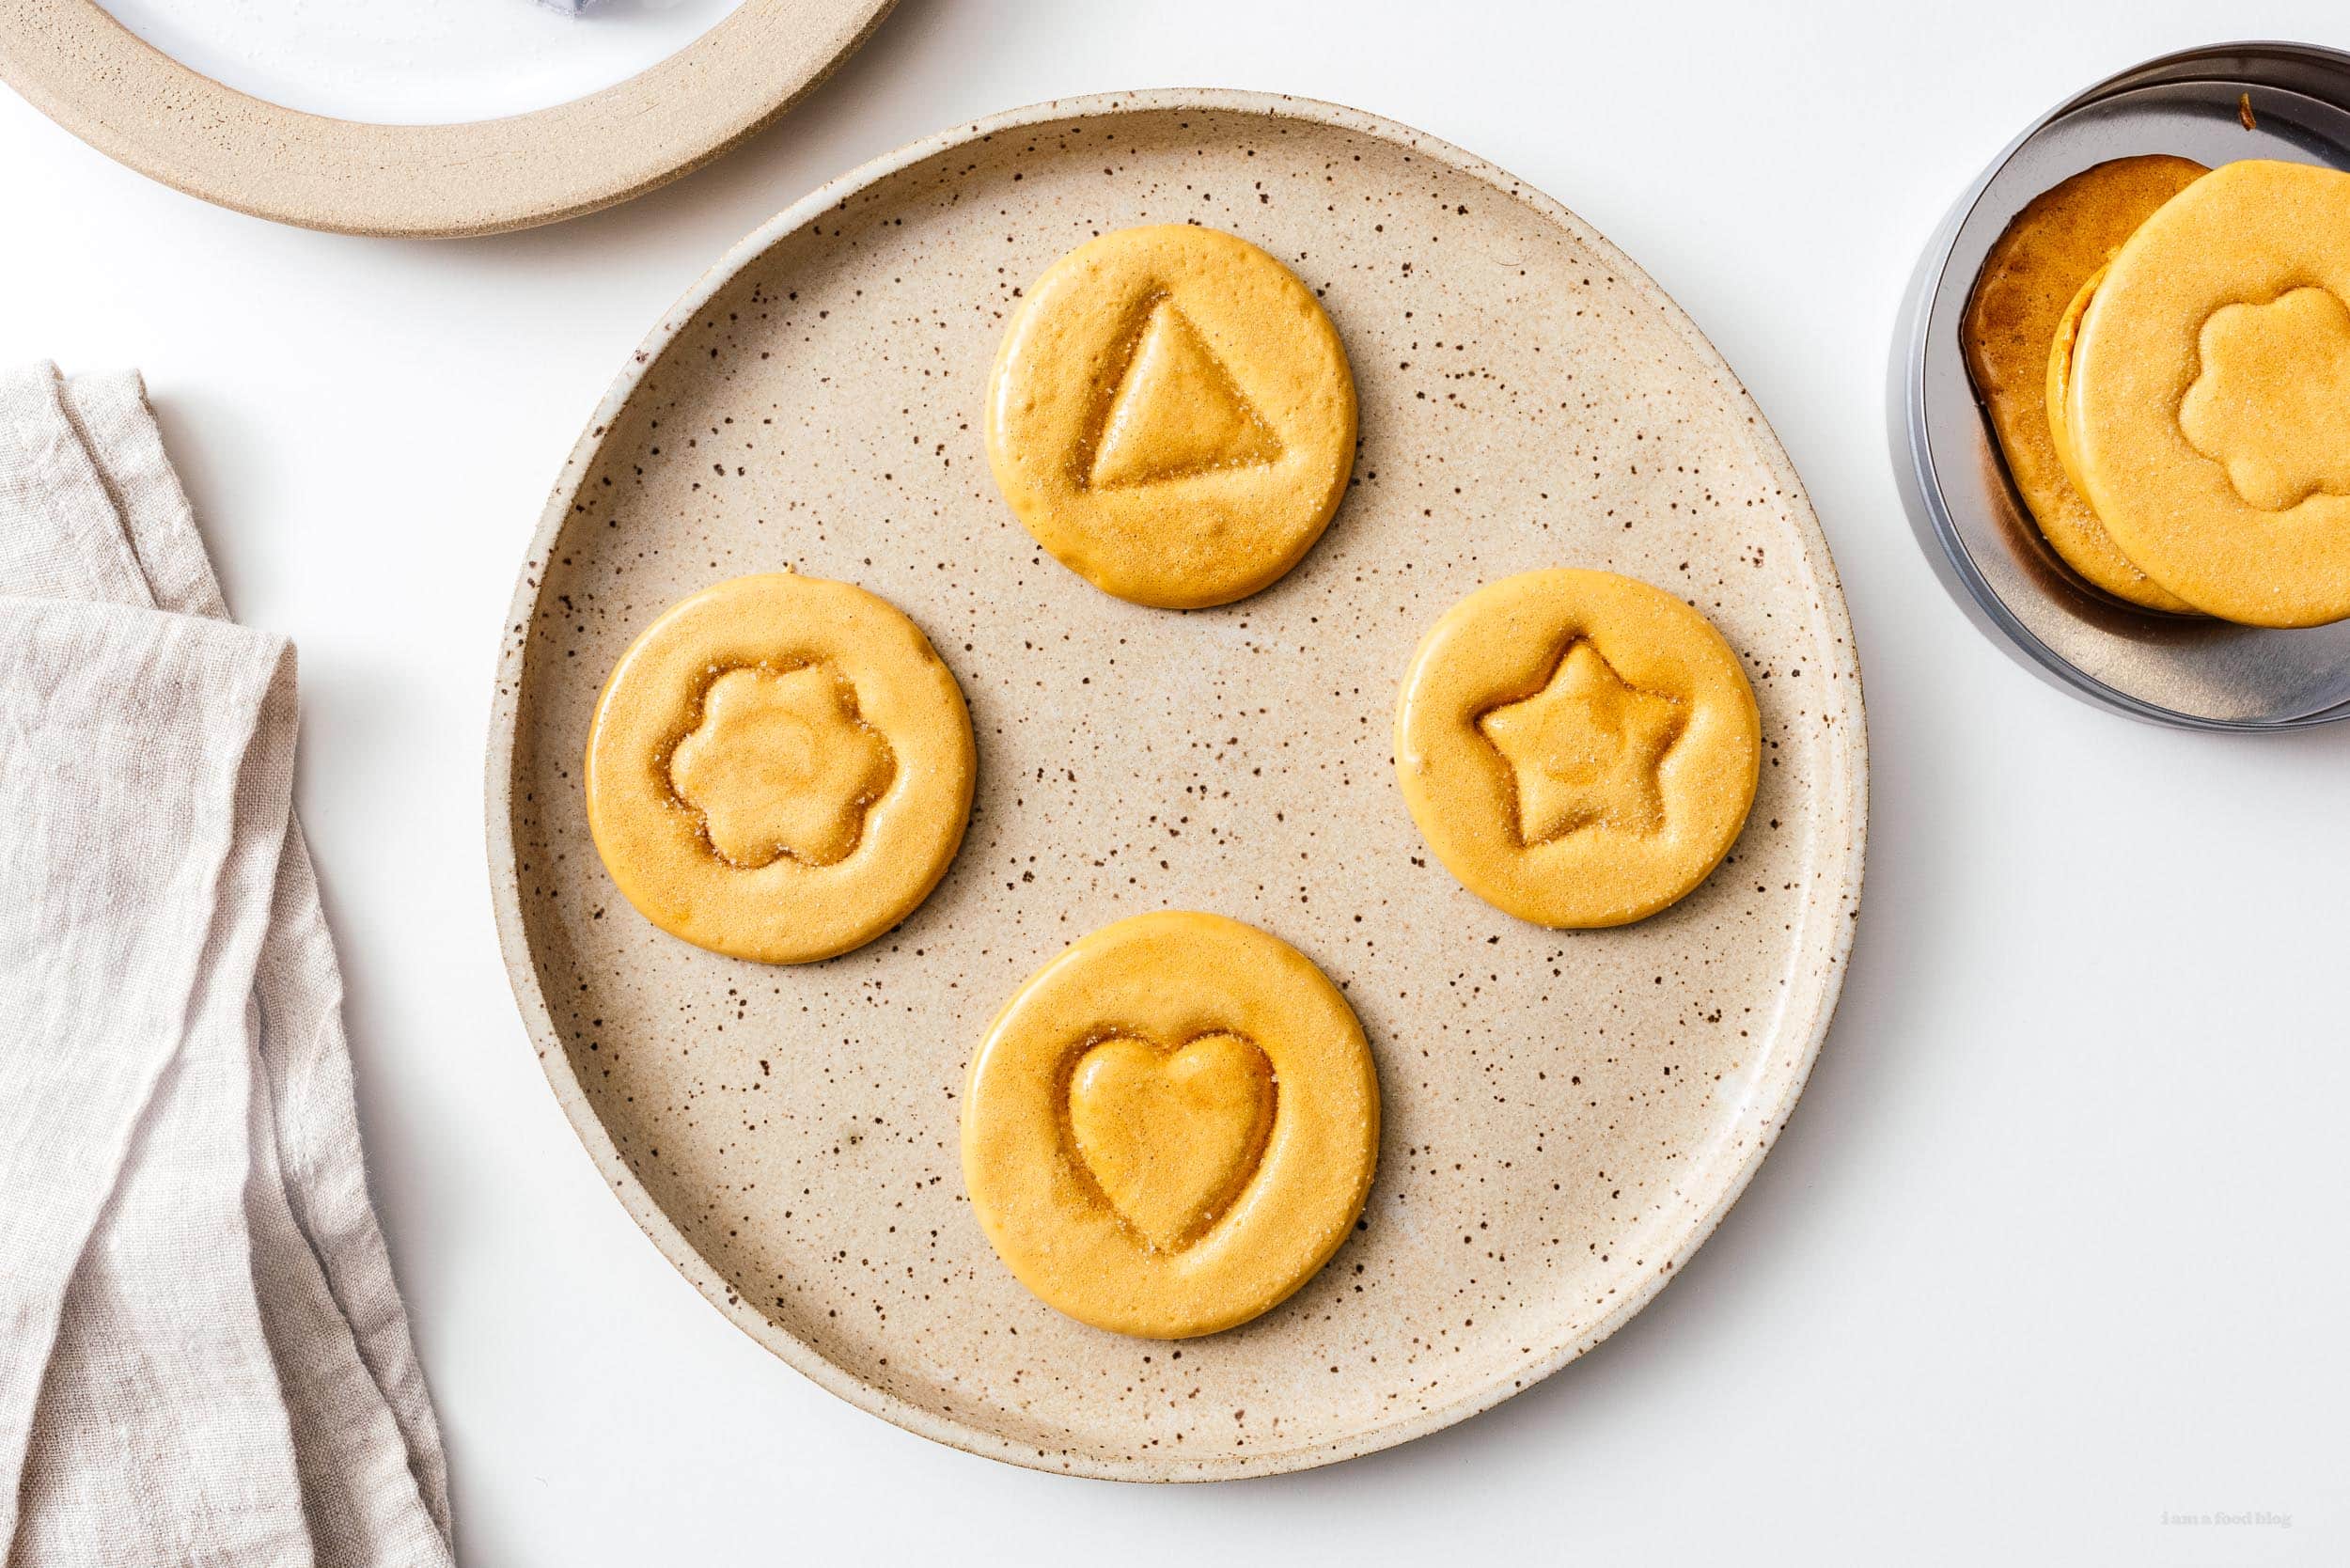
I Am... Dalgona Candy
You only need 2 ingredients to make the iconic Dalgona candy from Squid Game! I can’t remember the last time I had a birthday party but if I did one right now, it would definitely be a Squid Game themed party, minus the dying. We would compete for the money of course! One of the most iconic games in Squid Game was the dalgona candy game and I just had to make some for me and Mike to try. Spoiler, I lost, guess I’m ded LOL.
What is dalgona candy?
If dalgona candy sounds familiar it’s probably because you might have heard of the viral dalgona coffee sensation last year? Everyone and their grandmas made it! Dalgona candy is an old school Korean honeycomb candy that’s similar to seafoam or honeycomb toffee or the inside of a Crunchie bar. It’s sweet and crunchy and delicious. In Korea, street vendors sell dalgona (also known as ppopgi) stamped with shapes. If you manage to eat around the candy keeping the shape intact, sometimes they give you a free candy! Of course in Squid Game it’s much more deadly.How make dalgona candy?
Making dalgona is super easy, basically you melt sugar and mix in a bit of baking soda so it foams up. It ends up looking like whipped coffee, which is where dalgona coffee got the name from. After you stir in the baking soda and it foams up, you pour it out, stamp in a shape and let it cool.Ingredients
- sugar - sugar, when you heat it up, it turns a lovely golden caramel. You can use white or brown sugar, up to you! Brown sugar will come out much darker.
- baking soda - this is what makes the caramel foamy. Make sure you use baking SODA, not baking powder.
Dalgona tools
- stainless steel ladle
- wooden chopstick
- parchment paper
- a metal flat surface - I used the back of a metal round tin, you can also use a flat metal spatula, or even better, these okonomiyaki spatulas
- cookie cutters
Tips and tricks
I made so many of these, super frustrated that my dalgona kept sticking to the bottom of my flat metal tin. All the recipes on the internet said that you just need to wait 30-40 seconds before pressing but after lifting, the tops would just come off. Finally I decided to lightly oil and sugar the bottom of the tin and YAY, no sticking. I really recommend it if you’re having trouble. Here are some other tips and tricks I learned along the way.- Make sure you have all the tools and ingredients on hand: sugar, baking soda, lightly oiled and sugared flat metal surface, a parchment paper or silicon lined baking sheet, a metal spatula, a wooden chopstick, and the cookie cutters.
- You don’t need to stir the sugar too much, especially at first. Let it melt along the edges and the sides until it’s clear and melty, then start stirring. If you stir too early it will take forever for you to melt your sugar.
- Don’t add too much baking soda. It’ll make the candy bitter and it won’t taste good. You only need a very tiny pinch. Just make sure you stir it in really well and it will aerate and puff up the sugar.
- Let the candy cool a tiny bit before pressing it down or it will stick and you will be sad, like me. But even better, lightly oil and sugar the surface and you won’t have any problems with sticking.
- If you’re planning on making more than one (I made so many so I could get them perfect!), bring a pot of water to a boil then turn it off. After you pour out the candy, you can carefully add the ladle to the hot water and the excess candy will just melt right off. Just be careful because it will sizzle and expel a lot of heat.
- To get perfectly round dalgona candy, don’t worry about getting every little bit of candy out. Just use the chopstick to gently help the candy fall out into a blob. I tried using a rubber spatula to try to scrape everything out and ended up with blobs instead of circles.
Dalgona Candy
The iconic candy from Squid Game
- 1 tbsp sugar
- 1 small pinch baking soda
Gather all your tools and ingredients. Lightly oil and sugar a flat metal spatula. Add the sugar to the stainless steel ladle and hold over medium low heat.
Let the sugar melt along the edges until it’s clear, then stir with a wooden chopstick, until the sugar is melted and starts to caramelize. The sugar should be clear and lightly amber.
Move the ladle off the heat and stir in the baking soda, quickly until it starts to foam and turn a light caramel color. Move the ladle between on and off the heat to keep it warm.
Pour the candy onto a parchment paper lined baking sheet.
Let cool for 10-20 seconds and then press with the sugared spatula to the desired thickness.
Stamp with a cookie cutter part of the way through. Let cool until firm and crunch and enjoy!
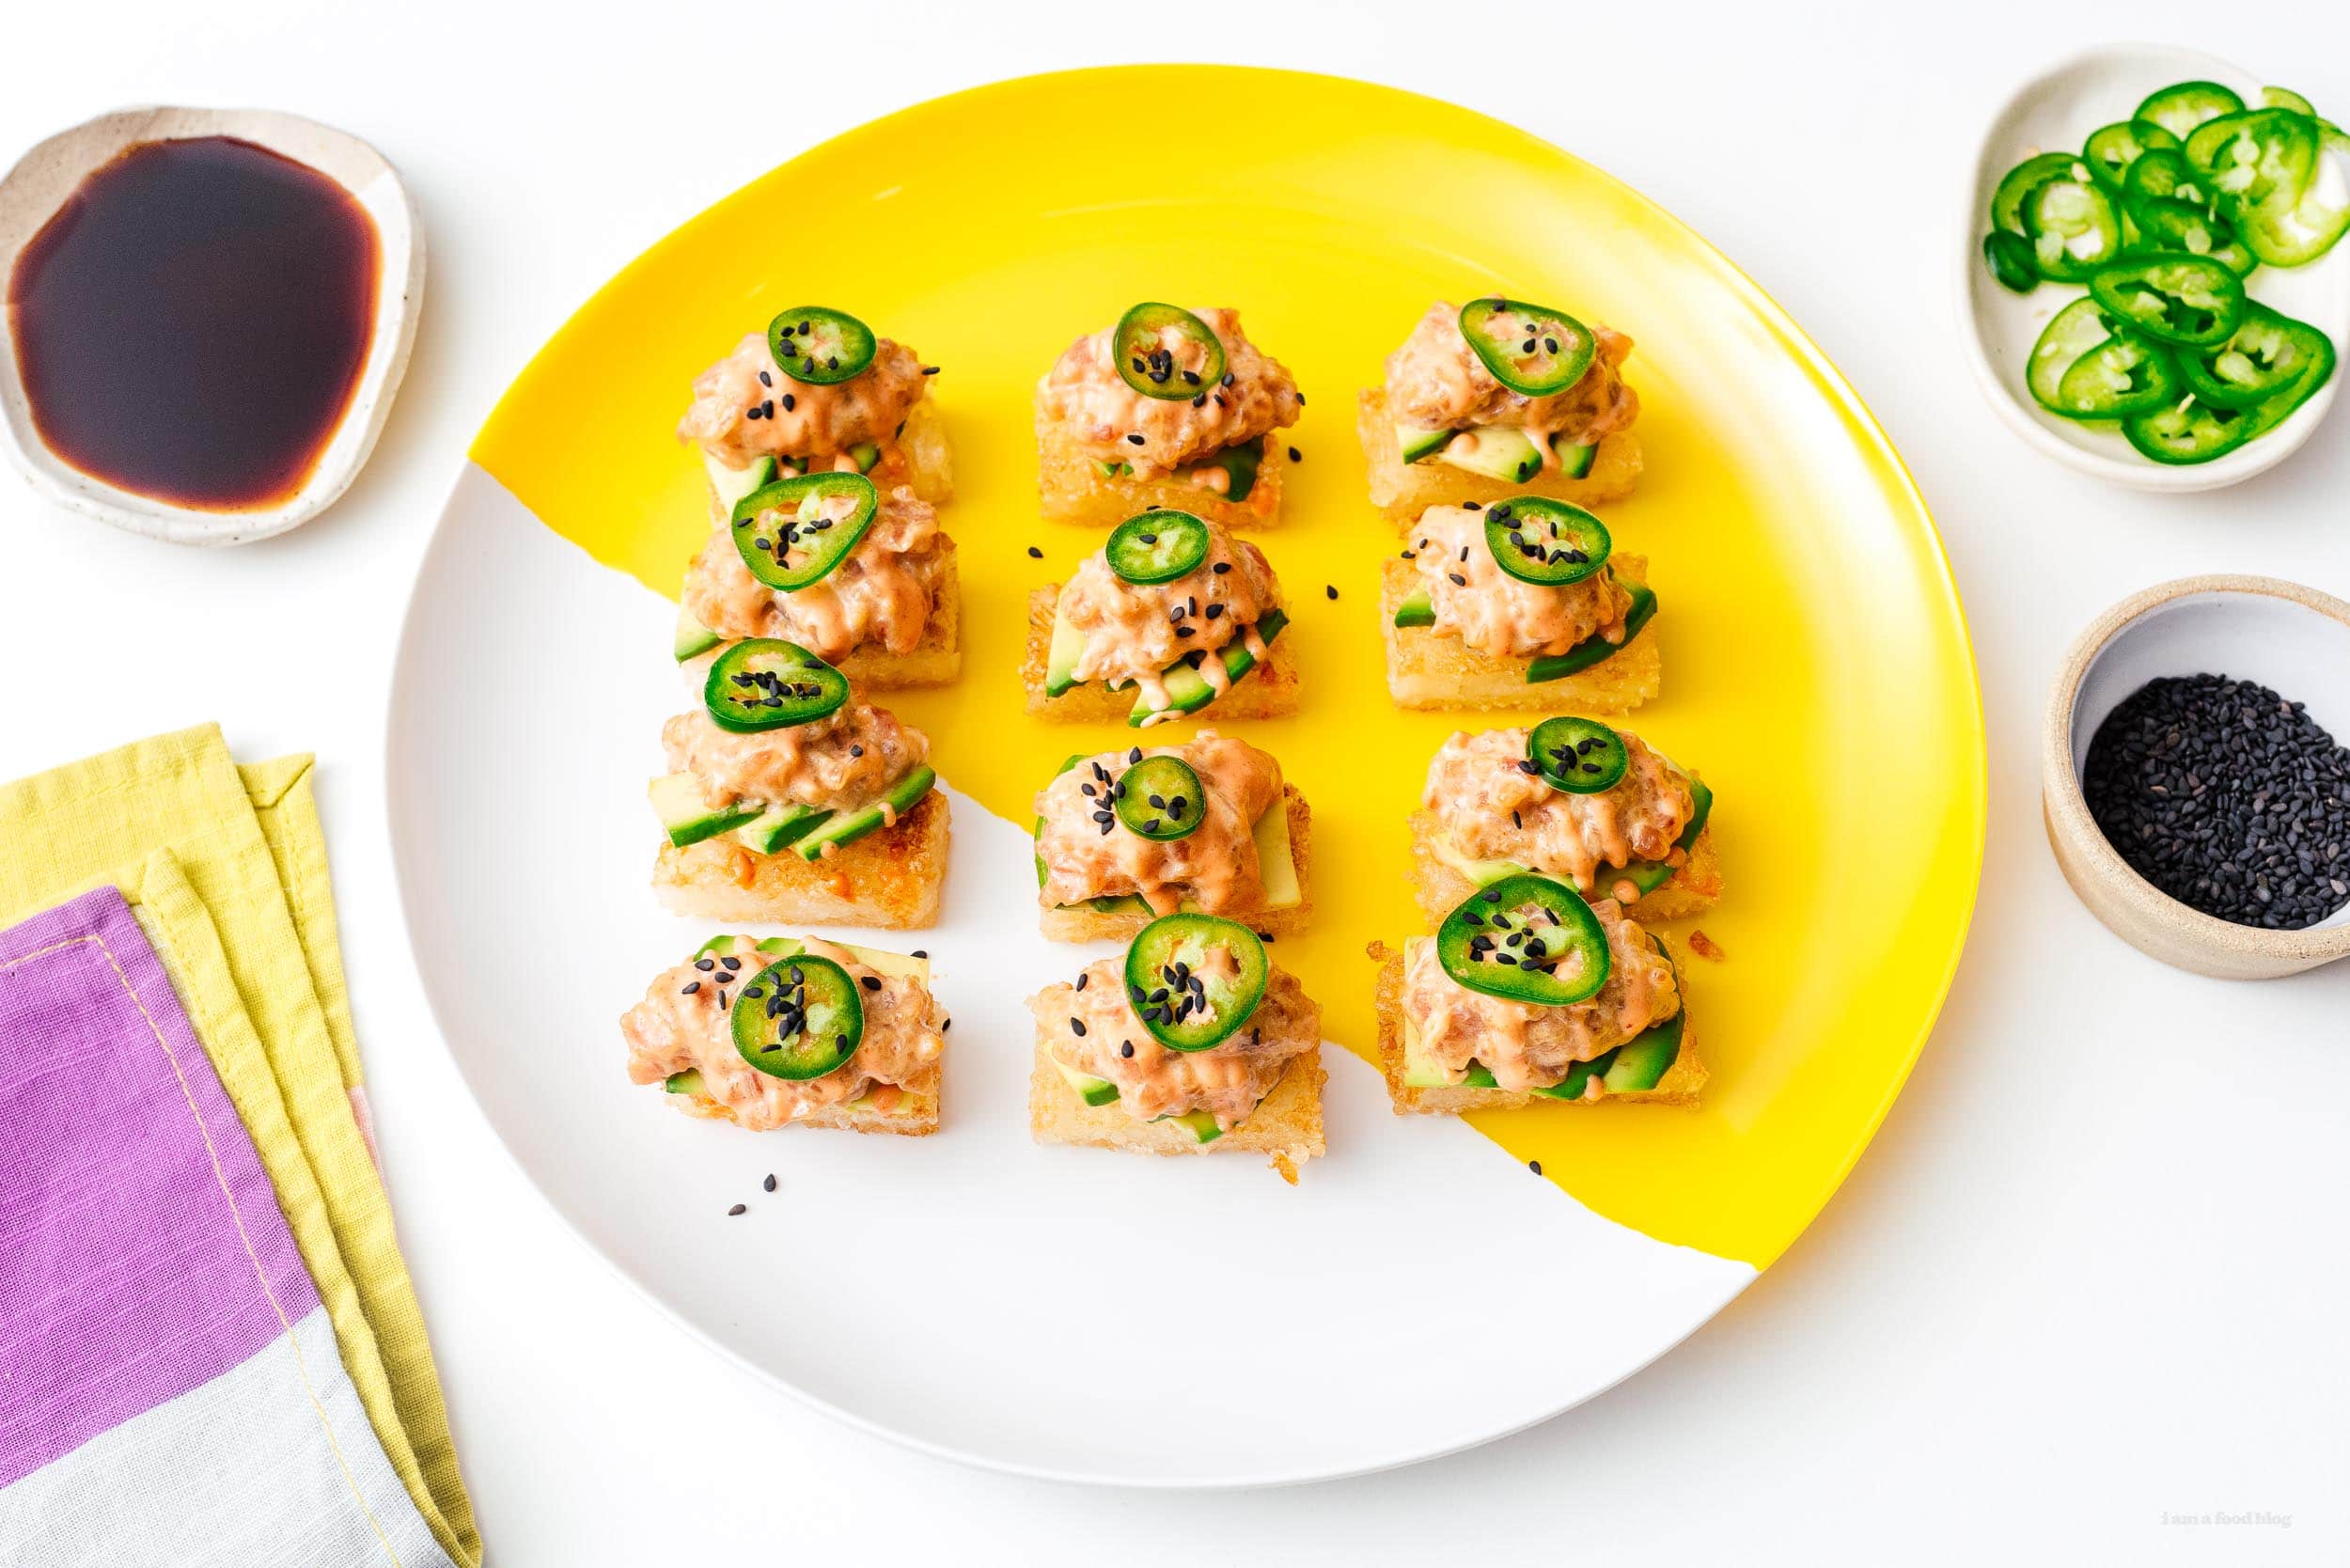
I Am... Crispy Rice
I am absolutely in love with crispy rice. It’s beloved around the the world: the saffron yellow socarrat of Spanish paella, the golden crispiness of Persian tahdig, and the best parts of Korean hot stone bowl dolsot bibimbap. Crispy rice has the most aromatic toasty nuttiness and I can’t get enough. Sometimes when I make rice on the stove, I let the bottom get scorched a little just so I can have a little treat. I love it so much that whenever I see a crispy rice dish when we go out to eat, I have to have it. It’s pretty common on Korean or Japanese menus: a little crispy rice nugget topped off with spicy tuna or salmon with a pile of kimchi or thinly sliced scallions. It’s the best bite: savory and nutty from the crispy rice, fresh from the fish, a bit spicy, and full of flavor and texture.
What is crispy rice?
Crispy rice is a little crispy rice cake made from fresh or leftover rice. You can use plain rice, but it tastes even better if you season it as sushi rice. Press the rice into a pan and chill it overnight and the next day, you cut the rice into little cakes and fry them until crisp on the outside and tender on the inside. You can snack on the crispy rice cakes as is or top them off with a myriad of toppings!Tiktok crispy rice
Crispy rice has been trending all over Tiktok and I am here for it. There are so many Tiktoks of people making gorgeous little crispy rice cakes. Some people use leftover rice, some people make rice fresh, some of them deep fry, some shallow fry, basically anything goes in the crispy rice world. I’m not sure who trended first with crispy rice but for me, I based this recipe off of the spicy tuna volcano at Gyu Kaku, a Japanese BBQ place. The spicy tuna volcano is heap of spicy tuna on crispy fried rice and it’s so good. I always order it when we go. Tiktok inspired me to make my own at home!Crispy rice ingredients
All you need is:- rice - the best rice to use is short grain Japanese rice. That’s what they use to make sushi. We usually buy a bag of Koshihikari, which is a popular type of rice variety from Japan. Koshihikari is soft, moist, fluffy, a tiny bit nutty and sweet. It has amazing texture and flavor.
- rice vinegar - go for unseasoned rice vinegar because we’re going to season to taste with sugar and salt. They sell rice vinegar in the Asian aisle at most grocery stores. We usually buy Kikkoman or Marukan unseasoned rice vinegar.
- sugar - there’s a bit of sugar in sushi vinegar, it adds sweetness and rounds out the rice vinegar.
- salt - one of the three components of sushi vinegar.
- oil - you’ll need a bit of neutral oil to fry the rice cakes. I like using canola, rice bran, or grapeseed. You don’t need much, we’re not deep frying, just shallow frying.
- toppings - you can enjoy your crispy rice cakes plain (I do it all the time, dipped in spicy mayo!) or you can top it with whatever your heart desires. I included some inspiration down below.
How to make crispy rice
First off you need to make rice, preferably short grain rice! I like to make rice on the stove. Here’s how I do it:- Wash and rinse one cup of rice until the water runs clear.
- Add the rice and one and a quarter cup water to a pot with a lid. Bring everything to a boil over high heat and when it’s bubbling rapidly, turn the heat down and put the lid on.
- Let it cook on low, covered, without peeking, for 17 minutes.
- When the time is up, leave the lid on for the rice to steam for 10 minutes.
- When the 10 minutes are up, fluff up the rice.
- After you fluff the rice, pour the sushi vinegar over it and use a spatula or rice paddle to fold the vinegar into the rice.
- Press the sushi rice into a baking pan, cover and place in the fridge overnight.
- The next day, take the rice out of the pan and use a sharp knife to slice into 2 x 3/4 inch slices. Now you’re ready to crisp them up!
To pan fry
Heat up a generous amount of oil in a pan over medium heat. Add the rice cakes and fry until golden and crispy, flipping once.To air fry
Lightly coat the rice cakes with oil and air fry at 400°F for 15 minutes, flipping halfway through.To bake
Heat the oven to 475°F. Lay down a sheet of aluminum foil and lightly brush with neutral oil. Lightly coat the rice cakes with neutral oil and bake, flipping once, until crisp and lightly golden, 15-20 minutes.Tips and tricks
- Don’t skip out on seasoning the rice! Plain rice will definitely work for this, but seasoned sushi rice is better.
- Speaking of rice, if you have it, use short grain Japanese rice. Our favorite rice is Koshihikari.
- Lightly wet your hands or spatula when pressing the rice into the pan so it doesn’t stick.
- It’s tempting to just pop the rice into the fridge, give it an hour, and slice it up, but if wait until it solidifies overnight, you’ll end up with a much more neatly sliced rice cake.
- Take your time and crisp the rice until golden and crispy. It’s tempting to turn up the heat but low and slow is the way to go.
Crispy rice toppings
Go wild! Essentially you’re making a crispy sushi rice cake so anything that you’ve had on sushi will taste amazing. Try:- sashimi grade tuna or salmon diced and mixed with kewpie mayo, sriracha, and fish eggs
- crab, avocado, kewpie mayo
- miso baked eggplant
- miso tuna salad
- Japanese egg salad
- if you’re vegan, sub the tuna or salmon with cubes of tomato
Crispy Rice
How to make gorgeous, nutty, satisfying crispy rice cakes topped with spicy tuna or salmon.
- 1 cup short grain rice (preferably Koshihikari)
- 2 tbsp rice vinegar
- 1 tbsp sugar
- 1 tsp salt
- 1 lb tuna (sushi grade, or salmon)
- 1/4 cup kewpie mayo
- 1 tbsp sriracha
- 2 tsp soy sauce
- 1 tsp toasted sesame oil
- 1 avocado (sliced)
- 1-2 jalapeños (sliced)
- toasted sesame seeds (as needed)
Place the sushi rice in a colander, rinse throughly and let drain for 15 minutes. Cook rice according to the package instructions or your preference.
While the rice is cooking, mix together the rice vinegar, sugar, and salt, until the sugar and salt dissolves.
Transfer the rice to a large bowl and fluff. Sprinkle on the sushi vinegar and use a rice paddle to fold the sushi vinegar into the rice.
Line a baking tray with parchment paper or plastic wrap. Spread the rice out, pressing it down, until it is about 3/4 inch high. Cover and let cool in the fridge overnight.
The next day, make the spicy tuna and prep the toppings. Cut the tuna into small pieces. Combine the tuna with the kewpie mayo, sriracha, soy sauce, and toasted sesame oil. Keep cold in the fridge.
Take the rice out of the fridge and slice into 2 inch by 3/4 inch pieces. Heat up a generous amount of oil in a pan and heat it up over medium heat.
Add the rice cakes and fry until golden and crispy, flipping once. Drain on a wire rack.
Top the crispy rice with slices of avocado, the spicy tuna, a slice of jalapeño, and a sprinkle of toasted sesame seeds. Enjoy!
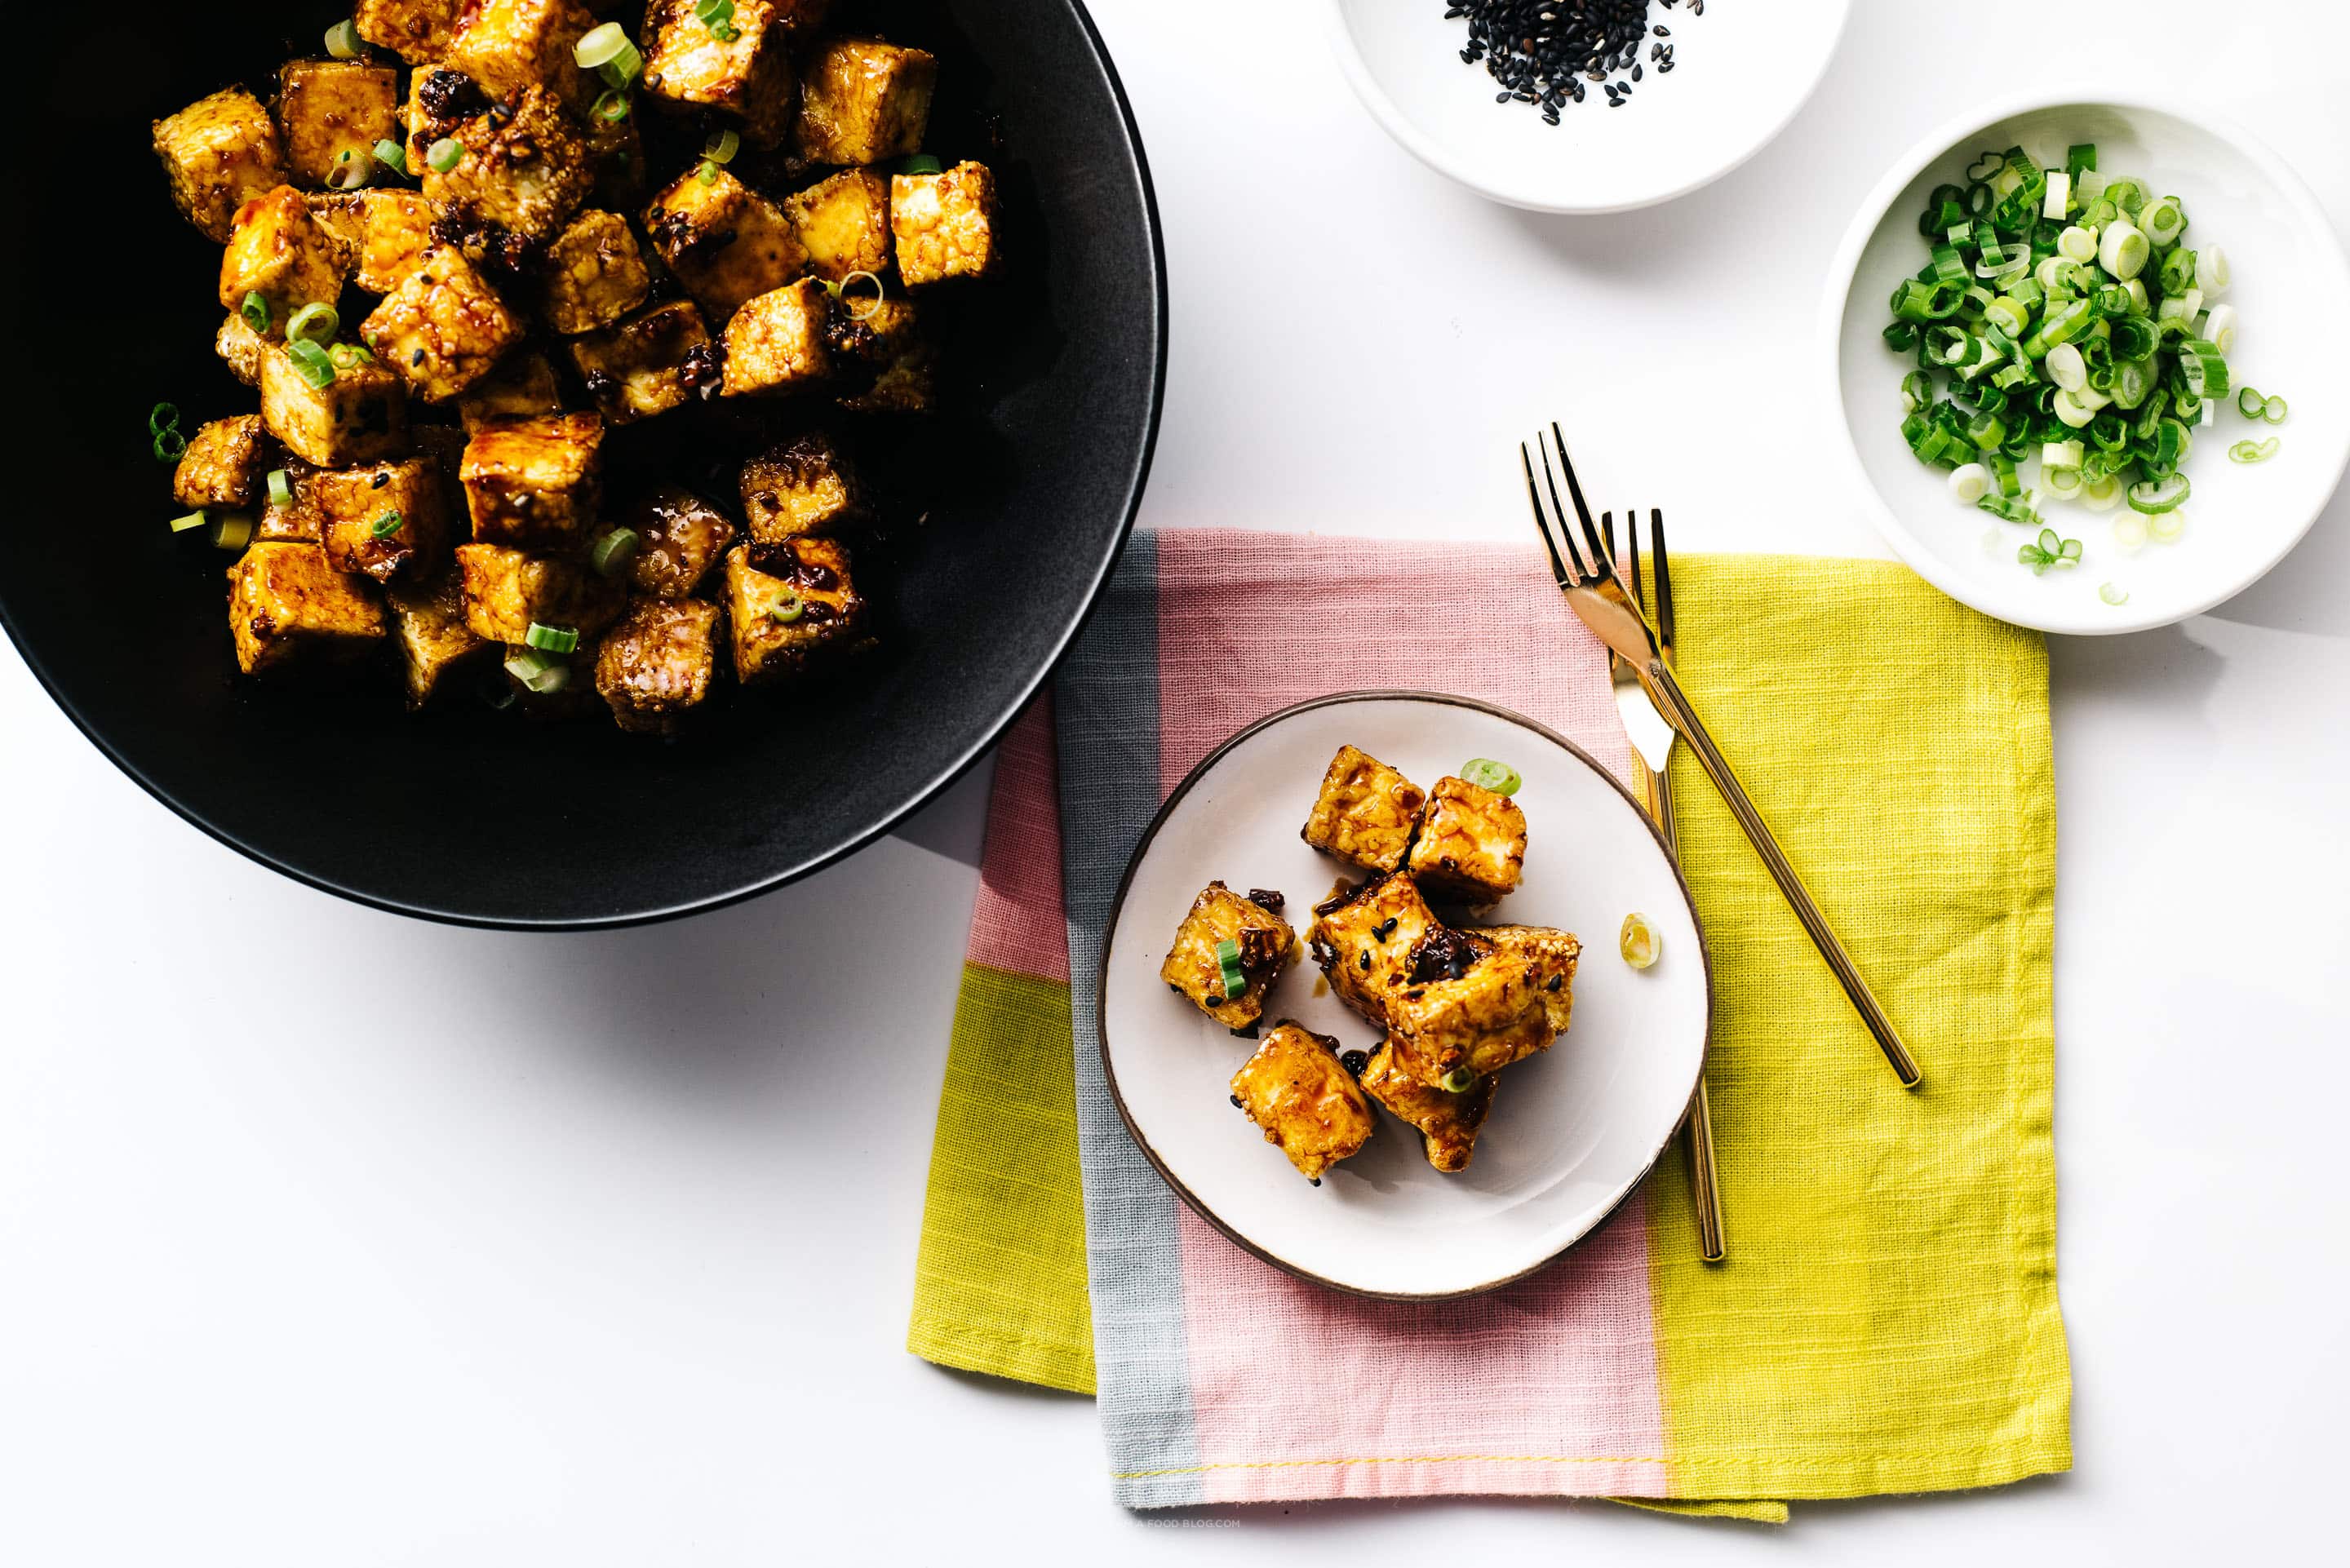
I Am... Crispy Oven Baked Honey Garlic Tofu Bites
Honey Garlic Tofu Bites!! Exceptionally crispy golden oven-baked tofu nuggets coated in a sweet and savory honey garlic sauce. Tofu has got to be my ultimate favorite protein. Healthy, quick, convenient, and so easy to keep multiple packages in the fridge. I’ve loved tofu forever and now that Mike is a total tofu convert, it’s a big part of our meal plans! I love tofu so much that I will eat it straight out of the package with just a touch of really good soy sauce and a huge pile of thinly sliced scallions. If I’m feeling like a sweet, savory, garlicky, crispy snack I’ll make these honey garlic tofu bites. Quick, easy, and so satisfying. Pair them with some fluffy rice or whole grains and greens for a honey garlic tofu bowl and live your best life.
What kind of tofu for tofu bites?
I like using firm tofu for tofu bites because it’s firm enough to keep its shape and it has a nice, pleasing texture. You can also use medium but I wouldn’t use silken or soft as it’s too fragile.Tofu from firm to soft:
- Extra firm tofu - holds its shape exceptionally well, perfect for crumbling, frying, grilling, and using in stir fries.
- Firm tofu - holds it’s shape and super versatile, great for pan frying, braising, and stewing.
- Medium tofu - smooth and a little soft. You can purée it easily for soups, dips, and sauces. Also tastes amazing in braises, soups, and stir fries.
- Soft/Silken tofu - very smooth and delicate. Best for mapo tofu, miso soup, or other soups and stews. Also delicious with just soy, ginger, and scallions!
How to press tofu
Pressing tofu gets all the excess liquid out and makes it easier to crisp up. It also makes the tofu more dense and chewy. It’s a super simple step. If you’re using extra firm tofu, you can skip this step and just pat the tofu dry.- Open and drain the tofu, then fold up a clean tea towel or paper towels so they’re roughly the same shape as the tofu.
- Place the towels on a cutting board or plate and put the tofu on top. Top with another layer of folded towels.
- Place a second cutting board or plate on top and weight it down with a heavy bowl. Let sit for 15-30 minutes, changing the paper towels if needed.
- Use the tofu in your recipe!
Freezing tofu
Freezing tofu draws out the moisture and gives it an even meatier, firmer texture. When you freeze tofu the water inside turns into ice, making small holes. The holes can soak up marinades and flavor like a sponge and the texture of frozen then thawed tofu is firm and chewy. If you want to try it, drain the tofu, slice it into the end shape, then freeze it. Once you thaw it, squeeze out any extra water and braise, bake, stir fry, deep fry, marinate, or anything your heart desires.How to make tofu crispy
Make sure you dry it out. Moisture is the enemy of crispiness so give your tofu time to sit on some clean kitchen towels or paper towels and dry the surfaces throughly. Cornstarch! It’s what gives tofu a craggy coating and bakes up to crispy, crunchy perfection. You can also use potato starch or sweet potato starch. Starch is the key to crispy tofu because when heated, it creates a network of molecules that holds it’s structure.Substitutes for honey
If you want to make this vegan, you can easily substitute the honey for maple syrup so you have a honey maple tofu! Just do a 1-for-1 swap.Oven baked honey garlic tofu
Bake these up in a hot 400°F oven and flip them half way through. Because cornstarch doesn’t brown very much, you can give the tofu a light misting or brushing of oil if you want them to be super golden brown. I didn’t brush them because the sauce coats the bites and makes them glossy and golden, but it’s up to you!Pan fried
In a deep non-stick frying pan, heat up a neutral oil over medium heat. When hot and shimmery, add the coated tofu and cook until crispy and golden, flipping on all six sides.Air fried honey garlic tofu
Lightly oil or use cooking spray on the air fryer basket. Place the coated pieces of tofu in the basket, with at least 1/4” of space in between pieces. Lightly spray the tops of the tofu with cooking spray. Cook at 400°F for 5 minutes, then flip and lightly spray with extra cooking spray. Cook for 5 more minutes at 400°F.Deep fried honey garlic tofu
Prepare a wire cooling rack over a paper towel lined rimmed baking sheet. Heat up 2 - 2.5 inches of oil in a deep heavy bottomed pot until it reaches 325°F. It doesn’t need to be too deep, just enough to cover the size of the tofu. Use a pair of tongs to gently add a couple of pieces of tofu to the hot oil, being careful not to overcrowd. Fry in batches until lightly golden, about 2-3 minutes. Remove from the oil and let rest on your prepared wire rack.Honey garlic sauce
After the tofu is crispy, it’s time to sauce and toss. Simply warm up the honey, along with minced garlic, and soy sauce until bubbly and thick.Honey Garlic Tofu Bites
Only 5 ingredients for a quick and tasty weeknight protein!
- 1 lb pressed tofu (1 package, see notes)
- 1 tbsp cornstarch
- 2 tbsp honey
- 1 tbsp soy sauce
- 3 cloves garlic (minced)
- black pepper (freshly ground, to taste)
- green onions (sliced, to garnish)
- toasted sesame seeds (to garnish)
Preheat the oven to 400°F. Dry off your tofu with a paper towel and cut into 1/2 inch cubes. Toss with the cornstarch and arrange the tofu on a parchment paper lined baking sheet.
Bake for 30-45 minutes – midway through, flip the tofu cubes.
When you have just 5 minutes left on the baking time (at that point your tofu should be a light golden brown) start the sauce. In a small frying pan, heat up honey, soy and garlic over medium heat until bubbly and thick. Taste and season with freshly ground pepper.
Remove the tofu from the oven and toss in the sauce. Garnish with sliced green onions and toasted sesame seeds. Enjoy hot!
You can substitute regular medium or firm tofu, just cut it and place it on clean paper towels, flipping every so often until it removes most of the excess moisture.
I Am... The ultimate guide to pho at home
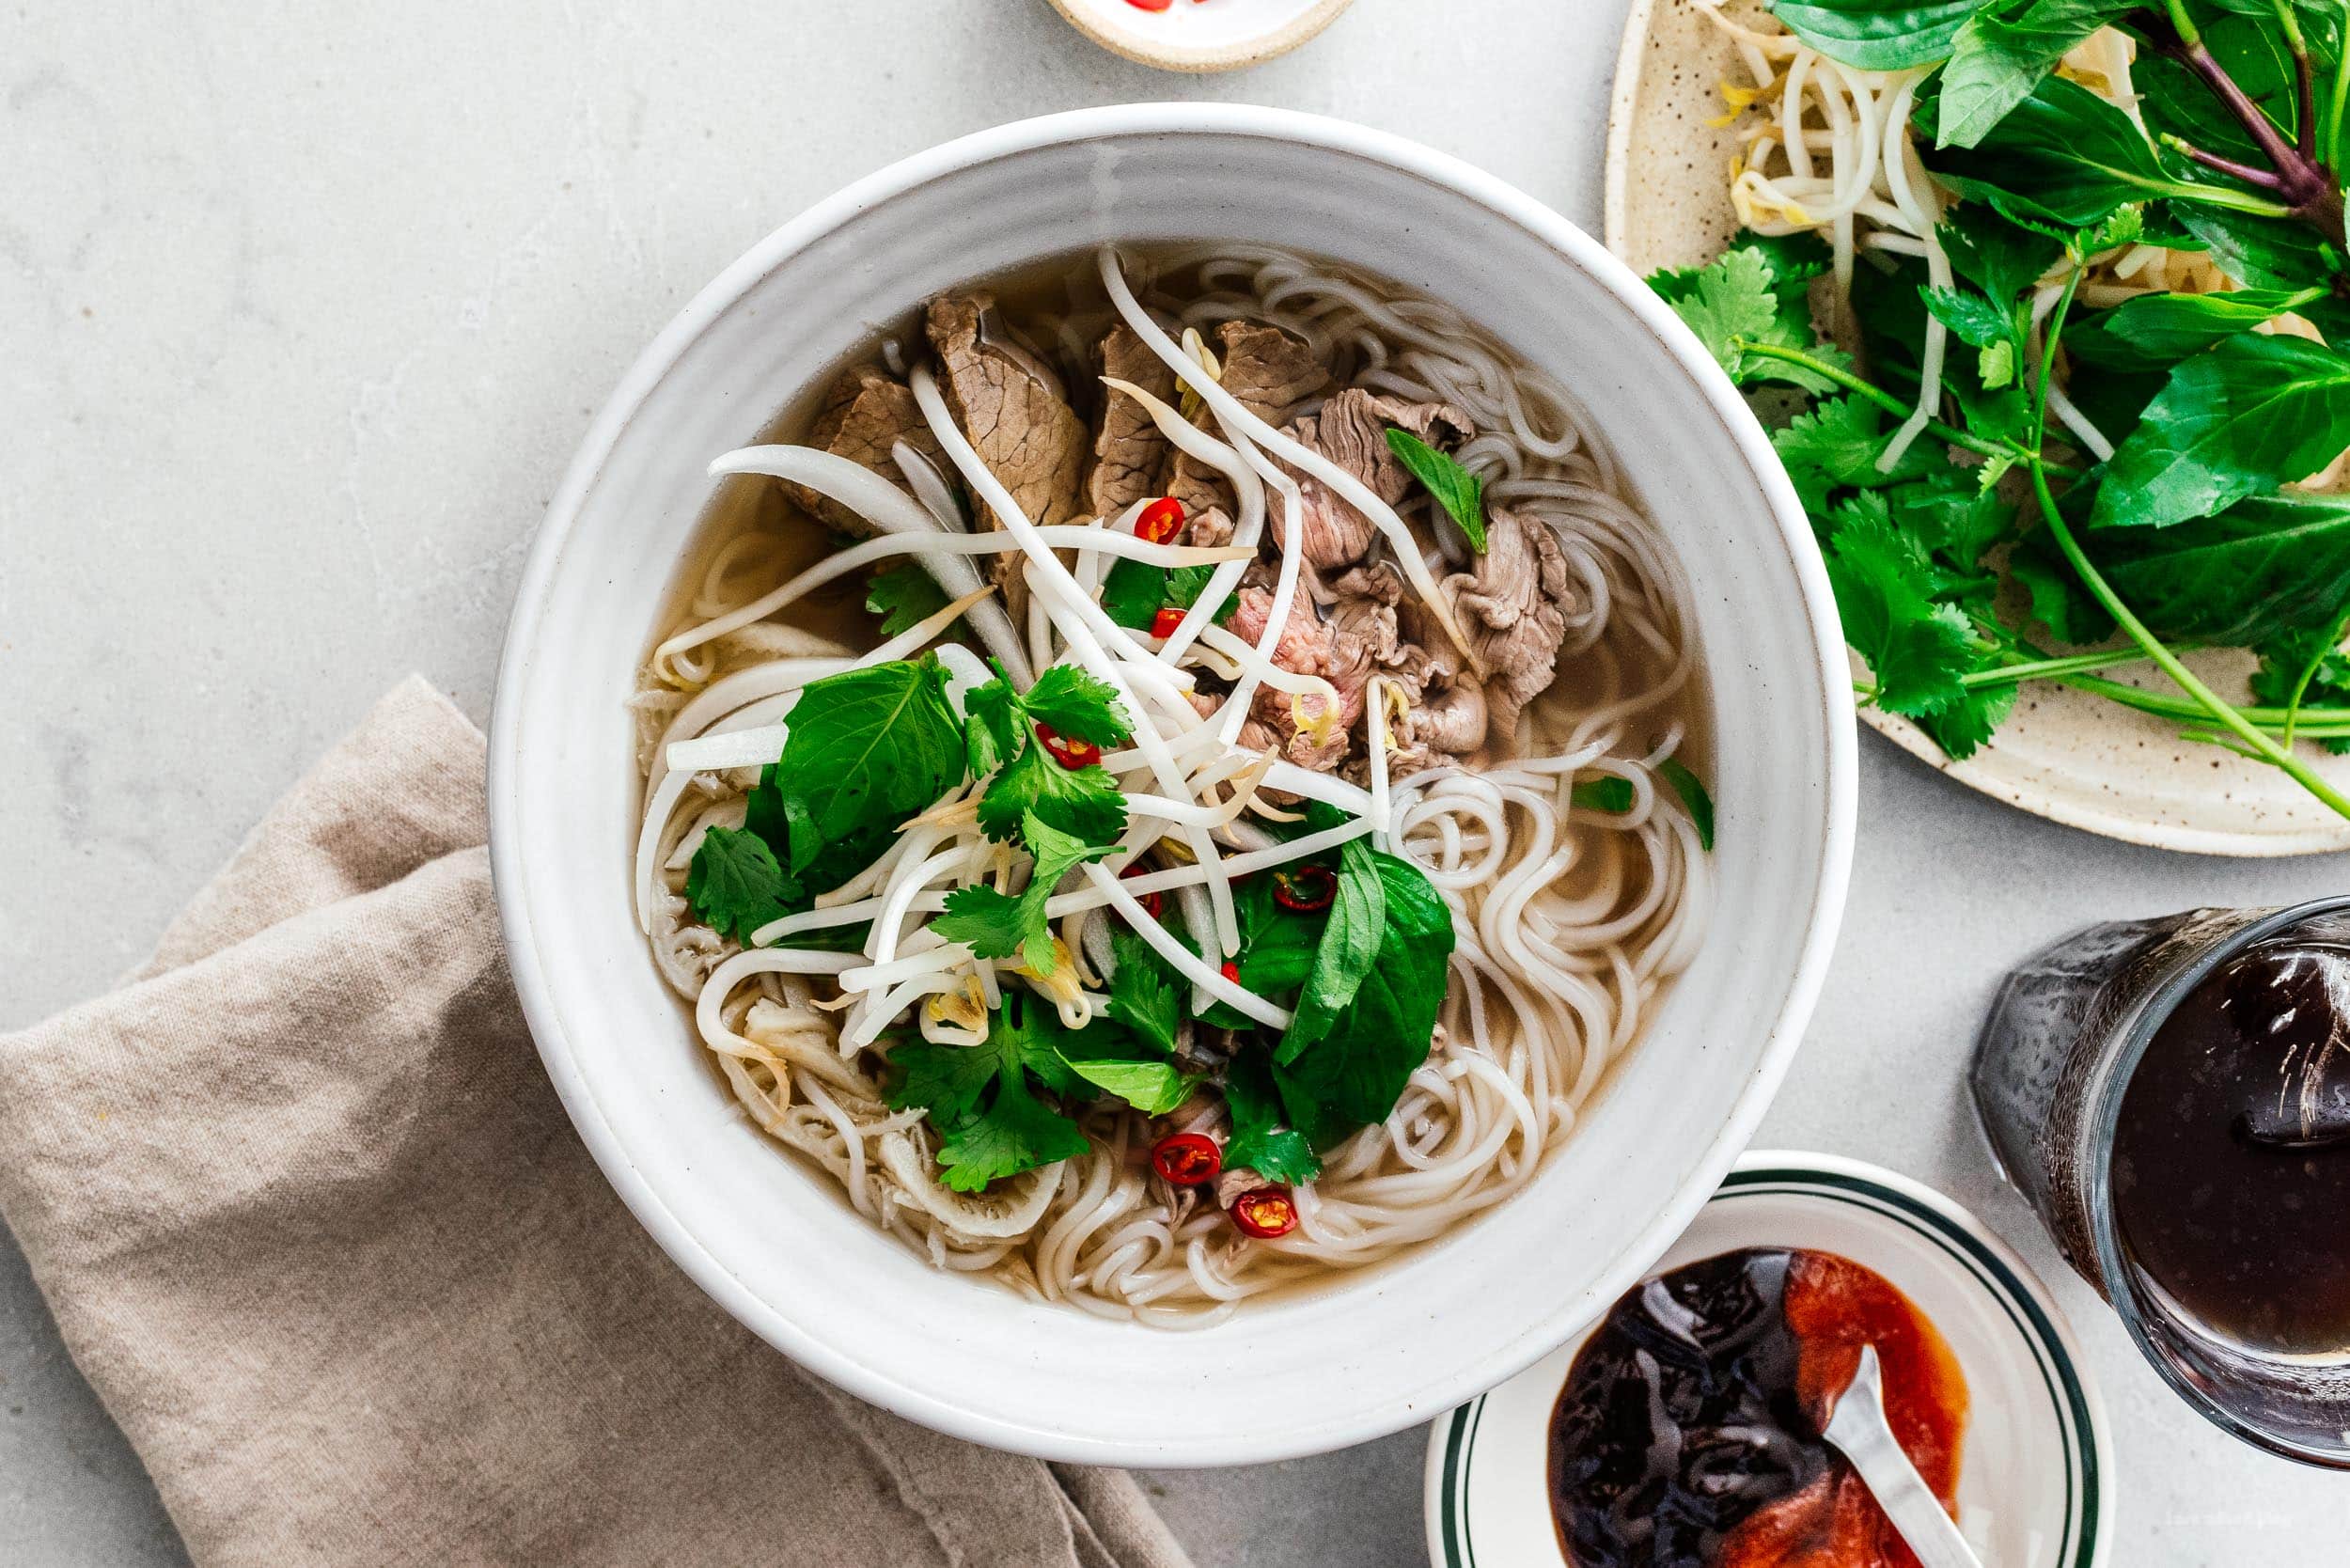
This is the best bowl of pho I know how to make over 20 years of making pho from scratch. You know pho needs no introduction. The deeply spiced fragrant broth is the stuff dreams are made of. The bouncy rice noodles, tender fresh beef, and bright poppy herbs and that gentle hint of lime, it's all I need in life (other than Steph).
What is pho?
Pho is a cozy, beefy, aggressively spiced soup that is also light, fresh, and bright at the same time. The simple combination of fresh rare steak, melty brisket, tender rice noodles, and that magical soup comes together to rival anything out of a Michelin starred restaurant, usually under $15 (sigh, the days of a $5 bowl are sadly long gone). If you want to know everything about pho, you can read this 3000 word ode to pho, but I think it's better just to jump right into making it.Why this pho recipe?
This recipe includes all the little tips and tricks I’ve picked through 20 years of making pho. It includes key points such as:- Throwing your spices in at the end to preserve their subtle flavor.
- Drying out your rice noodles so they soak up extra flavor.
- Separating out the process over two days for ultimate tastiness and relaxation.
The two day version
When you want to go all out, optionally separating your pho making over two days gives the best results. On day 1, you make the pho and strain it into a container, then refrigerate the soup and the brisket separately. On the morning of the next day, the fat will have solidified on the top of the soup. Remove the fat and melt it down over low heat in a small pot, then strain it into a small container and refrigerate. Rinse/slice the toppings, wrap them up, and throw them in the fridge too. Finally, half an hour to an hour before you want to eat, reheat the pho soup and season it to taste. Make the noodles and let them hang out in a colander to dry out a bit. Neatly slice your cold brisket and drop the slices in the soup to reheat. Thinly slice your steak if you didn’t buy it presliced. Then just build your bowls, adding the fat back in if desired, and go to town.Oxtail makes the best pho soup
Over the years I’ve tried everything that can make a good soup, and when I want to go all out, I splurge on oxtail. It has the perfect combination of collagen for body, fat for taste, and of course, beefiness for beefiness. It’s a little on the expensive side but totally, 100% worth it. I long for the days when oxtail was cheap and unknown. When we live in the desert and it’s hard to get oxtail, marrow/soup bones are great. But oxtail is by far the best option for the best pho soup. Note: After you are done with the oxtail, the meat is a little tasteless but very tender and falls right off the bone - remove and enjoy it with some soy sauce or fish sauce as a chef’s treat, or serve it, it's up to you!How to make pho soup
- Blanch the oxtails. Rapidly boil the bones for 5 minutes to clear out any impurities that might be there. Tip: I like to use a small pot to blanch the meat faster while heating up my 8 cups of water in a larger pot simultaneously. That way, I can just use tongs to transfer the bones from the small pot to the big pot without a lot of effort, and it saves time because you’re heating up both pots at the same time, and also because then you don’t need to wash a giant pot; the little one just goes in the dishwasher.
- Char the onions and ginger. I use a blowtorch exclusively for this. You can char them in a pan on the stove or under the oven broiler, but a good blowtorch is a super essential kitchen tool that’s not very expensive, and bonus, you can make creme brulee.
- Simmer the oxtails, onions, and ginger as low as possible for 3.5 hours. I’ve tried this at 3 hours and 4 hours, and 3.5 hours is the right amount of time. You’re looking for something super low, like 1 bubble every 30 seconds low. Preferably put a slightly ajar lid on it. Check back at the 1.5 hour mark to make sure you have at least enough water to cover the bones.
- Char the other spices. This is an optional step that I always do. You don’t need a lot of time, just a brief kiss with the blowtorch. If you don’t have a blowtorch, toast the spices over low heat until they become fragrant.
- Drop the brisket and spices in at the 3.5 hour mark and continue simmering for another 2 hours.
- And you’re done. You’ll need to season it with fish sauce, salt, and sugar, but I save that for the second day.
Stovetop vs Crockpot vs Instant Pot
- Can you make this with a crockpot? Yes! You can do everything in a crockpot if you skip the blanching step since you’re straining it at the end anyway. Skip the blanching step and do everything else in a crockpot on high/low (as appropriate) and you’ll have the best crockpot pho ever.
- What about the instant pot? Also yes! The instant pot is one of my preferred ways to make pho when I want something simple, although, full disclosure: it’s not as good as the stovetop/crockpot version. Since the instant pot is about speed, you can just drop everything on high pressure for 40 minutes, and you’ll have some amazing (and amazingly fast) pho.
Ingredients for pho
While pho is easy to make, technique-wise, it can be a little daunting to gather all the ingredients. If it’s your first time, the spices can even seem a little much, but the spices are good for many, many bowls of pho, as well as many other awesome dishes.Oxtail
This is the key to the most amazing pho. It used to be super cheap back in the day. As it became more popular in recent years, it’s also gotten more expensive, but it’s 100% worth it. After you’re done making the pho soup, the meat falls right off the bone. I don’t usually include it in the pho because it’s not as aesthetically clean as all the sliced meats, but if you wanted to, you totally could. Have it with a little Thai chili crushed into some soy sauce as a reward for all that work you did.Brisket
If you want your brisket to be 100% fall apart in your mouth, cook it for 4 or even the whole 5.5 hours. Personally, i like mine to have a little body (the rare steak provides the softness anyway) so I only cook it for 2 hours, which both gives it structure and leaves most of the taste where it belongs, in the brisket. You probably don’t need a large brisket - the recipe calls for just 1/4lb per person - so if a large brisket is all you can find, switch it out for an equally as traditional flank steak.Sirloin
This is the traditional rare steak that is the basis of pho tai, the default (and amazing) pho bowl you get everywhere. It’s a tender fall-apart melt-in-your-month affair that’s raw when it comes to you on the table, both to show off the quality of the meat and to let you finish the cooking so that its as perfect as possible. Tip: If the thought of serving raw steak to your diners (or yourself) turns you off, cook it in the soup on the stove for 5 seconds or so, then serve it on a separate dish so it doesn’t overcook in the hot pho soup. Ask your butcher to slice this, or buy hot-pot ready meats.Spices & Aromatics
In order of importance, my pho spice mix is: star anise, cinnamon, cloves, coriander seeds, white (or black) peppercorns, cardamom, fennel, and cumin. You’ll also need onion and ginger.Toppings
Toppings take a great noodle soup to the next level. For pho, we use lime wedges for brightness, fresh or blanched bean sprouts fior earthiness, fresh cilantro, sliced onions, fresh Thai basil, and jalapenos or thai chilis if you like spice.Pho noodles: dried or fresh?
Pho isn’t pho without rice noodles. As with almost all noodles, fresh pho noodles are best, but the dried stuff works too. Sometimes the noodles will be called rice stick or Thai rice stick noodles. For me, medium thickness is best. Unlike with ramen or other noodle-intensive dishes, the rice noodles are super forgiving. In fact, it’s better if you make them in advance. Briefly blanch the noodles about halfway to your desired softness, then drain and rinse them in cold water and let them dry out while you do other things. Letting the noodles sit and dry out seems counterintuitive since you just cooked them, but it’s the secret to flavorful noodles as they absorb the pho soup as they rehydrate.Assembling your pho
If you’ve never served multiple bowls of noodle soup simultaneously before, it can be a little complicated. Here's how to do it with the least amount of stress or fuss possible. You need large deep bowls that can fit 3 cups of liquid in them.- Heat your bowls by filling them with hot tap water for at least 2-3 minutes, then drain. Heating up your bowls ensures that the soup absorbs the heat of the bowl, instead of the other way around.
- Boil a pot of water for the noodles. In another pot over very low heat, warm up your pho soup .
- Cook your noodles half of the time indicated, then rinse them in cold water and drain. Divide evenly into each bowl.
- Prep the toppings: rinse and dry the bean sprouts, thai basil, and cilantro. Slice the onions and limes and plate everything. Put the bottles of sriracha and hoisin sauce on table.
- Slice your meats. The brisket should be 1/8” thick or so. Throw it in with the pho soup once it’s been sliced to warm it up. Slice the steak if you didn’t get that done for you at the shop, then divide both the steak and brisket evenly between each bowl.
- Once everyone is ready to eat, ladle the now piping hot soup over the raw beef in each bowl, then deliver to the tables.
- Eat as soon as possible, as loudly as possible, with as many toppings as possible.
Pho Recipe
An intensely cozy and beefy beef noodle soup.
- blowtorch
Pho Soup
- 1 lb oxtail
- 1/2 medium onion (charred)
- 2 oz ginger (halved lengthwise and charred, about 3")
- 8 cups water
Pho Spice Mix
- 5 star anise
- 1 cinnamon stick
- 1/2 tsp cloves
- 1/2 tsp coriander seeds
- 1/2 tsp peppercorns (white preferred)
- 5 cardamom pods
- 1/2 tsp fennel seeds
- 1/2 tsp whole cumin seeds
Assembly
- 1 lb brisket
- 1 lb sirloin (thinly sliced)
- 2 tbsp fish sauce
- 2 tbsp sugar (or to taste)
- 1-3 tsp sea salt (or to taste)
- 4 portions fresh pho noodles (or dried)
Toppings for Pho
- 4 lime wedges
- 1 cup bean sprouts (raw or blanched)
- 4 springs Thai Basil
- 4 springs cilantro
- 1/2 medium onion (thinly sliced)
Day 1
Bring a small pot of water to the boil and blanch the oxtails for 5 minutes. Bring a second, larger pot with 8 cups of water to a boil.
Transfer the oxtails to the second pot along with the charred onion, charred ginger, and 8 cups of water. Simmer on low for 3.5 hours.
Char pho spice mix, then add to the pho soup along with the brisket and continue simmering for another 2 hours (5.5 hours total)
Transfer the brisket to its own container, then strain and separate the pho soup. Refrigerate both.
Day 2
Skim the solidified fat from the pho soup with a fork and melt over low heat, then strain and refrigerate in a new small container. Prepare pho toppings as needed, cover and refrigerate.
When you are ready to serve
Combine the pho soup with enough water to make 8 cups, then season with fish sauce, sugar, and salt, if needed. I like 1 tsp of fine sea salt, but you should feel that your pho is on the verge of being too salty to compensate for the unsalted meat and noodles. Bring the soup to a low simmer. Slice the cold brisket and drop into the soup to reheat.
Bring a large pot of water to the boil and cook the noodles halfway, then rinse in cold water and drain. Heat up the bowls with hot tap water for 5 minutes, the drain. Divide the pho noodles evenly between bowls.
Slice sirloin if necessary, then divide between bowls along with brisket.
Ladle pho broth overtop, serve and enjoy immediately with many toppings.
See post for more detailed 2 day, instant pot, and crockpot instructions.
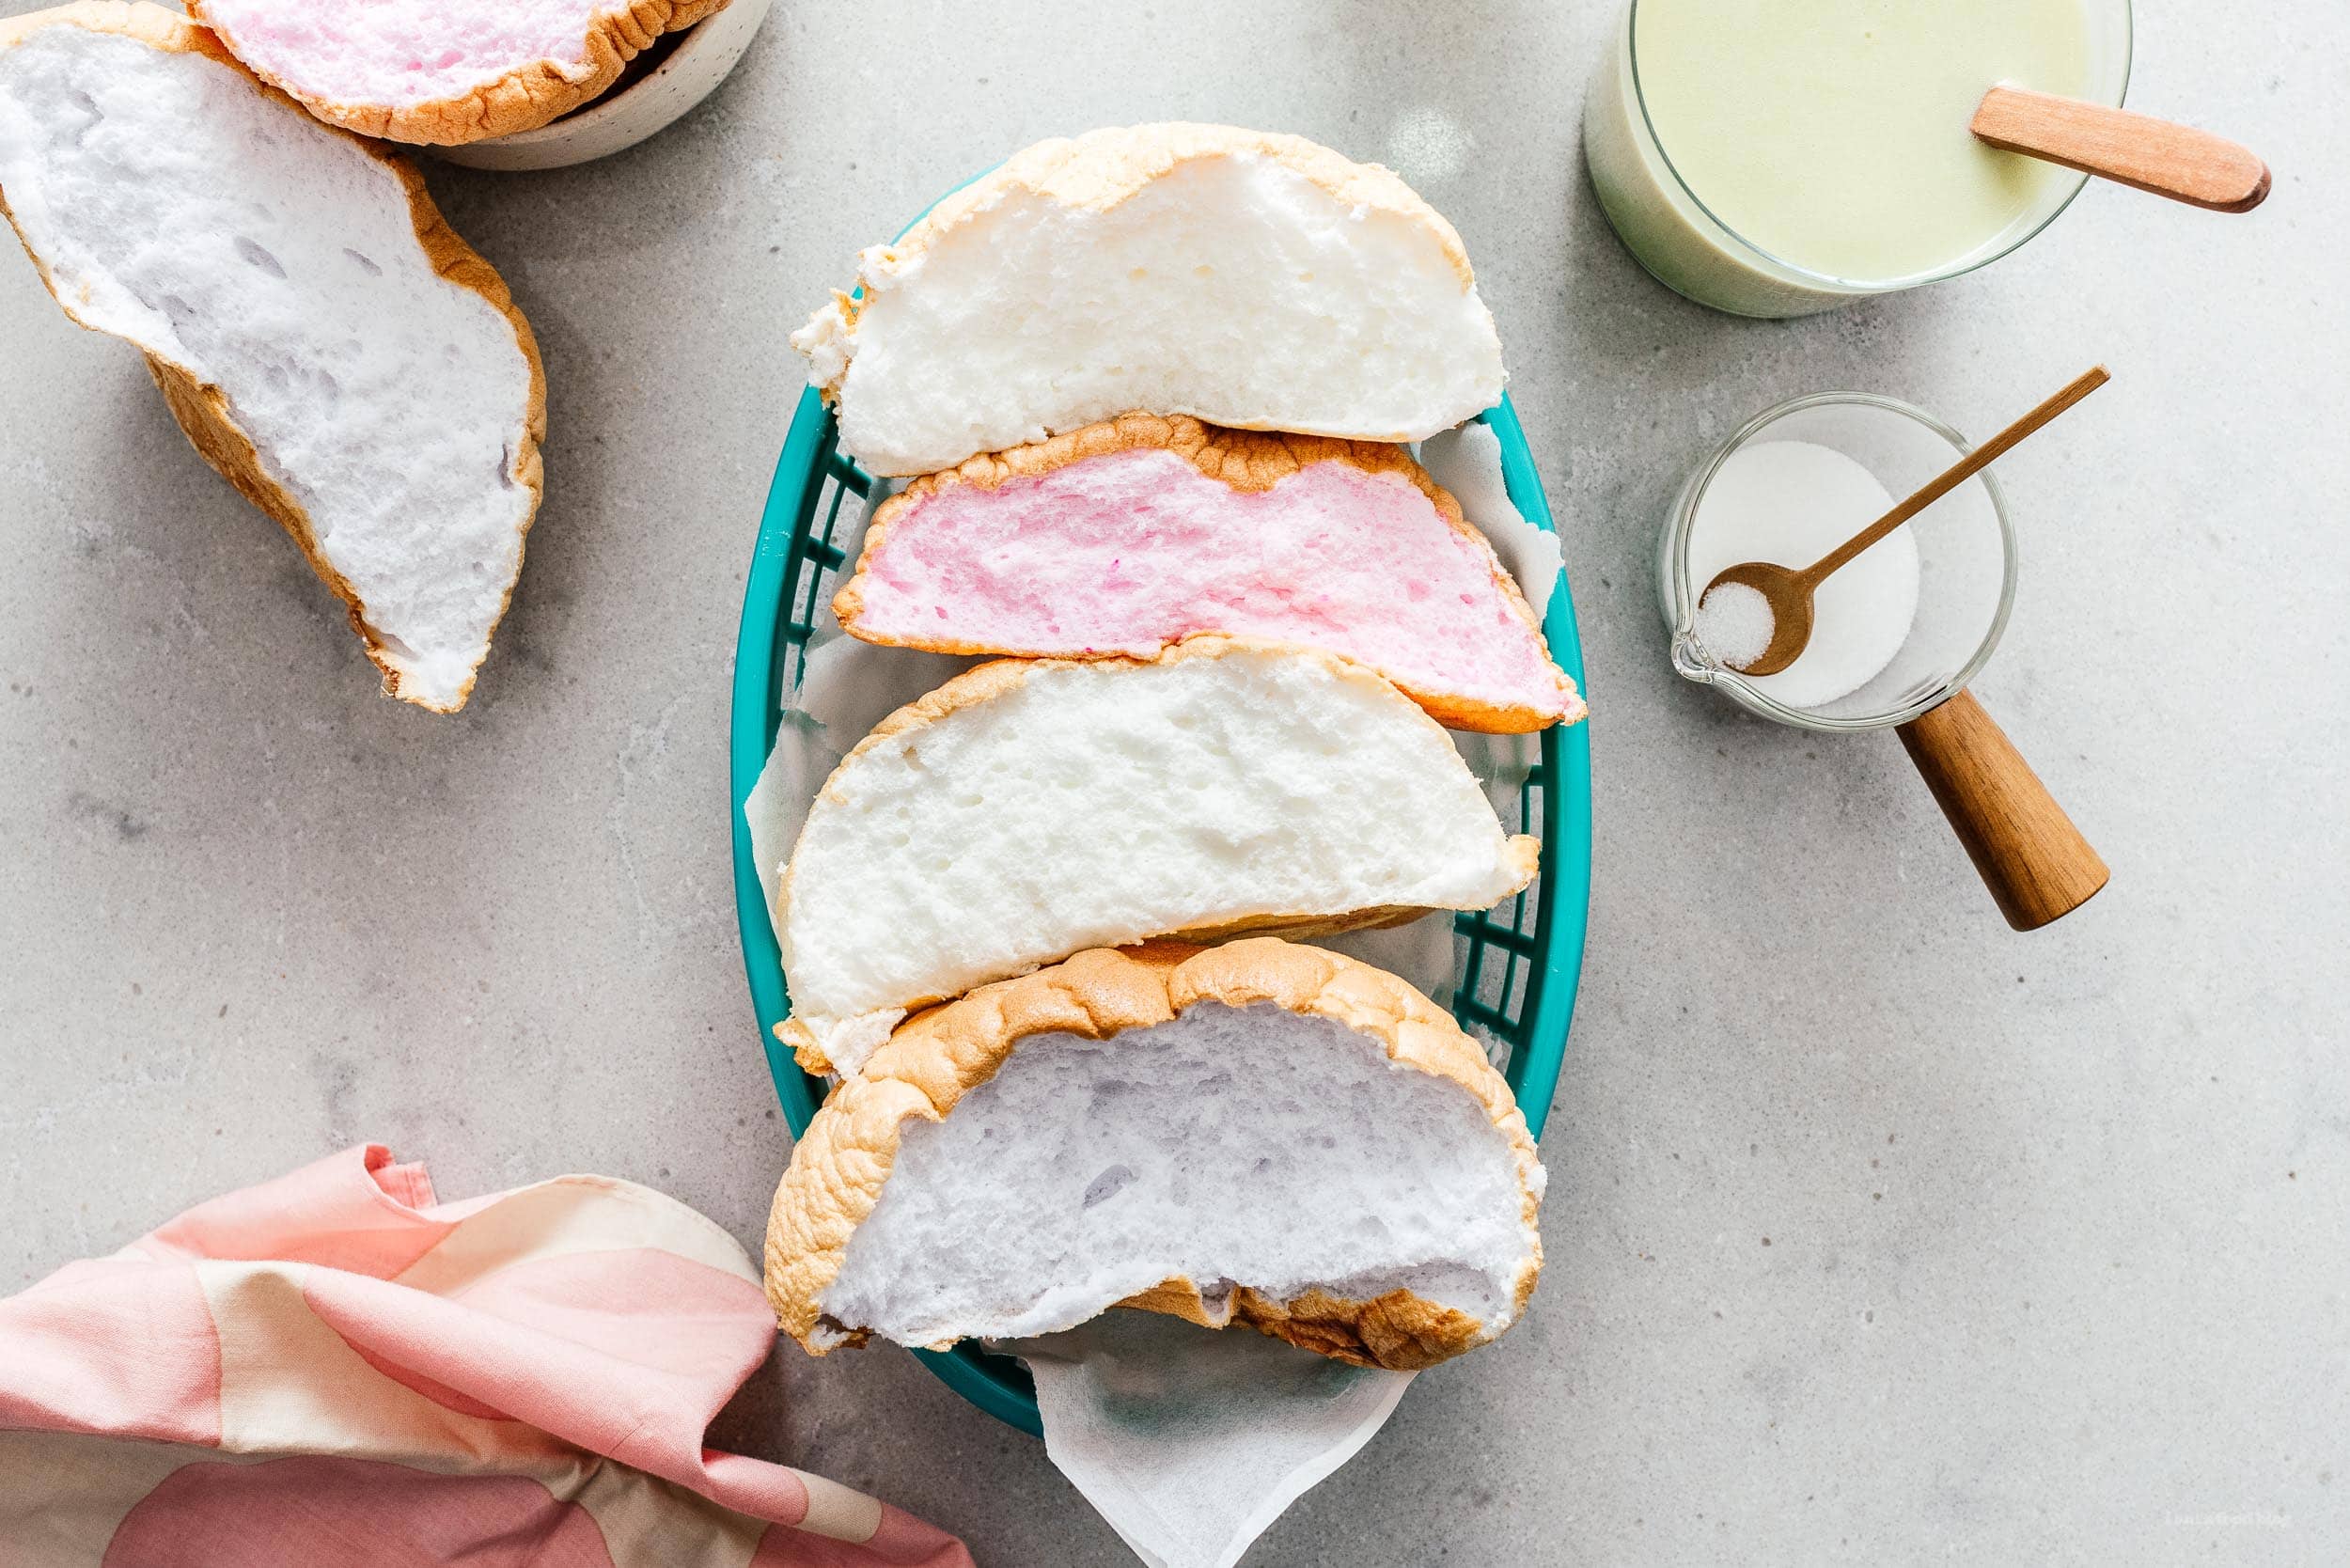
I Am... Cloud Bread Recipe: How to make that viral TikTok bread
Hello, I’m back at it with another viral TikTok recipe. I know, I know, TikTok is about to be banned but the viral recipes won’t stop and I am here for it because super fluffy cloud bread is so jiggly and cute. Plus it’s only three ingredients! I mean, I loved dalgona coffee and pancake cereal, so maybe there’s something to this TikTok food thing? After seeing multiple people ripping into and squishing their TikTok cloud bread, I just HAD to make some myself.
What is TikTok cloud bread?
If you’re on TikTok and you’ve looked under #cloudbread you’ve probably seen the fluffiest, most impossible giant puffs of bread you’ve ever seen. All you need to make it is egg whites, sugar, and cornstarch. Cloud bread is essentially a softly baked meringue with some rebranding. If you’re not sure what a meringue is: it’s a type of dessert made from whipped egg whites and sugar. Sometimes a binder (in this case cornstarch) is added to give it a bit more structure. Meringues taste kind of marshmallow-y when gently baked and light and crispy when baked and dried out longer. If you’ve had pavlova or lemon meringue pie or macaron, you’ve had meringue and by extension, cloud bread.Ingredients for cloud bread
- Egg whites. Egg whites are what give your cloud bread fluffiness and loft. If you’re going to separate egg whites yourself, be sure to not get ANY yolks into the whites or they won’t whip up. It’s better to separate your eggs while they’re cold, but they will whip up better if they’re at room temp. You can also just buy egg whites in a carton at the store, which is what I did. You’ll need 3 large egg whites or about 6 tablespoons of egg whites from a carton.
- Sugar. Just use regular white sugar. Sugar is what is going to stabilize your egg whites and let them fluff up even more. The sugar is also going to make your cloud bread just a little bit sweet.
- Cornstarch. You just need a tiny bit of cornstarch in your cloud bread, to help soak up any extra liquid in your meringue. Cornstarch also helps make your meringue shiny.
- Food coloring. This is optional, if you want to make your clouds colorful.
How to make cloud bread
- Whip the egg whites. Add your egg whites to a very clean, grease free bowl. Start to whip your egg whites on medium-low, until frothy and pale.
- Stir in sugar. Add the sugar, a little bit at a time on high, until the sugar dissolves and the egg whites start to foam up.
- Add the cornstarch. I like to sift the cornstarch in so that there are no lumps. Continue to whip on high until the egg whites become a glossy thick meringue that holds a peak. The egg whites are done when you lift the beater from the bowl and they hold a peak and look smooth and creamy like shaving cream If you tilt the bowl, the whites should not slide. Be careful not to over whip!
- Shape the cloud. Use a rubber spatula to scoop out the meringue and shape into a cloud on a parchment paper lined baking sheet.
- Bake. Bake in a low oven until golden and cooked through.
What does cloud bread taste like?
To be honest, this cloud bread is more looks than taste. Maybe just like TikTok? It’s beautifully fluffy and full of tiny air bubbles and very squishy and satisfying but it’s not the most delicious. It’s light and airy and reminiscent of a marshmallow. It kinda tastes like angel food cake texture wise, but not taste wise.Tips and Tricks
- Make sure your egg white whipping equipment is completely clean and free from fat or oil or your egg whites won’t whip up.
- Similarly, make sure there are ZERO egg yolks in your egg whites.
- Separate your eggs while they’re cold, but beat them up with they’re at room temp.
- Don’t add all the sugar at once. Your meringue will be fluffier if you add it in gradually, 1 tablespoon at at a time.
- Don’t over beat! If you meringue starts to look grainy or really wet, it means your egg whites have been over-beaten and your cloud bread won’t be fluffy.
Cloud bread FAQs
How do I whip the egg whites?
Make sure your utensils are COMPLETELY clean and there is absolutely no oil or fat residue on your whisk or bowl. If you break your yolks as your separating the eggs the whites won’t whip up. Use a stainless steel or glass bowl and make sure it’s completely clean. Don’t use silicone or plastic bowls or utensils – even when they seem clean, there’s a possibility of oily residue that will make it hard for your eggs to whip up properly. Whipping egg whites takes time, so don’t be surprised if it takes a while for them to whip up.Why didn’t my egg whites whip up? I’ve been beating them forever!
If your egg whites didn’t get fluffy it’s because there was oil or fat in your egg whites. Oil or fat is the enemy of whipping up meringues. Fat interferes with how the proteins in egg whites bond together to whip up. If you’re separating your egg whites by hand and there is fat on your hand, your whites might not whip up. If there is any oil or fat on your whisk or in your bowl, your egg whites won’t whip up.How can I make my egg whites whip up?
You can try adding a touch of cream of tartar (1/4 teaspoon), vinegar (1/4 teaspoon), or lemon juice (1/4 teaspoon) to help whip up your eggs. Cream of tartar, vinegar, and lemon juice are all acids that help stabilize the egg whites and encourage them to get extra whipped.Why didn’t my cloud bread bake through?
If your cloud bread is golden brown on the outside but still under baked on the inside it might be because your oven is running too hot. Some ovens aren’t calibrated well or have hot spots. It probably means that the oven was too hot and that the outside of the bread cooked faster than the inside. Cloud bread bakes at a very low temperature. If the inside of your cloud bread is raw, you can just put your cloud bread back into the oven until it is baked through.Does it taste like eggs?
Cloud bread is made from 3 ingredients: egg whites, sugar, and cornstarch. The egg whites are make up the majority of the recipe so it’s only natural that cloud bread will taste like eggs. If you want a sweeter cloud bread to help it taste less like eggs, add a 1/4 cup of sugar. Warning: if you do this, your cloud will not be as fluffy.Do I need a stand-mixer to make cloud bread?
Technically you don’t need a stand mixer. You can whip these up with a regular whisk or a hand mixer. But it will take a REALLY long time and a lot of arm muscle. You can do it! I use this milk frother and it works amazingly.Why is my cloud bread wrinkly?
That’s just the nature of cloud bread! Because it’s not a cake with a significant amount of flour to stabilize it, it will get wrinkly as it cools, kind of like a soufflé. It’s best to enjoy it while it’s still a bit warm :)Can I make cloud bread in advance?
Unfortunately, just like clouds, cloud bread is extremely fleeting. You can’t make it in advance because the longer it sits, the more wrinkly and shrunken it’ll get. Cloud bread is best made and eaten fresh from the oven.Substitutes for cornstarch
If you don’t have cornstarch, which is also known as cornflour, you can use regular all purpose flour. The amount of flour is very small so it won’t make a difference.Substitutes for sugar
Sugar works best if you’re making meringue but you can also use sweetener if you’re avoiding sugar. The meringue won’t fluff up as much but it will be sugar free. Try things like: stevia, splenda, or monkfruit sweetner.Why does my cloud bread taste like eggs?
Cloud bread only has three ingredients: egg whites, sugar, and cornstarch. It’s tastes like eggs because eggs are the main ingredient. If you want it to be sweeter, more meringue-like and less eggy, you can make it with more sugar or add some extracts like vanilla or almond. Instead of using 2.5 tablespoons of sugar, use 6 tablespoons. Add 1 teaspoon of vanilla or almond extract. The cloud bread will be a bit stiffer and not as fluffy but it will taste more like meringue!Cloud Bread Recipe
3 ingredient fluffy TikTok viral cloud bread
- 3 large egg whites (about 6 tbsp)
- 2.5 tbsp sugar (~30g)
- 1 tbsp cornstarch (~10g)
- food coloring (optional, see note)
Heat the oven to 300°F. In the bowl of a stand mixer, use the whip attachment to whip the egg whites on medium high until frothy.
Add the sugar slowly, 1 tablespoon at at time and whip on high until small bubbles start to form.
Sift in the cornstarch and continue to whip on high until the whites are whipped up into a glossy thick meringue that holds a peak, about 5-6 minutes.
Scoop out the meringue on to a parchment paper lined baking sheet and shape into a fluffy cloud or mound.
Bake for 20-25 minutes. The outside will be a light golden brown. Let cool and enjoy the fluff!
Optional: If you want to add flavoring (baking extracts) or color into your cloud bread, add it in when you add your cornstarch.
Estimated nutrition is for one loaf.
Recipe via @linqanaaa and @abimhn

I Am... 8 Keto Starbucks Drinks for Fall
If you’re anything like me, you’re totally susceptible to all those pumpkin spice latte ads you’ve been seeing. But what about keto?! Here are some keto Starbucks options for all my keep peeps out there.
Read More →
Latest Comment
“looks like a treasure map! Have been watching some cooking-travel shows that venture to Japan and really want to check o...”Sabrina on Tokyo Food Guide: Where to Eat the Best Udon in TokyoPopular
 2015 Holiday Giveaway
  One-Pot Lemon Scallop Pea Spaghetti
  Beer Battered Onion Rings, Jalapeno Aioli
  2014 Holiday Gift Guide and a Giveaway
  Easy Gourmet Hot Wings and a Giveaway!
  The Ultimate Veggie Sandwich
 Vegan(!) Creamy Corn Soup Recipe
  Sunday Brunch: Grilled Cheese Eggs Benny