I Am... Japanese Pancakes
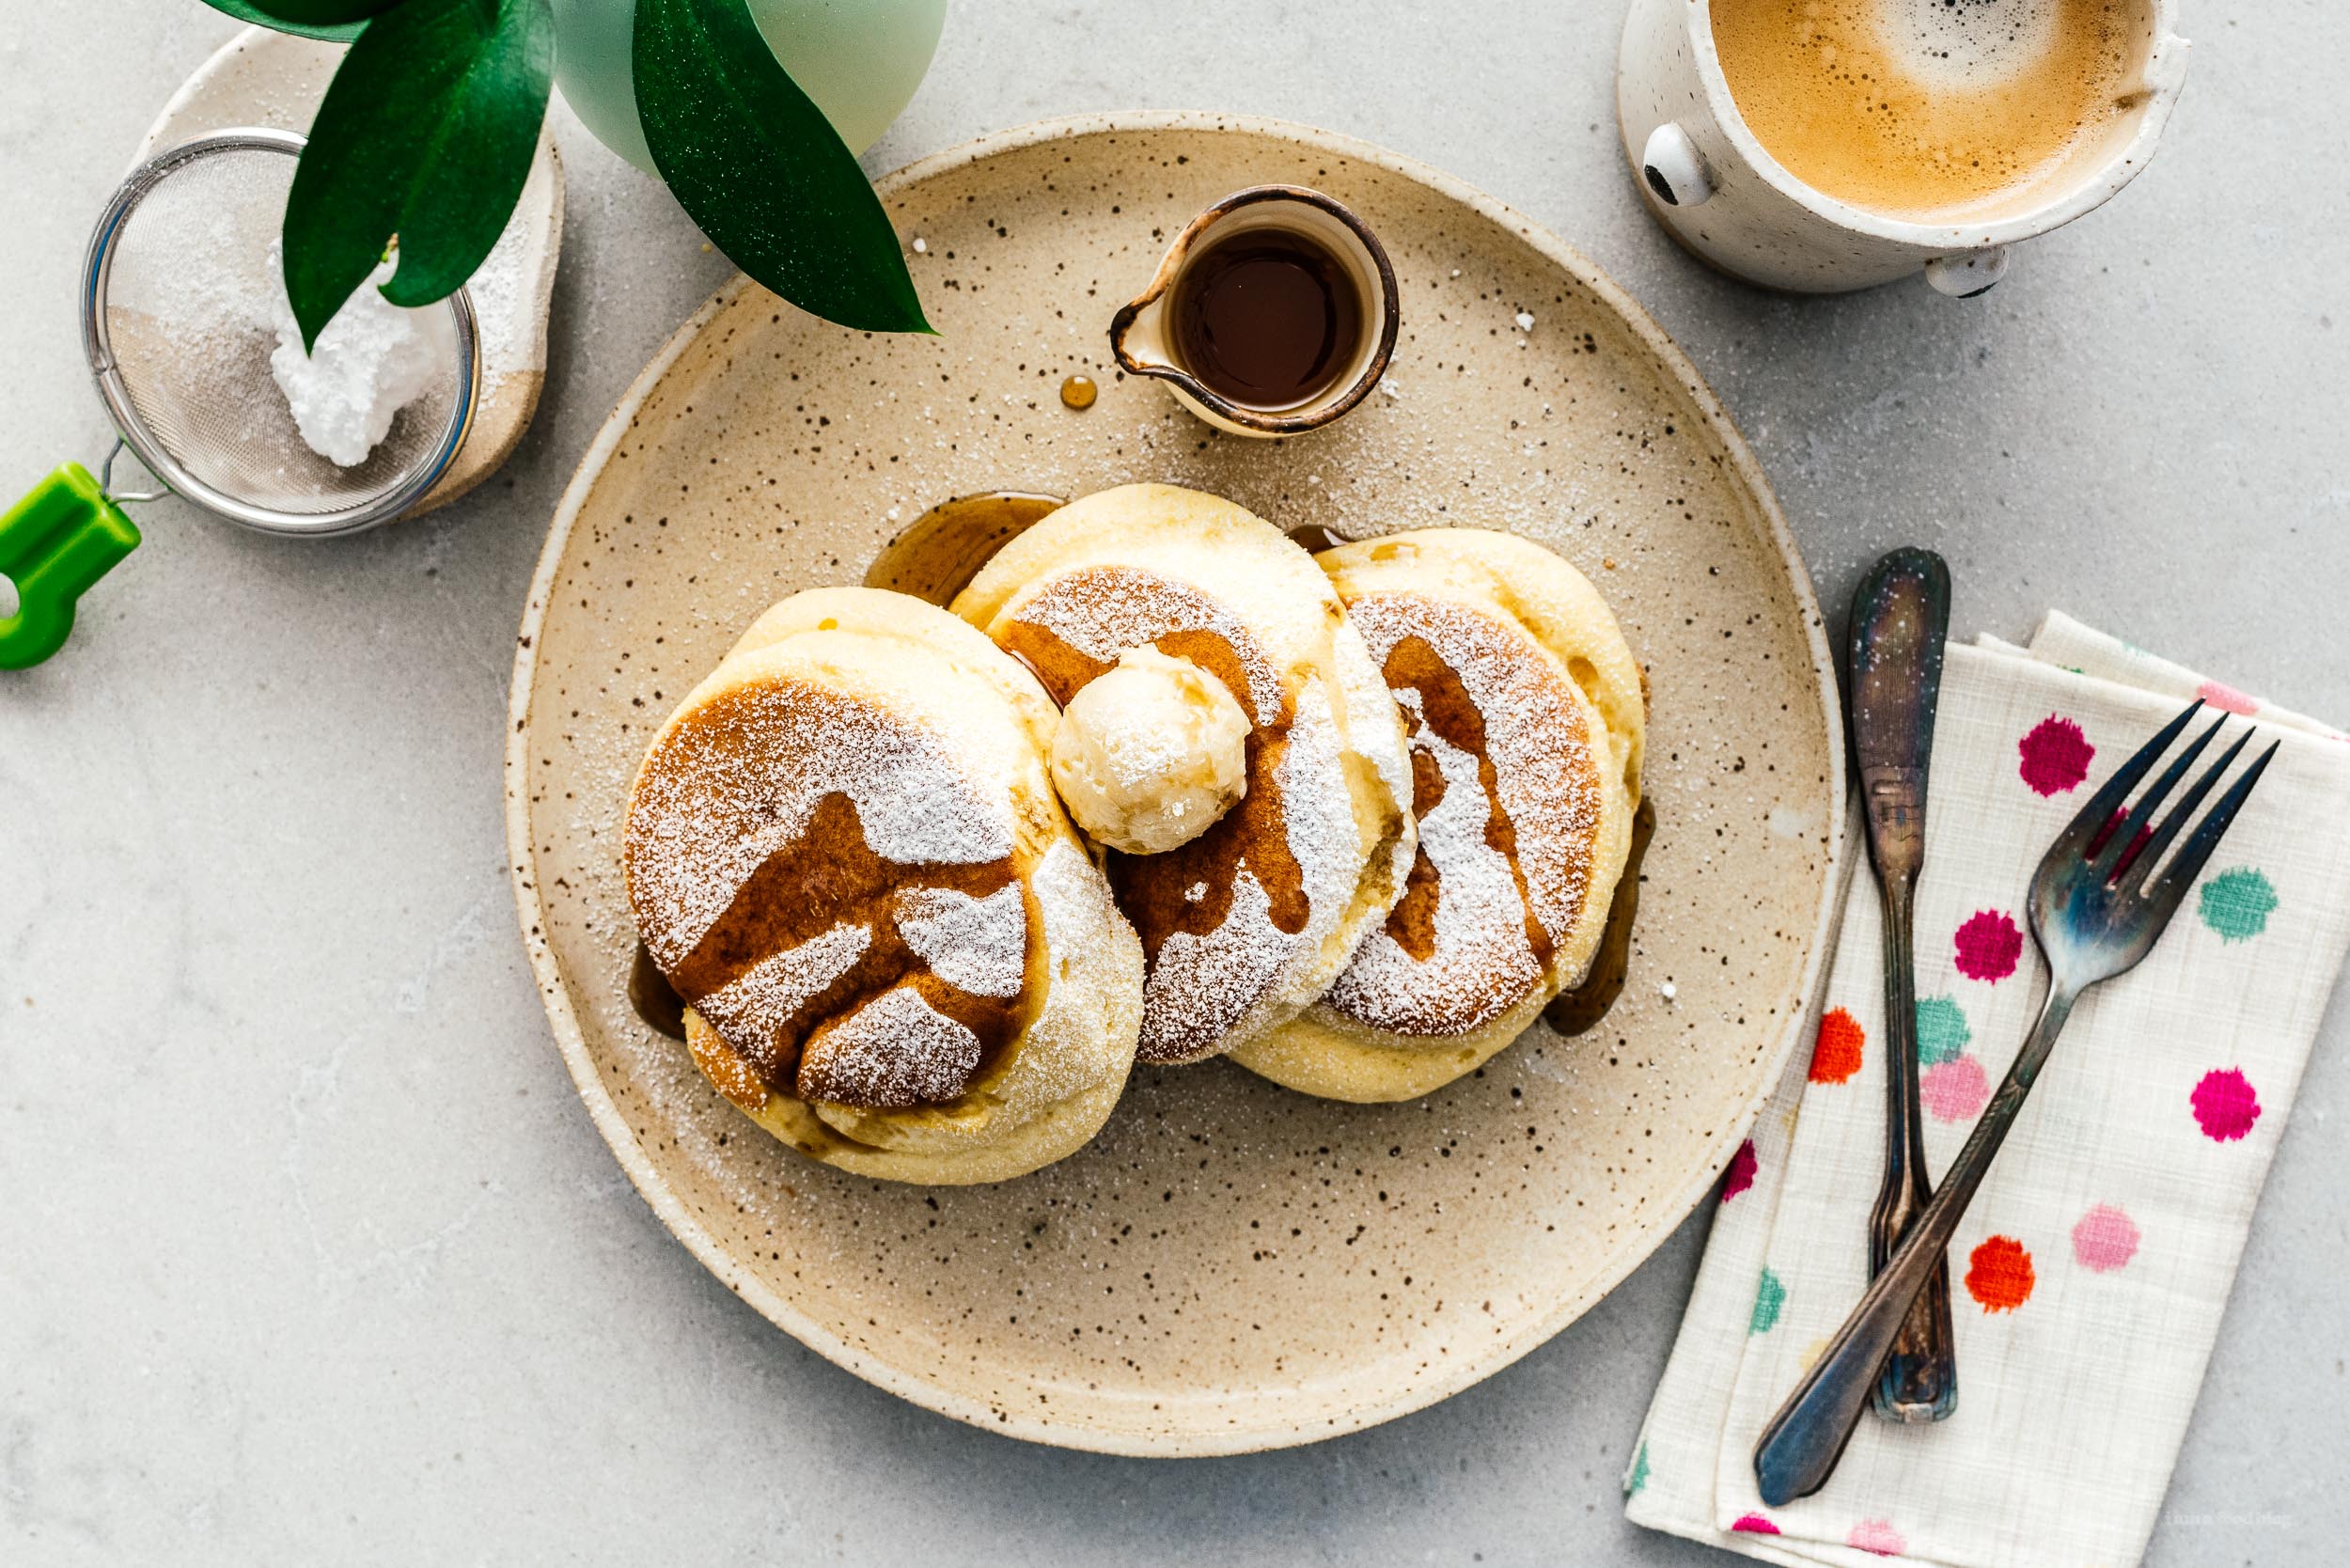
I MADE FLUFFY PANCAKES!! I MADE FLUFFY JAPANESE PANCAKES!! Sorry for shouting, but I'm so excited!! Ever since the first time I laid eyes on those giggly giant fluffy Japanese pancakes, I've been obsessed. We may or may not have been to almost every fluffy pancake place in Tokyo because of my obsession – here's a run down on the places we've been to. I love the way Japanese pancakes taste: light, airy, and oh so delicious.
Read More →
I Am... Sushi Bake
If you love California rolls, you’ll love sushi bake. It’s savory, creamy, and super satisfying. Because it's so easy to make, it's perfect for potlucks, gatherings, and get togethers. It’s SO good. Sushi bake is a super popular potluck dish inspired by sushi. It’s a deconstructed California roll, layered and baked in a casserole. Everything gets warm and creamy and you scoop it up into crispy sheets of roasted seaweed and top it off with cucumber and avocado.
What is sushi bake?
Sushi bake came around as an alternative to sushi rolls: all the flavors of creative sushi rolls layered and baked into a warm and comforting delicious casserole, meant to be scooped into little sheets of roasted seaweed. Like most casseroles, it’s a home style dish meant to be shared with friends and family. It’s easier than rolling lots of rolls and the scooping and sharing makes it fun and interactive. It’s infinitely customizable meaning there’s a sushi bake out there for everyone!How to make sushi bake
- Make: Take the time to make sushi rice. You can just use plain cooked short grain rice, but taking the time to add vinegar, sugar, and salt to make sushi rice will take your sushi bake to a whole other level.
- Spread: Spread the sushi rice into a oven safe dish and sprinkle with some furikake.
- Mix: In a bowl, mix up some shredded chopped crab with cream cheese and Kewpie mayo and then spread it on top of the rice layer. Sprinkle on a bit more furikake.
- Bake: Pop the sushi bake into the oven and bake until it starts to brown and bubble and is heated through.
- Enjoy: Remove from the oven and if desired, drizzle with extra kewpie mayo and sriracha. Enjoy scooped on to roasted seaweed snacks with cucumber and avocado.
Ingredients
- Sushi rice - Koshihikari is the standard variety of rice used for sushi and is very easily found online and in grocery stores. It’s a short and stubby rice that is that is naturally sticky. It cooks up beautifully and is perfect for sushi bake.
- Crab or seafood - You can go with either imitation crab (which is not crab at all but pollock which is a fish), canned crab, or fresh crab. Since the crab is baked, I suggest just going with whatever is easiest. For me, that means either canned or imitation crab. If you’re not a fan of crab, you can definitely used any sort of seafood that you love - like salmon or tuna or prawns!
- Kewpie mayo and cream cheese - the cream cheese mixed up with the crab gets melty and creamy and is so decadent and addictive. Kewpie mayo adds a subtle rich and sweet mayo flavor that is tangy from the rice vinegar.
- Furikake - Furikake, if you haven’t heard of it, is rice seasoning. Think of it as a mix of seaweed and sesame seeds and other tasty bits that people sprinkle onto bowls of rice to dress them up a bit. It’s super addictive and tastes amazing on everything: rice, noodles, pasta, popcorn, eggs, you name it, furikake makes it better. You can find furikake at Asian grocery stores or online.
How to serve sushi bake
Sushi bakes are eaten kind of like a little taco with roasted seaweed snack being the tortilla and the sushi bake being the filling. Just scoop a bit of sushi bake onto a piece of roasted seaweed snack and pop it in your mouth for the perfect bite. Typically you just put a dish of warm sushi bake in the center of the table and everyone can scoop a bit onto their plate, wrap it in seaweed and eat it. You can also slice it into little pre-portioned slices that you can easily move onto roasted seaweed.What kind of seaweed do I need?
Seasoned roasted Korean laver seaweed snacks is the best seaweed to eat with sushi bake. You’ll see them in little foil packs sold in the snack section. They sell them at Asian grocery stores, Costco, Whole Foods, Trader Joe’s, online, essentially everywhere! Roasted seaweed snacks look a little bit different than the typical seaweed used for sushi - slightly more translucent with a looser weave. You can also just use regular toasted seaweed cut into rectangular strips but I love the crispy crunch of roasted seaweed snacks.Sushi bake variations
Sushi bake variations are endless! Try these:- Miso salmon - instead of crab, use the equal amount of drained canned salmon. Mix in 1-2 tablespoons of miso.
- Tuna salad - instead of crab, use the equal amount of drained canned tuna. Mix in some sliced scallions.
- Spicy - mix in 1-2 tablespoons of sriracha into the crab mix and top with an extra drizzle of sriracha when eating.
- Cheesy - add an extra layer of shredded cheddar cheese on top before baking.
Spicy salmon roll sushi bake
To make a spicy salmon roll sushi bake, prepare the rice base as below. For the topping, combine 1 lb cooked and flaked salmon with 1 cup kewpie mayo, and 2 tbsp sriracha. Spread the spicy salmon mixture on top of the rice and top with the furikake and bake as directed below. Enjoy warm with seaweed!Crock pot sushi bake
A reader asked a really good question about making sushi bake in a Crock Pot so they could bring it to a party while keeping it warm. I hadn’t thought of it before, but the more I pondered, the more I thought about how it would absolute work to use the Crock Pot as a warmer. They key to making sushi bake in a Crock Pot is to use the Crock Pot as a warmer after you’ve already made and baked it. Here’s how you do it:- Make sushi rice by mixing cooked short grain rice with vinegar, sugar, and salt.
- Spread the sushi rice into the bottom of the slow cooker insert and top generously with furikake.
- Mix up your toppings of choice with cream cheese and Kewpie mayo and spread it over the rice. Finish with a generous sprinkle of furikake.
- Bake the sushi rice in the crock pot insert in the oven at 350°F. This is a lower temperature than usual because the crock pot insert can’t be heated too high.
- When the top is brown and bubbly and everything is warmed through (about 20 minutes), transfer the crock pot insert to the crock pot and keep warm on low.
- Keep it on low until ready to serve, then top with extra mayo and sriracha, if desired. Serve warm with roasted seaweed snacks to scoop up!
What to serve with sushi bake
Truthfully sushi bake is a full meal within itself but if you’re looking for some extras, try these:- Tamagoyaki because who doesn’t love sweet and savory rolled eggs
- No Japanese inspired meal is complete without miso soup!
- A lil salad with incredibly addictive Japanese dressing would be a lovely side
- Spicy, creamy, addictive prawn tempura in chili mayo
- Super fluffy, jiggly Japanese cheesecake for dessert
Sushi Bake
A savory, creamy, and super satisfying deconstructed California roll, layered and baked in a casserole.
- 1 cup rice (Koshihikari or other short grain rice preferred)
- 1/4 cup rice vinegar
- 1/2 tbsp sugar
- 1 tsp salt
- 8 oz imitation crab (shredded and chopped)
- 1/2 cup cream cheese (room temp)
- 1/2 cup mayo (kewpie mayo preferred)
- 1/4 cup furikake
- 1/2 cucumber (sliced, to serve)
- 1 avocado (cubed, to serve)
- 3 packages roasted laver (aka Korean seaweed snacks, to serve)
Heat the oven to 425°F. Place the sushi rice in a colander, rinse throughly and let drain for 15 minutes. Cook rice according to the package instructions or your preference. While the rice is cooking, combine the rice vinegar, sugar, and salt in a small sauce pan and warm over low heat until the sugar dissolves. Alternatively, microwave briefly, stirring to dissolve the sugar. Set aside.
In a bowl, mix the shredded crab with the cream cheese and mayo until smooth. Set aside.
When the rice is done, transfer to a very large bowl. Sprinkle on the vinegar mixture and use a rice paddle or spatula to mix the vinegar into the rice while using a slicing motion. Fan the rice while mixing to dry it out slightly.
Spread the sushi rice into an oven safe baking dish and top with 1/2 of the furikake.
Top with the cream cheese mayo crab mix. Sprinkle on the remaining furikake.
Bake for 10-15 minutes or until the top just begins to brown and bubble and the casserole is warmed through.
Enjoy warm with roasted seaweed snack, sliced cucumbers, and sliced avocados.
To reheat: warm in a 325°F oven for 10-15 minutes until heated through or in the microwave for 30s - 1 min.

I Am... Tiktok Baked Feta Pasta
This viral Tiktok Baked feta pasta has it all: big bold flavors, creamy comfort, and carbs. Baked feta pasta is the perfect summer food: it’s creamy, bright and tomato-y, and SO damn delicious. It’s probably the simplest pasta dish you’ll make this month and the reward is so high for an incredibly low effort.
What is tiktok pasta?
It’s super simple: cherry tomatoes are tossed with olive oil and placed in a baking dish with a block of feta. Everything gets baked up until the tomatoes burst, releasing their sweet and jammy flavors. The feta gets melty and oozy. You mix it all up into a quick sauce, toss in minced garlic, basil, crushed red pepper, and pasta. Boom, dinner is done!Tiktok pasta is so good and easy
Sometimes the best kind of cooking is the kind that takes no time at all so you can spend more time with loved ones enjoying the food. I love that the prep time for this dish is so low and the actual hands on time is super low. If you can stir, you can make this dish. The dominant flavors of this pasta are feta and tomatoes, it’s practically a two ingredient pasta. If you’re not a huge feta fan, you can definitely use another cheese – baked brie, cream cheese, or ricotta would be amazing.How to make tiktok pasta
- Toss: In a baking dish, toss cherry tomatoes with olive oil. Place a block of feta in the middle and drizzle some oil on top.
- Bake: Bake the tomatoes and feta in the oven until the tomatoes burst and the cheese is melty.
- Cook: While the feta is in the oven, cook the pasta.
- Stir: When the tomatoes and feta are done, stir in some minced garlic, some crushed red pepper flakes, and the pasta, loosening with some pasta water if needed. Finish with fresh basil.
- Eat: That’s it! Scoop it up an enjoy a bowl of pure cheesy carby comfort.
Tiktok pasta ingredients
- cherry tomatoes - the sweeter the better! There are so many types of mini tomatoes these days, from strawberry to grape to on the vine to heirloom. I used one package of classic cherry tomatoes and one package of cherry tomatoes on the vine.
- feta - you’ll want to get a nice higher quality Greek feta since it’s the main flavor of the dish. Grab a block of feta, the kind that comes in a brine, not the crumbles. If you want a milder, creamier feta, try French feta, it’s less tart than Greek.
- olive oil - most of the recipes I’ve seen call from anywhere from 1/4 to 1/2 cup of olive oil. I went with 1/3 cup, you want enough to coat the tomatoes and feta while having a bit of oil pool at the bottom of your baking dish so the tomatoes are essentially doing a tomato confit type thing. Too little olive oil and your tomatoes will end up drying out.
- pasta - you can use any shape you like, we went with casarecce the first time and rotini the second time and both were great.
- garlic - a couple cloves of minced garlic are mixed in and the residual heat of the tomatoes mellows the sharpness out while still giving you a huge hit of garlicky goodness.
- basil - fresh basil and tomatoes are perfect pairing. Slice some up to stir in and keep some extra leaves whole to garnish with!
Tomatoes
It’s tomato season and summer is the perfect time to make Tiktok baked feta pasta. There are so many sweet tomatoes out there right now and they’ll all add a nice seasonal twist to this comfort classic. Even if you aren’t a tomato fan, fresh, ripe, in-season tomatoes just hit different, so give them a try! Just remember to keep your tomatoes on the countertop until you cut them. Refrigerated tomatoes won't taste as good as room temp ones.Don't just stick with cherry, try these:
- roma tomatoes
- grape tomatoes
- beefsteak tomatoes
- cocktail tomatoes
- heirloom tomatoes
Not a tomatoer?
If you’re really not a fan of tomatoes, try these no tomato baked feta pastas:- Zucchini and peppers - chop up 1-2 zucchinis and 1 red pepper in place of the tomatoes.
- Broccoli and lemon - chop up 1 head of broccoli in place of the tomatoes and finish with lemon zest.
How to choose the best feta
Choose a feta that is made from sheep’s milk! Feta made from cow’s milk or goat milk is more crumby. If you want a smooth and creamy feta, sheep’s milk feta is the way to go. Also, younger fetas are more milky and creamy and aged fetas tend to be more complex and intense.Greek feta vs French feta
If you’re not a huge fan of feta but you want to try this pasta, try using French feta. Greek feta tends to be saltier, more crumbly, and tangy which can lead to your sauce being grainy. If you’re Greek feta fan, go for feta that has more sheep’s milk rather than goat. French feta is made with only sheep’s milk and is mild and creamy compared to Greek feta. Bulgarian feta is very similar to French feta: it’s made with 100% sheep’s milk and is not aged as long so it’s a lot creamier and not as tangy.Adding protein
If you’re looking to add some protein to your Tiktok baked feta pasta, it’s super easy, barely an inconvenience. Since the pasta bakes at 400°F for 30 minutes, you can add just about any protein to the baking dish and it’ll crisp up and cook in the oven while the tomatoes are roasting.Pancetta
For a twist, add cubes of pancetta, they’ll crisp up into little nuggets of rich, porky deliciousness.Chicken
You can add chicken to the pan, raw and cubed before you roast the feta and tomatoes. They’ll cook up while the tomatoes are roasting. If you have leftover chicken in the fridge, you can also just stir it into the sauce when you stirring in the pasta.Tofu
If you’re vegetarian, pressed tofu cubed up will add some extra lean protein. Some of the cubes with stay intact and some of them will stir into the sauce making it extra creamy.Help, my baked feta pasta is too tart!
It’s winter right now and there’s no escaping the fact that the cherry tomatoes out there aren’t the sweetest. Because this feta pasta doesn’t really have much sugar in it, the sauce can end up pretty tart or tangy depending on your tomatoes. The easy fix is adding a bit of sugar but if you don’t want to do that, the best thing to do is add some thinly sliced onions or shallots to the baking dish when you’re roasting the feta and tomatoes. The onions will caramelize in the oil and add a jammy sweetness.What is baked feta pasta?
Baked feta pasta is a pasta dish that’s currently going viral on TikTok right now because it’s incredibly easy to make, tasty, and it looks good. It’s based off of a Greek appetizer, baked feta. The first mention of mixing baked feta with pasta was popularized by Finnish blogger Jenni Häyrinen. She called it uunifetapasta or baked feta pasta. Apparently feta pasta is incredibly popular in Finland because a couple of other bloggers also blogged about it as well.Tiktok pasta FAQ
What if I don’t like feta?
If you don’t like feta, try using French feta which has a bit of a milder flavor or even a different kind of cheese. This pasta recipe will also work with brie, ricotta, fresh mozzarella, or even cream cheese.Do I have to use cherry tomatoes for tiktok pasta?
If you don’t have cherry tomatoes, literally any tomato will work, you want about 1 lb. If you use larger tomatoes, quarter them before baking.What kind of pasta should I use for feta baked pasta?
Any kind at all! I ended up using casarecce which is a cute pasta that’s shaped like an “S.” You can use penne, rotini, macaroni, rigatoni, or even long pastas like spaghetti or fettuccine.What kind of baking dish should I use?
It’s better to use a baking dish that’s not too large – a medium baking dish will help keep all the tomatoes close together and in the olive oil so they don’t dry out too much. We want the tomatoes jammy and soft, not oven dried.I don’t like raw garlic, does the garlic need to be raw?
When you add the raw garlic to the hot tomatoes, the residual heat of the tomatoes and feta will gently warm up the garlic and take off the raw edge while leaving a huge hit of garlicky flavor. If you really don’t want to use raw garlic, you can add it to the pan before you roast the tomatoes, but make sure they are covered in oil so they don’t get burnt.Tips on making Tiktok pasta taste EVEN BETTER
- Add everything to the pan. The original recipe has you stir in raw garlic after the tomatoes and feta are baked in the oven. For an even more delicious pasta, add crushed or smashed garlic directly to the pan when you add the tomatoes. Other aromatics will work too: quarter some onions or shallots for a sweet onion-y addition, or even ginger for a warming touch.
- Think about other herbs. Everyone knows basil and tomatoes go together, but get creative! Add some thyme sprigs, scallions, chives, oregano, parsley, or rosemary. Maybe sprinkle on some everything bagel spice or use Italian seasoning for even more flavor.
- Try a mix of cheeses. Go for half feta and half cream cheese for the ultimate in creamy, cheesy goodness.
Recipes similar to this Tiktok pasta
Did you enjoy making super delicious and easy pasta with under 5 ingredients? You can try these other ones too:- 2 Ingredient Creamy Herby Garlicky Pasta
- Everything Bagel Spice Aglio E Olio Pasta
- Sour Cream and Onion Pasta
- 2 Ingredient Alfredo Sauce
Baked feta pasta
This baked feta pasta has it all, big bold flavors, creamy comfort, and carbs!
- 2 pints cherry tomatoes (or any other tomatoes )
- 1/3 cup olive oil (the good stuff)
- 8 oz feta cheese (1 block)
- 9 oz pasta (of choice)
- 2 cloves garlic (crushed)
- fresh basil (chopped, to finish)
Preheat the oven to 400°F. In a baking dish, toss the tomatoes with the olive oil and place the feta in the middle, turning it to coat it in oil. Season everything with salt and pepper and bake for 30 minutes.
After 30 minutes, turn the heat up to 450°F and roast until the feta is golden brown 10-15 minutes.
While the feta is baking, cook the pasta according to the package directions. Save 1-2 cups of the pasta water, then drain well.
When the feta and tomatoes are done, remove from the oven and immediately add the garlic and crushed red pepper, if using. Stir everything together until the tomatoes and feta combine into a creamy sauce.
Stir in the drained pasta until well coated and creamy, adding in a bit of pasta water to loosen if too thick. Taste and season with salt and pepper. Stir in some chopped basil and finish with crushed red pepper. Enjoy!
This version inspired by Grilled Cheese Social.
Serves 2 hungry eaters generously with leftovers, or 3 for lunch.
Estimated nutrition is for 3 servings (3oz pasta per person).

I Am... Flour Bakery’s Famous Banana Bread
Maybe it’s delusional, but I’m pretty sure that anyone who tastes Flour Bakery's banana bread will turn into a banana bread convert. This is the 10 year anniversary of this post which originally went up today in 2016. That's how much I love, love, love banana bread. I think it’s the best of the quickbread/cake-y breads. Squishy, full of banana flavor, and when done right, absolutely one of the best high-value, low-effort bakes. I don’t think I know anyone who doesn’t like banana bread. I think even people who don’t eat bananas enjoy banana bread.
I'm bananas for bananas
I am one of those people who love bananas. So much so that I recently asked Mike how many bananas in one day is too many? The answer, in case you don’t want to google it, is one to two. Nothing crazy will happen if you eat 6 in one day, but apparently you shouldn’t make a habit of it. Bananas don’t really last long around here because I tend to eat them up. If I want to make banana bread, I literally have to hide bananas from myself. I tell myself I’m just ripening them in a paper bag, but really, out of sight, out of mind.Bananas for banana bread
The best bananas for banana bread are the sad bananas. The kind that get looked over at the grocery store. They’re the ones that are the sweetest, literally. Bananas continue ripening off the vine and as they ripen, the green banana starch, with the help of enzymes, literally turns into sugar. Green bananas have a distinctly different nutritional make up than ripe bananas. Anyway, all that to say, if you want your banana bread to taste sweet and banana-y, make sure you have fully ripened bananas.I love this banana bread
This banana bread loaf is my absolute go-to. I make it all the time (when I manage to save bananas for it anyway). The flavor is intensely banana-y and the crumb is small, tender and moist. I didn’t come up with this recipe, the genius behind it is Joanne Chang, the owner-baker behind Boston’s famous Flour Bakery. You bet I consumed multiple slices when we visited.Why this banana bread is the best
It’s the ideal banana bread: soft and moist with a super even, tight crumb, spring-y and sticky with caramelized banana notes and just a hint of cinnamon. Don’t just believe me though, this banana bread recipe has won double-blind banana bread bake-offs and the reasons why are:oil
oil-based quick breads taste better than butter-based ones and that’s because oil is 100% fat. Butter on the other hand has water and milk solids along with the milk fat. The milk solids are heavier, resulting in a denser, drier loaf. Oil-based banana breads are tender, soft, and moist. Plus, using neutral oil lets the banana flavors really shine.sour cream
a touch of sour cream is the secret to the tender, rich crumb of this loaf. The acidity activates the baking soda for a lighter loaf and the fat content helps the loaf stay moist. Plus, the subtle tang contrasts the bananas, highlighting their sweetness.many bananas
Before this recipe became my go-to, most of the banana breads I made had either 2-3 bananas. Really, a lot of banana breads just tell you how many bananas you need. Because this is a bakery recipe, Chang lets you know exactly how much banana you need, in grams. That keeps it consistent and banana-y without worrying about what a standard banana size is.cinnamon
I don’t think I’ve ever had cinnamon in banana bread before this recipe. It’s just not something I think of but cinnamon perfectly compliments the sweetness of bananas. It adds a tiny bit of warmth and richness. It’s not so much cinnamon that you notice it, it’s more in the background.low-oven temp
Most banana bread recipes call for a 350°F oven, but Chang opts 325°F. A lower oven temp does equal a longer baking time, but you’re rewarded with an evenly baked perfectly moist throughout loaf. Slowly baking at a lower heat helps the banana flavor intensify and caramelize.To dome or not to dome
Personally I like domed tops on banana bread. Previously, when making this recipe, my only gripe was the fact that the top never domed. For some reason flat topped loaves don’t do it for me. So I added just a touch of baking powder for lift. The tiniest amount so you don’t notice or taste it at all. All you’ll notice is that big, beautiful, loaf-y cracked top.Final thoughts
I’ve been making this banana bread for 10 years now(!) and I’m never gonna stop. I make it full batch, half batch, with Totoro faces, and with chocolate-y bottoms. Over the years, I stopped using a stand mixer and added the tiny bit of baking powder for the domed top. I love it in all forms, but if you’re looking for a lighter loaf, make a half batch in a smaller pan or make three loaves with this recipe. The big loaves are just touch more dense because of the sheer amount of batter that has to fight gravity while the little ones bake up fluffy. That’s it! Gonna go eat a slice or three now! xoxo stephFlour Bakery's Famous Banana Bread
Joanne Chang’s famous banana bread from Flour Bakery: moist, super banana flavor, and so, so addictive
- 1 2/3 cups all purpose flour (210 grams)
- 1 tsp baking soda
- 1/4 tsp baking powder
- 1/4 tsp ground cinnamon
- 1/2 tsp kosher salt
- 1 cup plus 2 tablespoons sugar (230 grams)
- 2 large eggs
- 1/2 cup canola or other flavorless oil (100 grams)
- 3 1/2 very ripe bananas, peeled and mashed (about 1.5 cups or 340 grams)
- 2 tbsp sour cream
- 1 tsp vanilla extract
Arrange a rack in the center of the oven and preheat to 325°F. Lightly butter and flour your loaf pan of choice. This recipe will make one standard loaf or three mini 6 inch x 3 inch loaves.
In a large bowl, sift together the flour, baking soda, baking powder, cinnamon, and salt. Set aside.
In another large bowl, use a whisk to whisk together the eggs and sugar until light and fluffy. If desired, use a stand mixer fitted with the whip attachment and whip until light and fluffy. Slowly drizzle in the oil and whisk to combine completely.
Stir in the mashed bananas, sour cream, and vanilla until combined.
Fold in the sifted flour mix, using a rubber spatula, ensuring there are no lumps of flour or flour streaks.
Pour the batter into your prepared pan and bake for 1 hour and 15 minutes for a standard loaf and 50 minutes for mini loaves. Insert a skewer into the center of the loaf. If the skewer comes out clean or with a few crumbs, the loaf is ready. If the skewer comes out coated with batter, bake for 5-10 more minutes. The top of the loaf should be golden brown and spring back when you press it.
Remove the loaf from the oven and let cool in the pan on a wire rack for 30 minutes, then remove from the pan and let cool completely on the wire rack before slicing. Enjoy!

I Am... Dubai Chewy Cookie (aka Dubai Chocolate Cookie)
The Dubai chewy cookie is going viral on Korean socials and I am absolutely here for it. I’m not over Dubai chocolate and neither is Korea or the internet because there’s a new cookie in town and it’s the chewy Dubai chocolate cookie. I LOVE the filling of Dubai chocolate — I literally eat it with a spoon — so when I saw the chewy Dubai cookies I broke out my trusty jar of pistachio paste and went straight to the kitchen.
What is the Dubai chewy cookie?
If you’ve had Dubai chocolate, think of the crispy, crunchy, creamy pistachio kadyif filling, but instead of it inside a chocolate bar, imagine it in a soft and squishy cocoa dusted marshmallow. It’s kind of like a filled mochi, but way easier to make because you use store-bought marshmallows.Who invented the Dubai chewy cookie?
Du-Jjon-Ku, aka what Koreans are calling the Dubai chewy cookie, is so incredibly popular that Korea is looking at a marshmallow and pistachio shortage. I’m not sure which bakery invented them, but it was one in South Korea. Like most of Asian, they love chewy desserts and the dujionku was invented to please the locals. There are lineups around the block at bakeries that sell the cookie, partially because it’s so good and partially because, well, it’s viral. Much like Lisa (of BLACKPINK) did for Labubus, Jang Wonyoung of IVE is doing for Dubai chewy cookies.Chewy Dubai chocolate cookie ingredients
- kadyif - the best part of Dubai chocolate, the crispy crunchy bits! You can buy it or make it, but I recommend buying it. Dubai chocolate is so popular that they sell it online now. If you absolutely want to make it, it’s super simple, just time consuming. More on how to make kadyif right here.
- pistachio cream - pistachio cream is what give Dubai chocolate that glorious green hue and flavor. Pistachio cream is essentially pistachio paste that’s been sweetened and cut with either dairy or white chocolate. Pistachio cream is more spreadable and liquid compared to pistachio paste. It’s readily available online and in specialty stores.
- tahini - most of the recipes I’ve seen online for chewy Dubai cookies don’t have tahini in them, but I feel like that tiny bit of tahini makes this particular recipe sing. The sesame just adds another note and makes the cookies more multidimensional.
- butter - we’re going to use the butter two different ways: first, to toast the kadyif and second, to make the marshmallow shell.
- marshmallows - you can use mini or jumbo marshmallows, but I like using the jumbo marshmallows because they melt slower and I just inexplicably feel like they work better.
- cocoa powder - a bit of cocoa powder is what’s going to make the marshmallow shell chocolately.
- milk powder - this is optional if you don’t have milk powder at home, but adding it in adds a nice little toasty milky note. I’ve seen many people online omit the milk powder and be happy, but I haven’t tried it since I wanted to stay true to the original.
How to make chewy Dubai chocolate cookies
- Toast - Start by toasting the kadyif in a bit of butter until it is golden brown and crunchy.
- Mix - After the toasted kadyif is cool, mix it up with pistachio cream, tahini, and a sprinkle of salt.
- Scoop - Use a cookie scoop to scoop out balls of the filling. Put the filling in the freezer to let it firm up.
- Melt - Make the chocolate marshmallow shell by melting marshmallows with butter over very low heat.
- Stir - Once the marshmallows start to lose their shape but aren’t yet completely melted, stir in cocoa powder and milk powder. Stir until the marshmallow mix is completely smooth and glossy.
- Divide - Put the marshmallow mix on a lightly oiled cutting board or piece of parchment paper. Use a knife to cut it evenly into 6 pieces.
- Shape - Using lightly oiled hands (or wear gloves and lightly oil) flatten a piece of the marshmallow mix and place a ball of filling in the centre. Wrap and pinch the marshmallow around the filling.
- Dust - Finish the cookies by dusting them with cocoa powder and enjoy!
Where to buy chewy Dubai chocolate cookies
If you’re not a baker or just want to buy some Dubai chocolate cookies, you’re in luck! Well, that is, if you live in Korea and are willing to wait in line. Just kidding, there are a bunch of cafes in North America that are jumping on to the trend, so just do a quick search and see if anyone is making them near you.Tips and Tricks
This is a relatively simple recipe to make, but it’s always helpful to have some insider tips and tricks.- If you’re not into it, don’t make the crispy kadyif. Just buy it. If you like doing meticulous things, by all means you should make it and I have the recipe right here.
- Use a cookie scoop for the filling. Using a cookie scoop will give you the perfect domed ball shape. Once you’re scooped all your filling, freeze it. Freezing the filling helps it keep its shape.
- Add the cocoa powder and milk to the marshmallows once they start melting a tiny bit. They don’t need to be completely smooth before you stir in the cocoa and milk. Marshmallows melt and cool very quickly, so you have to be mindful.
- Use gloves and lightly rub oil on them so the marshmallow doesn’t stick. Work with the marshmallow mixture while it’s still warm. Using gloves will give your hands a bit of protection against the heat and the oil will help with shaping.
- Store in little cupcake wrappers. Even after dusting the chocolate marshmallow shell with cocoa powder, you’ll want to keep all the cookies separate without touching. The best way to do this is to put them individually into cupcake wrappers. Or, if you want them to look like the ones they sell in Korea, they package them up in cute lil domed containers.
How to store Dubai chewy cookies
Keep them in an air-tight container for up to 2 days at room temp if you like a soft and gooey filling or in the fridge if you like a firmer, crunchy filliing. That’s it! I’ve taken to making mini ones so I can just pop them in my mouth instead of biting into them. I love mini everything and mini chewy Dubai cookies are even better than the standard size, in my opinion. Happy cookie-ing! xoxo stephChewy Dubai Chocolate Cookie
Chewy Dubai chocolate cookies are going viral on Korean socials and I am absolutely here for it.
- 1/4 cup butter (divided)
- 1 1/4 cup kadayif (chopped ~100g)
- 1/2 cup pistachio cream (~100g)
- 1 tbsp tahini
- pinch of salt
- 4 cups marshmallows (about 7oz (~200g))
- 2 tbsp cocoa powder (plus extra to finish)
- 1 tbsp milk powder
Melt the butter in a large non-stick pan over low heat. When melted, add the chopped kadyif, stir, and toast until deeply golden and crunchy. When golden, remove from the pan and let cool.
Add the toasted kadyif to a bowl and stir in the pistachio cream, tahini, and a pinch of salt. Mix well.
Use a cookie scoop and scoop out the filling on to a parchment paper lined cookie sheet. When all the filling is scooped up, place the cookie sheet in the freezer to firm up.
While the filling is in the freezer, make the chocolate marshmallows. Add the butter and marshmallows to a non-stick pan and heat gently over low heat while stirring.
When the edges of the marshmallows soften, stir in the cocoa powder and milk powder. Stir until smooth, removing from the heat if necessary.
Immediately pour the melted chocolate marshmallow mixture onto parchment paper or a lightly oiled cutting board.
Take the prepared filling balls out of the freezer.
Divide the chocolate marshmallow into 6 even pieces and use lightly oiled hands (or wear gloves and lightly oil them) to press the chocolate marshmallow into flat rounds.
Place a ball of the prepared Dubai filling into the middle of the chocolate marshmallow, enclose and pinch to surround the filling. Repeat as needed. Finish by dusting all of the cookies generously with cocoa powder.
I Am... Shawarma
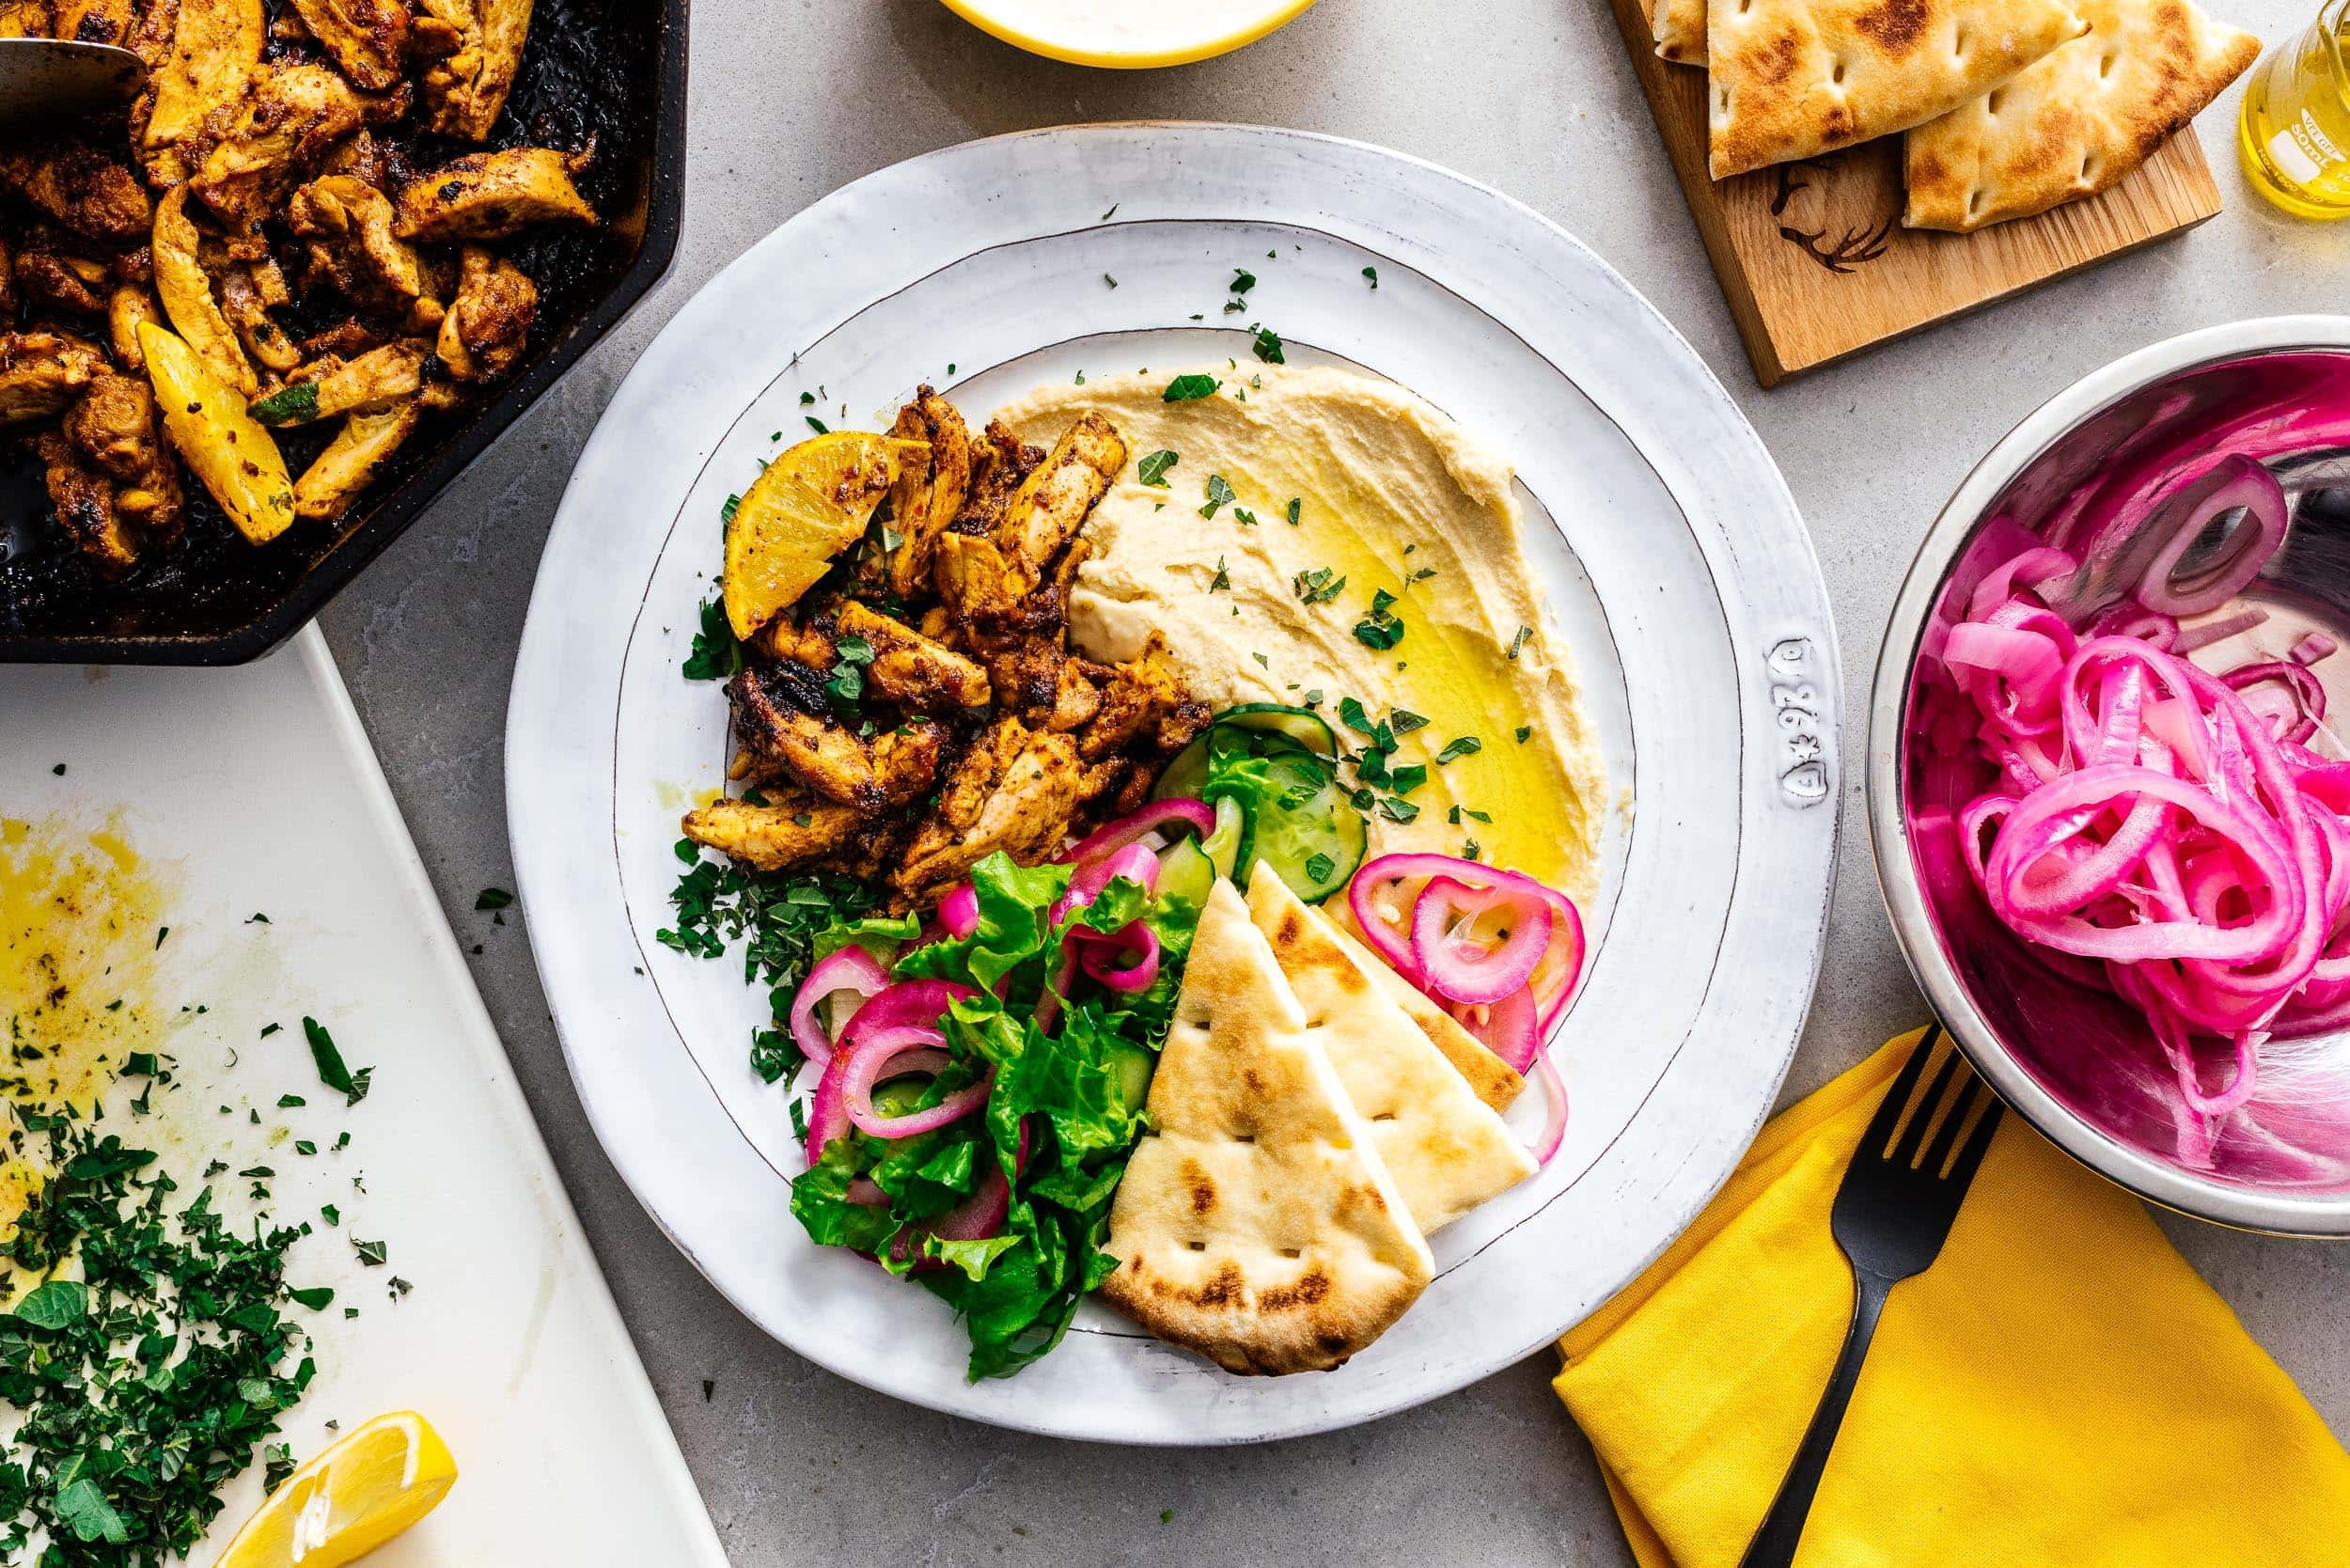
This chicken shawarma is going to blow you away. It's so good and made with pretty much only spices you already have in your pantry. Shawarma is all the good things: crispy charred spiced meat wrapped up in a fluffy pita with fresh lettuce, juicy tomatoes, and crunchy cucumbers. I love shawarma and get it everywhere I go. It’s one of the best combinations on earth, especially at 2 in the morning. Heck, it’s one of the best combinations at any time of the day really. There’s a reason why humans have been grilling meat since the beginning of time and the deliciousness of shawarma is one of them.
How to make shawarma
Shawarma can be made with lamb, beef, chicken, or turkey. In our case, we’re going to be using chicken thighs.- Make a spice mix: In a small bowl, mix together cumin, paprika, garlic powder, coriander, cardamom, ginger, turmeric, aleppo peppers, cinnamon, and ground cloves to make a spice mix.
- Marinate: Add the spice mix, along with olive oil and lemon juice to a bowl with the chicken thighs. Marinate for at least 2 hours.
- Cook the chicken: You can do this in the oven, on the stove, in the air fryer, or on the grill. When it’s done, let it rest, then slice.
- Serve: enjoy hot on a platter with shawarma sauce, salad, and a pita; or place everything in a pita and wrap it up, street food style.
Shawarma ingredients
Shawarma is all about the spice, so aside from chicken thighs, fresh lemon juice, and olive oil, you will need: cumin, paprika, garlic powder, ground coriander, ground cardamom, ground ginger, turmeric, aleppo pepper, cinnamon, and ground cloves.- Aleppo pepper - These little dried pepper flakes are amazing. The aleppo pepper in this recipe is optional, so leave it out if you’re spice adverse. But if you’re adventurous, please give it a try. It’ll add just a hint of heat and so much deliciousness. They’re about as half as spicy as regular crushed red pepper flakes but so much more flavorful: earthy, with a fruity tang.
What is shawarma?
Shawarma as we know and love it, is a staple street food of the Middle East. Traditionally, shawarma refers to a Levantine way of preparing meat: thin cuts of marinated meat are stacked in a cone on vertical rotisserie and grilled. The word shawarma itself means “turning.” Typically shawarma is a low cost street food featuring vast quantities of tuom (garlic paste), chicken, pita bread, and fries. You can find it all over the world as plates and wraps, and it's the best thing after a long night of drinking or a quick pick me up anytime.What if I don’t have all the spices?
If you don’t have all the spices and you don’t want to buy them just for shawarma, you can buy a shawarma spice blend instead. It won’t taste the same as this recipe since all spice blends/mixes are different, but in a jam, it will work just the same.
Do I need a vertical spit?
You can get all the flavors of shawarma without the spit! The key is marinating your meats in the same spices that they use at your favorite shawarma shop. If you want that extra bit of char, after your chicken is cooked and sliced, you can aggressively char it in a cast iron pan for extra flavor.How to cook shawarma
- Stovetop - Heat up a cast iron or heavy bottomed frying pan over medium-high and cook the chicken for 3-4 minutes per side until caramelized and cooked through.
- Oven baked - Heat the oven to 425°F and lay the chicken out in a single layer on a foil lined sheet pan and bake for 20-30 minutes, flipping halfway.
- Air fryer - Air fry the marinated thighs at 360°F for 12-15 minutes, or until cooked through, flipping halfway.
- Grill - Heat the grill on medium high. When hot, grill the chicken for 3-4 minutes per side, until charred and cooked through.
Sides
Go all out and create the ultimate mezze platter with:How to serve
You can serve shawarma tucked into a pita like a wrap or you can serve it on a plate with rice, salad, and a pita on the side.Don’t forget the sauce!
Is it shawarma if there isn’t shawarma sauce? I’ve included a creamy garlicky yogurt sauce recipe with a hint of tahini and lemon. It’s so good you’re going to want to eat it with a spoon.Chicken Shawarma Recipe
This chicken shawarma is going to blow you away. Pantry spices + chicken = magic!
- 2 lb boneless skinless chicken thighs
- 3 tbsp extra virgin olive oil
- 1/2 lemon (juice only)
Shawarma Spice Mix
- 2 tsp ground cumin
- 2 tsp smoked paprika
- 2 tsp garlic powder
- 1 tsp ground coriander
- 1 tsp ground cardamom
- 1 tsp ground ginger
- 1/2 tsp ground turmeric
- 1/2 tsp ground aleppo pepper (optional)
- 1/4 tsp ground cinnamon
- 1/4 tsp ground cloves
Shawarma Sauce
- 3/4 cups greek yogurt
- 4 cloves garlic (crushed)
- 2 tbsp tahini
- 2 tbsp lemon juice
- salt and freshly ground pepper (to taste)
Assembly
- 2 cups romain
- 1 cups tomato (cubed, tomatoes of choice)
- 1 cucumber (sliced, optionally salted)
- 1/2 red onion (sliced, optionally pickled)
- 4-8 fresh pita
In a small bowl, mix together the cumin, paprika, garlic powder, coriander, cardamom, ginger, turmeric, aleppo peppers, cinnamon, and ground cloves to make a shawarma spice mix.
Add the spice mix, along with olive oil and lemon juice to a bowl with the chicken thighs. Season with salt and pepper. Marinate for at least 2 hours.
While the chicken is marinating, make the shawarma sauce by stirring together the yogurt, garlic, tahini, and lemon juice. Taste and season with salt and pepper. Cover and set aside in the fridge until ready to eat.
Heat up a cast iron or heavy bottomed frying pan over medium-high and cook the chicken for 3-4 minutes per side until caramelized and cooked through.
Slice the chicken into bite sized pieces and enjoy hot on a platter with shawarma sauce, rice, salad, and a pita; or place the shawarma in a pita with lettuce, tomatoes, cucumbers, onions, and drizzle with shawarma sauce. Optional: After slicing the chicken into bite sized pieces, and add back to the pan and cook over high heat to add extra char before serving.
If you don’t have all the shawarma spices and you don’t want to buy them just for shawarma, you can buy a shawarma spice blend instead. It won’t taste the same as this recipe since all spice blends/mixes are different, but in a jam, it will work just the same.
I Am... 8 Super Easy Steak Sauce Recipes
Whether they're super aged pieces of steak-y art or supermarket 2-packs, these 8 steak sauce recipes will take your steak dinners to the next level. Life is too short not to eat steak! If you’re looking for an easy yet impressive home cooked meal for date night, the answer is – and forever will – be steak. There’s just something about making steak at home that is so incredibly impressive. I love it when Mike makes me steak and I know that he’s equally happy when I make it for him. It just seems extra luxe to be making steak at home. It probably has something to do with the fact that steakhouses tend to be high end fancy affairs. But the secret to steak is: you can make it at home just as good or even better for a fraction of the cost.
Read More →
I Am... Chicken Tinga Recipe
Tinga is life. Juicy chunks of chicken in a tangy slightly spicy tomato and chipotle sauce is so, so good and I am addicted. Recently Mike found a new-to-us super authentic Mexican place and since he was feeling like burritos we planned to spend the afternoon with some food to go and a little hanami-style picnic. He had already decided on a chicken tinga burrito but I was kind of unsure. I have this thing where I’m super indecisive when it comes to food. I always want to make the best decision possible. Anyway, Mike ordered his burrito while I waffled between ALL the other choices. His burrito was ready in a flash and I insisted that he eat it right away - because I wanted to taste it too so I could make an informed decision. One bite and I was sold. It was SO delicious. Huge chunks of juicy chicken in a tomatoey chipotle sauce. The plentiful caramelized onions were sweet and smoky and some diced potatoes added a bit of creaminess. I was dead. I had to recreate it the moment we got home.
What is tinga?
Tinga is a Mexican dish made with chicken, called tinga de pollo in Spanish. It’s made with shredded chicken and onions simmered in a tomato and chipotle in adobo sauce. Tinga is super popular in tacos or on a tostada with refried beans, lettuce, cheese, crema, and salsa. It’s smoky, with just a hint of heat. It’s SO GOOD I sometimes just eat it as a stew without rice or tortillas or anything. The best part is that it comes together super quickly but tastes like you’ve been simmering for hours.How to make tinga
Making tinga is super easy:-
- Blend the sauce. This part is easy, just pop the chipotle in adobo, tomatoes, garlic, oregano, and cumin into a blender and blend until smooth.
- Caramelize the onions. Take your time and caramelize the onions until they are golden, soft, and drive you wild with how good they smell.
- Simmer the stew. Add the sauce to the pan, along with the chicken, bay leaves, and chicken stock and simmer until all the flavors meld and everything is delicious.
Chicken tinga ingredients
-
-
- Chicken. Tinga usually uses chicken that’s already been cooked which makes it come together amazingly fast. You can use leftover shredded rotisserie chicken, or just cook some chicken and shred it especially for tinga. Or you can just shred whatever leftover roast chicken you have in your fridge. I like chicken thighs because they’re super juicy but usually I see tinga made with breast, so it’s up to you whichever you like best.
- Chipotle in adobo. This is what adds such a huge amount of flavor to your tinga! Chipotle in adobo come in little cans and are ruby red salty-sweet-spicy-tangy-smoky deliciousness. They are the base of so many Mexican stews and marinades. You can pretty much find them in all grocery stores.
- Tomatoes. Tomatoes add a bit of tang and sweetness to your tinga. We used fire roasted tomatoes for an extra bit of smokiness but you can use regular canned tomatoes or even just sub 4 fresh tomatoes, chopped.
- Onions. Tinga needs onions. They add caramelized sweetness and so much flavor. Take your time where you’re cooking the onions, you want them to brown but not turn black. Caramelizing onions always takes a long time but the flavor payoff is so worth it.
- Spices. Tinga is pretty light on the spices, but absolutely necessary is Mexican oregano and cumin. The cumin adds a warm earthy aroma and the oregano adds lemon-y citrus flavors. But only if you use Mexican oregano, which is different than the usual oregano you find in the spice aisle. Mexican oregano can be found near the Mexican food stuffs in the grocery store and it’s pretty cheap to get a bag. If you don’t have any, you can always sub regular oregano, but try and find some when you have a chance.
-
What are chipotles in adobo?
Chipotles in adobo are key to so many Mexican stews and marinades. Essentially, chipotle in adobo are smoked and dried jalapeños rehydrated and canned in tomatoes, vinegar, garlic, and spices. Keep a couple of cans in your pantry, it’s what we do because we use them all the time. They are super versatile and add so much flavor. You can use them in sauces, glazes, marinades, braises, soups, salsas, almost anything. We usually end up using the can in one go, but you can easily just use one or two and save the rest in a container in your fridge (or freeze them) and use them to add extra umami to anything.Instant Pot chicken tinga
- Blend the sauce and set aside.
- Caramelize the onions on sauté high then add the sauce, raw chicken, and chicken stock to the pot.
- Set to 5 minutes at high pressure. Quick release when done.
- Open the lid carefully then remove and shred the chicken.
- Add the chicken back to the sauce and simmer on sauté high for a couple more minutes until the sauce is reduced.
Crockpot chicken tinga
- Blend the sauce and set aside.
- Sauté some onions in a pan on the stove and when caramelized, add them to the slow cooker, along with the raw chicken, sauce, and chicken stock.
- Set the slow cooker to 2-3 hours on low or 1-2 hours on high. When the time is up, remove the chicken and shred, then add back into the sauce.
Chicken tinga FAQ
The key to making the BEST chicken tingaThe onions:
Caramelized onions are key. They add sweetness, depth, and umami to the dish. Lots of people want to rush this step, but caramelizing onions takes time. Pro tip: use low heat and don’t move the onions around too much.The chicken:
How the chicken is cooked is also super important. Most tinga recipes (including this one) start with precooked chicken so it’s important that your chicken isn’t overcooked. My favorite way to cook chicken is to do it in the air fryer. You can also just poach your chicken right in the sauce, especially if you’re making Instant Pot or Crockpot chicken tinga.The oregano:
Mexican oregano is a different plant than the usual oregano you see in the spice aisle. It’s indigenous to Mexico and has a more woodsy, citrus-lime earthy flavor compared to your typical oregano, which is from the Mediterranean. You can find Mexican oregano in the Mexican aisle at the grocery store and if you can’t, you can sub regular oregano, but try and find some, it makes a difference.How to serve chicken tinga
- as tacos tucked into warm tortillas
- on a crispy tostada with refined beans, lettuce, cheese, crema, and salsa
- In a burrito
- on a giant leafy salad
- on top of nachos topped with a ton of cheese
- as a stew with some Mexican rice
- in taquitos!
What to serve with chicken tinga
Make a plate and serve it up with Mexican rice, beans, pico de gallo, warm tortillas, shredded lettuce, salsa, guacamole, and tortilla chipsIf you have some extra chipotle in adobo, try these recipes:
I feel like I can talk about chicken tinga forever but you probably are drooling, so I’m going to let you go so you can get started on dinner! xoxo stephTinga
The best Mexican inspired chicken stew or taco/burrito filling ever
- instant pot
- 6 cloves garlic
- 7 oz chipotle peppers in adobo (1 small can)
- 15 oz fire roasted tomatoes
- 1 tsp Mexican oregano (sub regular oregano if needed)
- 1 tsp cumin
- 1 medium onion (sliced)
- 1 cup chicken stock (low sodium preferred)
- 2 bay leaves
- 4 cups cooked shredded chicken (or 2lbs boneless skinless chicken)
Add the garlic, chipotles, tomatoes, oregano, and cumin to a blender and blend until smooth. Set aside.
Heat up 1-2 tablespoons oil in a frying pan or skillet over medium heat. Add the onions and cook, slowly, until caramelized and brown, stirring every so often, 5-8 minutes.
Stir in the blended sauce, the chicken stock, bay leaves, and the cooked chicken. Bring to a simmer and cook, covered, for 10 minutes. Taste and season with salt and pepper if needed. Enjoy in tacos, burritos, burrito bowls, flautas, with tortillas and rice, or just as is!
Alternately, if you want to just cook the chicken in the sauce, add the boneless skinless chicken thighs or boneless skinless chicken breasts to the sauce and cook for 12-15 minutes, or until the chicken is cooked through. Remove from the sauce, shred and add back into the sauce.
If you want a less spicy version of this, use just 1/2 can of chipotle in adobo and if you’re really sensitive to spice, you can use only 1 or 2 peppers from your can of chipotle in adobo.

I Am... Super Easy 2 Minute Chocolate Mug Cake
Do you love cake? Do you love mugs? If you answered yes to either question then you know in your heart that mug cake is for you. Mug cake is just so incredibly cozy! What could be better than curling up on the couch with a warm chocolate cake in a mug in your hands? It is the pinnacle of being. Food confession time: when I was a kid, I LOVED those frozen chocolate cakes you got at the grocery store. Deep‘n Delicious is the chocolate cake that has all my warm and fuzzy nostalgic childhood memories. Think Sara Lee but way better. I’m pretty sure it’s a Canadian thing, so if you have no idea what I’m talking about, I don’t blame you. Basically, DND (as it shall now be known) is a frozen chocolate cake with star shaped chocolate frosting piped on top. This is almost as easy as pulling a pre-made cake out of the freezer, but it has the bonus of being warm, so mug cake is my new favorite thing!
What is mug cake?
Mug cake is a cake that’s made in a mug! It bakes up in just a minute in the microwave and is a warm and chocolate-y treat that will satisfy any chocolate sweet tooth. Mug cake is perfect for when you just want a single serving of cake and don’t want to bust out all your baking equipment.How to make mug cake:
- Whisk. Whisk together the milk and oil in a mug.
- Mix. In a bowl (or you can do this straight in the mug) mix the flour, sugar, cocoa powder, baking powder, and salt.
- Stir. Stir everything together then add the chocolate.
- Microwave. Bake your mug cake in the microwave on a plate (in case of overflow), let cool slightly and dig in!
What does it taste like?
Heaven! Seriously, I’m not joking guys, this cake is SO GOOD. It’s moist, chocolatey, and light and fluffy. I love the melty chocolate parts that essentially make it like molten chocolate lava cake. I like it plain, with a little bit of powdered sugar, with whipped cream, with ice cream, oh my gosh, I feel like I need one right now. The best part is that it comes together so quickly. Bonus points for the fact that I almost always have everything right at home.Mug cake ingredients
For this mug cake, you need:- Milk. I use whatever milk I have in the fridge, usually 2% or almond.
- Oil. Try to use a neutral oil that doesn’t have any flavor like canola oil.
- Flour.
- Cocoa powder. For cocoa powder, we need the unsweetened kind, not hot chocolate milk.
- Baking powder.
- Sugar. You can adjust the sugar to you liking, or use a sugar alternative.
- Chocolate chips. The chocolate gets melty and gooey and is the best part! I usually just chop up a bit of a chocolate bar/baking chocolate if I don’t have chocolate chips in the pantry.
No eggs in this mug cake?
Yep, that’s right. This recipe has been updated and there are now no eggs in this mug cake. Eggs tend to make mug cakes have a bit of a rubbery texture, so bye-bye eggs and hello tender, fluffy cake. As a bonus, it’s now vegetarian and can easily be made vegan too. I developed this recipe from wacky cake, a cake that has no eggs in it. I kept it pretty similar but switched out the water for milk.Can I make vegan mug cake?
Yes! This can absolutely be made vegan. Just substitute a milk alternative for the milk: oat milk, almond milk, soy milk, coconut milk, rice milk, cashew milk, macadamia milk.Can I make sugar free mug cake?
You can definitely make a sugar free mug cake by using sugar alternatives like honey, agave, maple syrup, coconut sugar, or even sweeteners. If you’re using sweeteners, don’t swap out the sugar one-to-one, adjust as per the sweetener.Tips and tricks
Each microwave is different in strength so the very first time you make this recipe try experimenting a bit. I find that 1 minute plus 10 seconds in my microwave works best, but you might need a bit extra. Because this recipe doesn’t have any eggs in it, you can have it on the gooey side if you love cake batter. The kind of mug you use matters! One that has straight sides is best and bigger is better. Use a mug that holds at least 1 and 3/4 cups. If you use a smaller mug, you should put the mug on a plate so you can catch the overflow, which will make clean up easier.Variations:
- Cream cheese: add in a nugget of cream cheese when you add the chocolate.
- Nutella: add a spoonful of nutella instead of the chocolate.
- Peanut butter: add a spoonful of peanut butter instead of the chocolate.
- Coconut: use coconut milk and and stir in a tablespoon or two of shredded coconut into the batter.
- Biscoff: add a spoonful of biscoff cookie spread instead of the chocolate and top with crushed biscoff cookies.
Vanilla Mug Cake
If you’re looking for a two minute easy vanilla mug cake, I’ve got you. This is mug cake is fluffy, sweet, and full of vanilla. It’s like a little birthday cake in a mug. Bonus points if you add in sprinkles to make it a funfetti mug cake! Here’s how you make it:In a microwave safe mug that holds at least 1.75 cups of liquid, whisk together:
2 tbsp milk 1 tbsp oil 1/4 tsp vanilla extract 1/8 tsp white vinegar
In a small bowl, mix together:
4 tbsp flour 2 tbsp sugar 1/8 tsp baking soda pinch of salt
- Add the flour mix to the mug and whisk well, making sure there are no lumps. Add in sprinkles now if you want a funfetti cake.
- Place on microwave safe plate and microwave for 1 minute and 10 seconds. If needed, continue to microwave in 10 second increments if it’s not cooked through.
- Let cool slightly and enjoy!
- Optional: Top with a quick frosting: mix together 2 tbsp room temp butter with 1/4 cup icing sugar and splash of vanilla extract or milk until smooth and fluffy.
If you want to bake a whole cake, here are some of my favorite cake recipes:
- Chocolate loaf cake
- Cinnamon streusel coffee cake
- Yogurt lemon cake
- Chocolate birthday cake
- Carrot cake
- Coconut cake
Mug Cake
Do you love cake? Do you love mugs? If you answered yes to either question then you know in your heart that mug cake is for you.
- microwave
- 6 tbsp milk
- 1 tbsp oil
- 4 tbsp flour (1/4 cup)
- 2 tbsp unsweetened cocoa powder
- 2 tbsp sugar
- 1/4 tsp baking powder
- 1 pinch salt
- 1 tbsp chocolate chips (or chopped chocolate)
In your mug (make sure it holds at least 1.75 cups of liquid), whisk together the milk and oil.
In a small bowl, whisk together the flour, cocoa powder, sugar, baking powder, and salt.
Add the flour mix to the mug and whisk well, making sure there are no lumps.
Sprinkle on the chocolate.
Place on a microwave safe plate and microwave for 1 minute and 10 seconds.
Let cool slightly and enjoy!
You may want to microwave your cake for a bit longer depending on how gooey you like your cake. Microwave in 10 second increments after the first minute until it’s done to your liking.

I Am... Easy Dubai Chocolate Recipe
If you think Dubai chocolate is too expensive and/or you've never had it, you need to try making this at home right, right now. Dubai chocolate has been having a moment for a long time now. Way longer than anyone ever expected, because it's actually pretty good. Did you know you can make it at home? It's a little bit of a process but easier than you think. Surprisingly, I never was particularly interested in it; I’m not sure why some things have me locked in obsessed while others are never on my radar. Anyway, the other day my brain (and okay, my endless doomscrolling) got me on video after video of Dubai chocolate. After 10 minutes (okay it was more but I have time blindness) I was convinced. I NEEDED Dubai chocolate in my life. By the way, for an even easier experience, check out these Dubai Chewy Cookies which is almost exactly like Dubai chocolate, but without the tempering. Sure, I could go out and order some or *GASP* go to the source in Dubai, but as the olds like to say, “we have Dubai chocolate at home.” Follow me on my kinda-long-journey - don’t worry I’ll try to keep it kind of short - on making homemade Dubai chocolate.
What is Dubai chocolate?
First off, what the heck is Dubai chocolate? Dubai chocolate is type of filled chocolate bar created by Emirati Fix Dessert Chocolatier in Dubai. Essentially, it’s a milk chocolate bar with a filling of sweet pistachio and tahini cream mixed with finely chopped knafeh. Experience and taste-wise, Dubai chocolate is sweet and crunchy with a roasted nuttiness from the pistachios and tahini. Flavor-wise, it may be pretty classic, but adding in the crispy knafeh was a genius move on Chef Omamalin.The anatomy of a Dubai chocolate bar
- Exterior - the outside of the original Dubai chocolate bar is milk chocolate, but now it comes in dark and white varieties. The different varieties have different colored chocolate artfully splattered on the surface, kind of like edible Jackson Pollock paintings.
- Interior - the insides of a Dubai chocolate bar are a creamy pistachio green with visible strands of crispy kadyif. Breaking into a Dubai chocolate bar is an experience: you get the classic look of a standard chocolate bar on the outside with a unique texture and flavor on the inside.
How to make Dubai chocolate at home
- Make the kadayif - you can skip this step if you have fresh or dried kadayif. If you want to try making your own, check out the instructions after this section.
- Toast the kadayif - Melt a bit of butter over low heat in a large non-stick pan with high sides. When melted, add the chopped kadayif. Stir and toast, until the kadayif is deeply golden, about 8-10 minutes. Keep stirring and take your time. Patience is key, you want everything evenly toasted. When the kadayif is golden, remove it from the pan and let it cool.
- Temper the chocolate - Put an inch of water into a small pot and place on the stove over low heat. Place a heat-proof bowl on top (make sure the bowl is big enough to hover over the water, you don’t want the bottom of the bowl to touch) and add two-thirds of your chopped chocolate. Stir the chocolate until smooth and melted, then carefully take the bowl off the pot and add the remaining chocolate. Stir all the chocolate together until it’s smooth and shiny.
- Make the chocolate shell - Add some of the chocolate to your chocolate bar molds and tip and swirl the chocolate so it coats the bottom, sides, and corners. Tip out any excess chocolate back into your bowl. Put the chocolate mold into the fridge or freezer to set.
- Mix the filling - While the chocolate shell is setting, mix up the filling. In a large bowl, stir together the pistachio cream, tahini, and salt. Fold in the toasted kadayif.
- Fill the chocolate bar - Add the filling to the chocolate shells, about three-quarters of the way up, spreading the filling evenly.
- Seal the chocolate bar - Remelt the chocolate, if needed, the pour onto the bars, smoothing out and sealing the filling inside.
- Let set - Place the chocolate bars in the fridge or freezer until the chocolate sets and is hard.
- Enjoy! - Carefully unmould the chocolate and enjoy!
Homemade kadayif
If you want to make your own kadayif, simply sift together flour, cornstarch, and a pinch of salt. Whisk in water and a touch of oil. When the batter is super smooth, add it to a piping bag with a very small tip. Heat a large non-stick pan over low and drizzle the batter in a circle or zig-zag motion, being careful to not overlap the “noodles”. When the batter pulls away from the pan, it’s done. Scoop it up and place it in a bowl. Repeat until all the batter is finished, then roughly chop the kadayif into 1-inch pieces.Dubai chocolate ingredients
- chocolate - chocolate bars need chocolate. It’s up to you what percent chocolate you want to use. The famous Dubai chocolate bar is milk chocolate, but since I LOVE dark chocolate, I went with that, specifically the Callebaut 811 dark chocolate. Whichever chocolate you decide to use, make sure you use a high-quality chocolate, preferably a high-quality couverture chocolate. Couverture chocolate is
- pistachio cream - The roasted nuttiness of pistachio is amazing with chocolate. For this chocolate bar, we’re going to use pistachio cream, which is a sweetened version of pistachio paste. Pistachio cream compared to pistachio paste is smoother, creamier, more fluid, and sweeter. Pistachio paste is usually used as a filling for pastries or topping for pastries and confections like this chocolate bar. You can find it online, at specialty grocery stores or sometimes even at Costco.
- tahini - a bit of tahini, a sesame paste that contains hulled with sesame seeds. It's a core Middle Eastern condiment and ingredient that adds a delicious roast-y nutty flavor to everything it touches. Tahini is pretty common and you’ll find it in the natural foods section of the grocery store where you find nut butters and other organic condiments.
- kadayif - this can be store-bought or home-made. If you live in an area with Middle Eastern grocery stores, you’ll probably be able to find it, but if you can’t, you can easily make it at home, recipe and how-to below! You can also purchase it online.
- butter and salt - we’re going to use a bit of butter to toast the kadayif so it becomes extra crunchy and golden brown and we’re going to need a pinch of salt to balance out all the sweetness and make the pistachio and tahini pop.
Equipment needed to make Dubai chocolate at home
- deep chocolate bar molds - I used these molds and they work perfectly. They’re nice and deep and demold easily.
- double-boiler - this is just a fancy way to say a small pot with a bowl on top so you can melt your chocolate. Add about 1 inch of water to a small pot and add a heat-proof bowl on top. Make sure that the bowl can sit on the rim of the pot without touching the water.
- silicone spatula and off-set spatula - technically you don’t need these items but they’ll probably help. The silicone spatula is great for stirring chocolate while it’s melting and the off-set spatula is great for smoothing out and evenly spreading the filling and chocolate.
What does Dubai chocolate taste like?
Now that I’ve tasted it, I’m obsessed. I didn’t get it before, but I do now. Flavor wise, you get a hint of depth from the dark chocolate, a deep toasted nuttiness from the tahini and a sweet creaminess from the pistachio paste. The whole bar is a nice balance of sweet and salty. Kadayif on its own has a pretty mild flavor, so it’s more about the texture and the fact that it can take on a lot of flavor without getting soggy. That makes it perfect for stirring into a creamy filling. The pastel green crispy-crunchy creaming filling is not too sweet and pairs perfectly with the snappiness of a good dark chocolate. If you like nutty chocolate, chocolate with things in it or texture in your chocolate bars, you are going to love Dubai chocolate.Can’t get knafeh of it
Dubai chocolate hit peak popularity in 2024 on TikTok due to the duo of the AMSR crunch and vibrant and fluffy pistachio knafeh filling. Plus, the literal fact that it was only available in Dubai made it even more appealing. When I say this chocolate bar had influencers in a chokehold, I’m not exaggerating. People were literally flying to Dubai to get their hands on a chocolate bar. Now, Dubai chocolate has taken over the world and “Dubai chocolate” is synonymous with a pistachio-tahini kadayif filling. You can get Dubai inspired chocolate everywhere, from your local artisanal chocolatier to Lindt, Costco, and Amazon.What is knafeh?
The bulk of the filling of Dubai chocolate is knafeh, a traditional Arab dessert that’s sweet and crunchy made with kadayif, cheese, and a sweet simple syrup called attar. Knafeh hits it all: sweet, salty, creamy, crispy-crunchy on the outside and soft and chewy on the inside. Cleverly, Dubai chocolate’s original name was “Can’t Get Knafeh of It.” That being said, most homemade bars have kadayif instead of knafeh because Emirati Fix Dessert Chocolatier in Dubai now makes many kinds of Dubai chocolate and the most popular and easiest one to make at home is “Dubai Pisatachio” which has kadayif instead of knafeh.What is kadayif?
Kadayif is a kind of pastry that looks like fine noodles. If you know what filo dough is, it’s similar to that but shredded thinly. It’s an essential ingredient in a ton of Middle Eastern pastries and desserts. In the Middle East, it’s sold in grocery stores and is pretty common in the frozen pastry section, pretty much the equivalent of where you’d find frozen pie crusts and puff pastry in North America. It looks raw when you buy it but it’s completely cooked, just not toasted. At home, you can either make your own (more on that below), but it at a Middle Eastern grocery store, or attempt to shred filo dough. I think they’re going to start selling kadayif at mainstream grocery stores though, that’s how popular Dubai chocolate is!Knafeh vs. kadayif
Simply put, knafeh is a dessert and kadayif is an essential ingredient in the dessert. Think of it like shredded coconut and coconut macaroons. Just like you need shredded coconut to make the coconut macaroons, you need kadayif to make knafeh. For the purposes of the Dubai chocolate bar thought, you’ll just need kadayif (the ingredient), not knafeh (the dessert).Dubai chocolate tips and tricks
- Take your time to toast - the whole point of Dubai chocolate is the crispy crunchy filling so take your time to toast the kadayif. Do it on low, stir it regularly and make sure it isn’t too pale or burnt. Letting it cool completely before mixing it in with the pistachio paste and tahini helps it stay crunchy.
- Temper your chocolate - this is a fancy way of saying melt the chocolate so it sets properly so your chocolate bar isn’t melty when you eat it. To temper chocolate, melt two-thirds of your chocolate, then move the bowl away from the heat and stir in the remaining one-third of the chocolate. Using some unmelted chocolate to cool down the melted chocolate helps it set faster and makes it easier to pour and work with.
Dubai Chocolate
Dubai chocolate has been having a moment for a long time now.
- chocolate mold
- 2 tbsp unsalted butter
- 1 batch kadayif (about 2 cups chopped, see recipe below)
- 1/2 lb dark chocolate (chopped)
- 3/4 cup pistachio cream
- 1.5 tbsp tahini
- 1 pinch of salt
Melt the butter in a large non-stick pan over low heat. When melted, add the roughly chopped kadayif and stir. Toast the kadayif until deeply golden and crunchy, stirring occasionally, about 8-10 minutes depending on the heat of your stove. Keep an eye on it and don’t forget to stir at regular intervals so the kadayif toasts evenly. When toasted, remove from the pan and let cool.
While the kadayif is cooling, melt the chopped chocolate in a double boiler. Add an inch of water to a small pot and place it on the stove. Place a larger, heat-proof bowl into the pot - the rim of the pot should support the bowl so that the bottom of the bowl doesn’t touch the water. Place two-thirds of the chopped chocolate in the bowl and turn the heat on to low. Stir the chocolate with a silicone spatula to encourage even melting.
When the chocolate is smooth and melted, carefully remove it from the double boiler and add the remaining chocolate. Stir until all the chocolate is smooth.
If desired, optionally melt white chocolate and color with oil-based green food coloring. Gently splatter into the chocolate bar mold before adding the chocolate for the shell.
Add about 1/4 cup of melted chocolate (per bar) to the chocolate bar mold and tip the mold to spread the chocolate evenly across the bottom, sides, and corners. Pour out any excess chocolate back into your bowl of melted chocolate and scrape off any excess with an offset spatula. Let the chocolate set completely by chilling in the fridge or freezer until hard.
While the chocolate is setting, make the filling. Add the pistachio cream, tahini, and a pinch of salt to a large bowl. Mix until smooth then fold in the toasted kadayif until completely combined.
Take the chocolate bar mold and fill evenly with the pistachio filling to about 3/4 way up the mold.
Gently remelt the chocolate then evenly pour over the filling, using an offset spatula to spread evenly. Place the chocolate bars in the fridge or freezer to set completely.
Unmold and enjoy!
Kadayif Recipe
- 1 cup all-purpose flour
- 1/2 cup cornstarch
- 1/4 tsp salt
- 1 tbsp neutral oil
- 1 cup water
- Sift the flour and cornstarch together in a bowl and stir in the salt.
- Add the water and oil and whisk until smooth.
- Pour the batter through a fine mesh sieve into a liquid measuring glass.
- Place a piping bag into a tall glass, flowing over the edge of the piping bag. Pour the batter into the piping bag.
- Heat up a large non-stick pan on extra low heat. Cut a very small tip into your piping bag then pipe strands of batter onto the pan in a zig-zag or circular motion, trying not to overlap the strands. The kadayif is ready when it starts to lift from the pan. It will be soft, pale and pliable. Use a spatula to remove it from the pan and place it on a plate covered with a slightly damp towel to keep it from drying out. Pipe and cook until the batter is finished.
Estimated nutrition is extremely estimated and dependant on what kadayif you use.

I Am... Easy Authentic Instant Pot Pho (stovetop too)
Pho is maybe the world's most beloved soup. My earliest memories of going out to eat were to pho restaurants. As a Vietnamese person, pho is something I've been making for over 20 years and eaten for my whole life. There are other pho recipes on the internet, but a lot of them don't taste quite right to me, so this one is mine, and I hope you enjoy it too. If you want to fill up on some deep pho love and geekery, read on, or if you would like to just make the best, most authentic pho you've ever made at home, feel free to jump to the recipe using these handy links:
- What is pho?
- Pho soup
- Pho noodles
- Meats
- Toppings & garnishes
- Bowls
- How to make pho
- How to pronounce pho
- Pho variations
- Just skip to the recipe
What is pho?
Pho (properly made) is a deeply spiced and aromatic soup of a clear broth and rice noodles, topped with different cuts and textures of meats and fresh herbs. It doesn't need to be meat, and in fact many Vietnamese have vegan pho, but it's by default beef noodle soup, which is what this recipe is for.Pho soup
A great pho soup is a well made beef broth with charred aromatics, sweetened with sugar, and seasoned with fish sauce. The signature taste of beef pho though comes from the charred aromatics and spices: if you leave those out, you don't have pho, you have generic beef noodle soup.Bones vs Meat
Traditionally pho soup was made with bones, but I prefer a cheap cut of meat. Where we live, bones cost more or less the same as cheap beef because of the popularity of bone broth and marrow. Lately we’ve gravitated towards a cut from the ribs called finger meat (shown below) which I feel has the perfect ratio of connective tissue, fat, and meat to make an incredible pho soup. Using a cut of meat with some connective tissue and fat goes a long way, but any cheap cut of meat, soup bones, or a mix of both will do. I’m a sucker for whatever is on sale. You won't be throwing away the meat once the pho is made either, so there's no wastage if you go the meat route.Charred Spices & Aromatics
Charred aromatics are the most important part of a great pho soup. It's the first thing I learned from my parents when we made pho at home, especially charring the onion. My dad says it's not even pho if you don't do that. The easiest way to char your aromatics is by putting them on a sheet tray and blow torching them all at once. While everyone needs a good blow torch because they're cheap and insanely useful in the kitchen, you can also char over a gas range, on an outdoor grill, in the oven/broiler, or in a cast iron pan. If you're charring over a gas range or even with a blowtorch, just char the larger items: ginger, onions/shallots, cinnamon stick, and star anise. You'll see daikon in the recipe list as well. That's my mom's secret ingredient (it's a lot of people's secret ingredient). You don't need to/can't toast that.Fat content
Every good noodle soup needs fat for the broth to stick to the noodle and pho is no exception. If you prefer to control the fat content of your pho (and can wait a few hours before eating) this is a trick I learned from Ivan Ramen's cookbook:- Leave the pho in the fridge until the fat solidifies (typically 4-6 hours)
- Scoop only the fat out into a small saucepan.
- Melt it over low heat.
- Strain into a small container.
Seasoning
Pho is about balance, but not necessarily subtlety. Personally speaking, I like my pho to be extra. I'll season my pho soup until it's just on the verge of too sweet, then I add enough fish sauce to counter balance the sweetness and create a massive umami bomb. The blandness of the noodles and the brightness of the customary squeeze of lime at the table will temper all the craziness and bring the universe back into balance. The sugar I prefer for pho is rock sugar, which you should be able to get in the Asian aisle of just about any supermarket, and definitely at every Asian supermarket. Some people traditionally use palm sugar. I wouldn't say it's totally worth the extra effort to get special sugar, but if you're in the area already, rock sugar is delicious and very pretty. Regular white sugar is just fine though. On Richness: some commenters complain that this pho doesn't have the richness they're looking for. That richness comes from MSG, which is an essential and authentic, though not traditional ingredient in many bowls of pho around the world. If you think this needs richness, reach for that little red panda shaped bottle. I add about 1 tbsp but in 1 tsp increments.Fish sauce
Not all fish sauces are equal, and you really do get what you pay for, especially when you never pay more than $10 or so. If you aren't shopping at an Asian grocery store, Red Boat is usually your best bet. If you’re at the Asian supermarket though, and see something called mắm nhĩ, go for that: it’s basically the equivalent of first press or extra virgin for fish sauce, and is always a good bet. Never buy mắm nêm unless you are prepared to cook outdoors. Do you even need fish sauce? No. It's traditional, but it's also traditional to use salt or a mix of both depending on how "clean" you want your pho to taste. My mom leaves out the fish sauce in favor of salt these days. I would never consider this. She says I'll change my mind in 30 years.Pho noodles
If you can, get fresh pho noodles, but if you can’t, the dried stuff works too. Sometimes the noodles will be called rice stick or Thai rice stick noodles. Medium thickness is best. Briefly blanch the noodles about halfway to your desired softness, then drain and rinse in cold water so they don't stick too much. Allow them to dry out in a colander for 5-10 minutes while you prepare the other items. Drying out the rice noodles seems counterintuitive since you just cooked them, but it's the secret to flavorful noodles as they suck in the pho broth to rehydrate later.Meats
Pho is beloved not just for its broth but the meaty toppings. Sirloin, well done brisket, flank, tripe, meatballs, the list goes on and on. Anyone who has been eating pho for awhile will tell you that dặc biệt (house special), which is every meat the restaurant has, is the way to go, but at home, you may not want to go that nuts. For me though, a good pho should have 2-3 different meats. If you make this with finger meat, flank, or brisket, you should have some nice well done meat, and to that I’d recommend some meatballs, sirloin that’s been thinly sliced and allowed to cook in the broth (buy sirloin roast to get the nice round pieces), and, for the truly adventurous, tripe/omasum.Sirloin
Sirloin is the star of pho. It's the default inclusion, it's always there. You want it as thinly sliced as possible and cooked only in the soup. Traditionally much of it will be left out of the soup both so you can see how fresh and high quality the meat is, and so that the meat doesn't overcook before it hits your table. It only needs about 30 seconds to cook in the piping hot broth.Meatballs
Vietnamese meatballs are bouncier and denser than what you'd typically think of meatballs as. Their traditional greyish color can be offputting at first, but their deliciousness will quickly retrain your mind to associate them with feelings of fullness and delirious satiety. Because of how dense these are, I like to halve them.Brisket and Flank
Well done brisket or flank's soft fall-apart-in-your-mouth texture is deeply satisfying, but so are the pho-full flavors they pick up in cooking in the pho broth for hours. Properly speaking, they should cook in the pho broth after it's been made and seasoned, but if you are short on time, just cook them at the same time the pho broth is made. They won't have as much flavor, but the texture will still be there. And, will you really notice the flavor as you dip it in your personalized mix of sriracha and hoisin anyway?Tendon
Tendon is chewy, a little crunchy, and so satisfying in a bowl of otherwise very soft things. It can be extremely hard to find unless you go to a butcher or a Vietnamese supermarket. Not even an Asian supermarket typically carries these, but if you see it, you should get it. Tendon should be chopped into bite sized pieces and added along with the bones as it takes hours to properly soften.Tripe
Tripe/Omasum is another slightly crunchy textureful meat that doesn't look as good as it deserves to. It's always been my favorite part of pho. You want it thinly sliced and briefly blanched, 1-2 minutes. I blanch it in the noodle water to keep it white, but again, we can one pot this in the instant pot, it's not that finicky.Toppings & Garnishes
Vietnamese food's claim to fame are the fresh flavors and herbs and pho is no different:- Sliced raw onions and chopped cilantro are basically mandatory in my pho. I realize both are separately polarizing to two different groups of people. They're pretty important to me though.
- Thai basil is a must, but if you can't get any, sweet basil is a sad-but-passable substitute.
- Limes add brightness and offset the salty-sweet-umami-bomb in your mouth.
- Vietnamese food is spicy, but pho isn't, some say that's because it originated in the less-spicy north. Regardless, Jalapeños or Thai chilies are always supplied to fix that issue for the people who love spice.
- Bean sprouts add an earthiness and sometimes crunch to your soup. Many people like to blanch their sprouts and judge a pho place based on whether they took the time to blanch the sprouts first. Other pho restaurants ask you if you want them blanched or not. For me, I don't like them at all and skip them.
- Sriracha and hoisin sauce has been a fixture at pho restaurants since forever, even in Vietnam. Always feel welcome to add them to your soup and especially to make a dip out of them for your meats. They are 100% authentic, despite what Bon Appétit said about that (I still can't believe they didn't delete the tweet).
Bowls
Over the years, I've come to realize that unless you grew up eating noodle soups, you probably don't have the right bowl for pho at home. Serving pho in mixing bowls is pretty sad after you've slaved away for hours on a beautiful pho broth. You need large bowls that can comfortably fit 2 cups of soup as well as noodles and meats, my rule is about 9" wide and 3.5" high. You should also warm your bowls before serving. We just fill them up with hot tap water for 3-4 minutes.How to make pho
Do you really need hours to make pho? Traditionally this is the way it was done at large restaurants, but Vietnamese people embraced the pressure cooker basically the moment it became available, so there is zero shame to making a one hour Instant Pot pho. Bonus, it traps the smells, aka flavor, inside the soup instead of in your house. If you don't own an Instant Pot though, making it the traditional stovetop way or even the crockpot way is easy.How to make pho in an Instant Pot
- Char your spices and aromatics. Ideally with a blowtorch so you can char all the spices at once, but if you have a grill, broiler, or cast iron pan, just char the onion/shallots, ginger, and cinnamon.
- Load everything up in the instant pot along with 4 quarts of water. If you want to do this the easy one pot super fast way, just throw it all in. If you have a little more time, leave out the sugar and topping meats to braise slowly later.
- Cook. Cook the broth on high pressure for 35 minutes. Do a quick release once done. If you intend to eat right away, prepare the rice noodles, meats, and garnishes while the broth is cooking.
- Season. Add sugar (if you didn't add it in the prior steps) and fish sauce (or salt) until the broth is just about overseasoned. It'll balance out once you add the noodles.
- Build. Add rice noodles and sirloin in your bowl, then fill the bowl up with about 2 cups (or more) of pho soup. Top with onion and cilantro, then at the table, let everyone add thai basil, bean sprouts, chilies, hoisin, and sriracha to their liking.
- Enjoy!
How to make pho on the stove
- Char your spices and aromatics. Ideally with a blowtorch so you can char all the spices at once, but if you have a grill, broiler, or cast iron pan, just char the onion/shallots, ginger, and cinnamon.
- Boil the bones and meats for 5 minutes to remove most of the scum, then drain. Ideally, wash the pot again too.
- Fill up the pot with the parboiled bones or finger meat, tendons if using, aromatics, and spices along with enough water to cover. Bring to a very gentle simmer and hold it there for 4-6 hours. If you have flank or brisket, add it in 2 hours before the broth is finished cooking.
- Prepare. Just before you intend to eat, prepare the rice noodles, meats, and garnishes while the broth is cooking.
- Season. Add sugar and fish sauce (or salt) until the broth is just about overseasoned. It'll balance out once you add the noodles.
- Build. Add rice noodles and sirloin in your bowl, then fill the bowl up with about 2 cups (or more) of pho soup. Top with onion and cilantro, then at the table, let everyone add thai basil, bean sprouts, chilies, hoisin, and sriracha to their liking.
- Enjoy!
How to pronounce pho
By now everyone knows to pronounce pho as fuh. But you can be a little closer to the tonal Vietnamese if you pronouce it as if you are asking a question. I think it's closest if you always pronounce the single word as it sounds at the end of this sentence: "Really?! You want to eat pho?!"Other phos to make
- Authentic Instant Pot Chicken Pho Recipe
- The Best Instant Pot Vegan Pho Recipe
- Turkey Pho Recipe
- Pho-strami: A Pho-Forward Take on Pastrami
Authentic Pho Recipe
A pho recipe developed over decades from our Vietnamese family to yours.
- instant pot
Pho spices and aromatics
- 5 star anise pods
- 1 cinnamon stick
- 1 tsp whole cloves
- 1 tsp coriander seeds
- 1 tsp peppercorns (white preferred, black if not)
- 1 tsp fennel (optional)
- 5 cardamom pods (optional)
- 1/2 medium onion (peeled)
- 2 inches ginger (halved lengthwise)
- 1 shallot (peeled and halved)
For the pho soup
- 2 lbs beef for soup (see notes)
- 3 inch daikon (1" slices, optional)
- 4 qt water
- 2 oz rock sugar (~1/4 cup white sugar, or to taste)
- 1/4 cup fish sauce (or to taste)
- 24 oz dried pho noodles (or fresh, see notes)
- 8 Vietnamese meatballs (or more, cut in halves)
- 1 lb sirloin roast (thinly sliced)
- 1 lb brisket (or flank steak)
- 1/2 lb tendon (optional)
- 1/2 lb omasum (optional)
To serve the pho
- 1/2 cup fresh cilantro (roughly chopped)
- 1/2 medium onion (sliced)
- 3 cups bean sprouts (blanched if desired)
- 1 lime (cut into wedges)
- 1 bunch Thai basil
- 1 jalapeño (sliced)
- sriracha
- hoisin sauce
Arrange the larger aromatics on a heat proof baking sheet and blow torch until fragrant. Alternately, toast all aromatics in a cast iron pan on the stove or in the oven broiler for a few minutes until fragrant.
To make the pho soup
Transfer charred aromatics along with sugar and all meats except the sirloin to Instant Pot/Pressure cooker. Fill to the max fill line with water, about 4 quarts. Set pressure to high and cook time to 35 minutes and cook. Quick release the pressure when cooking time is completed. See notes for stovetop instructions.
Once cool enough to taste, add fish sauce 1 tablespoon at a time until it’s just about overseasoned. Add extra sugar if needed. If you go too far, just add water. You may optionally strain the pho at this point to get as clear of a broth as possible.
To serve
Warm your bowls with hot tap water, then drain. Bring a pot of water to a boil and briefly blanch the noodles, then rinse with cold water and drain well. Divide noodles evenly into each of the warmed bowls. Thinly slice the sirloin (if needed) and top each bowl. Thickly chop all the other meats and divide evenly.
Cover with about 2 cups of hot broth per bowl and sprinkle chopped cilantro and sliced onions over top. Serve with a plate of bean sprouts, limes, Thai basil, and chilies. Have small dipping plates of sriracha and hoisin sauces for each person.
We used finger meat in this recipe but the choice of beef or bones is up to you. See the section on meats for more details.
If you don’t have a pressure cooker, bring the beef to a boil along with enough water to cover for 5 mins, then drain and wash the pot. Add clean cold water and gently simmer the beef, tendons if using, aromatics, and daikon for 4-6 hours. You can do this part in a crockpot as well. Try to maintain the same level of water during the cooking process, checking back every 30 minutes or so. 2 hours before the soup is finished, add the brisket. 20 minutes before serving, add meatballs and tripe.
While the nutrition information is as accurate as possible, it is only representative if you consume all of the broth. It includes 1/2 of meat per bowl, which may be a lot more than you have if you didn't go for the optional meats, and includes 1 tbsp of fat per bowl. If you go with 1 tsp of fat, it is 806 calories, and if you go with no fat, it is 773 calories per bowl.

I Am... Tini’s Mac and Cheese Recipe
Tini’s viral mac and cheese is an absolute dream and so rich and delicious. Three kinds of cheese and corkscrew pasta are a match made in heaven. If you’re a mac and cheese lover, this is the recipe you need to try. It's the creamiest, richest, most over the top mac and cheese you may ever make.
What is Tini’s mac and cheese?
Tini’s mac and cheese is a viral Tiktok with over 60 million views and counting. It’s viral in the way people wish their videos could go viral. Everybody and their aunt made her mac and cheese for Thanksgiving, so if you want to give it a try, I’ve detailed it for you below. It’s probably the best thing you can bring to Easter or a potluck or a cookout or a summer BBQ, for real, for real.How to make Tini’s mac and cheese
- Cook the pasta: in a large pot of salted water, cook the pasta over high heat according to the package directions then drain well.
- Make a roux: melt 3 tablespoons of butter in large non stick pan. When it’s melted, add half of the seasoning and stir it around to release the aromatics. Stir in 3 tbsp flour and stir and cook until everything starts bubbling and the raw flour cooks.
- Add the evaporated milk: slowly stream in one can of evaporated milk and whisk immediately. It should start to thicken slightly.
- Add the heavy cream: stir in the heavy cream, whisking it in completely. Whisk in the remaining seasoning and 1 tbsp of Dijon. Let the sauce thicken slightly, whisking occasionally.
- Add the cheese: Add in 1/2 of the cheese, by the handful, whisking in and letting each handful melt before adding more cheese.
- Stir in the pasta: Stir in your cooked pasta making sure all the sauce coats every single noodle.
- Layer the mac and cheese: in an oven safe casserole dish, layer the pasta. Add 1/2 of the mac and cheese to the pan, spreading it out evenly. Then add 1/2 of your remaining shredded cheese. Add the rest of the mac and cheese and finish the top with the last of the shredded cheese.
- Bake: Pop the casserole into a preheated 350°F oven and bake for 25-30 minute or until the top melts and it’s golden and bubbly.
- Broil: Finish it off by broiling for 2 minutes so the mac and cheese gets a nice little crust.
- Enjoy! Add some sliced chives if you want (Tini does!), then scoop and enjoy!
Tini’s viral mac and cheese ingredients
- pasta - Tini uses corkscrews aka cavatappi (pictured above) aka the best pasta for mac and cheese because the sauce goes into the center of the tube and when you bite into it, you’re biting into pockets of cheesy creaminess. You can find corkscrews at most grocery stores or online.
- cheese - there are three kinds of cheese in Tini’s mac and cheese: mozzarella, colby jack, and sharp cheddar. Buy blocks of cheese and grate them yourself. After your shred all your cheese, mix them up and divide them into 2 equal portions.
- butter - you need butter to make a roux or white sauce, go for unsalted.
- flour - flour is the other ingredient in roux. The regular all purpose flour in your pantry is perfect.
- evaporated milk - one can of evaporated milk makes everything super creamy.
- heavy cream - using heavy cream instead of milk makes this mac and cheese even creamier and richer.
- seasonings - salt, pepper, garlic powder, smoked paprika. The garlic powder adds garlickiness and the smoked paprika adds a hint of smokiness in the background. Mix up all the seasonings together in a small bowl so it’s easy to add to the pan.
- Dijon mustard - most people don’t know this but almost all mac and cheese recipes contain some kind of mustard. Tini opts for Dijon, which cuts through the richness of the cheese and adds balance to the entire dish.
Who is Tini?
Tini is a cook (she was also on Next Level Chef with Gordon Ramsey) with a popular Tiktok account with over 5.5 million followers.Mac and cheese tips and tricks
Shred your own cheese - Pre-shredded cheese usually has cellulose in it to make sure the shreds don’t clump and the cellulose makes your mac and cheese grainy. Layer - Just like lasagna, layering mac and cheese is a pro move. You get pockets of melty cheese and a crispy cheese top. Season - Don’t skip the garlic powder, smoked paprika, and mustard! They really add that extra bit of oomph and flavor that takes this mac and cheese over the top. Trust me, you don’t really taste any of the seasonings in particular, instead they just meld together into a really nice flavor note that makes you want to eat more and more.Make ahead mac and cheese
You can make this entire recipe ahead of time up until the point where you bake it. Cover it tightly and keep in the fridge for up to 3 days before baking. To bake it, cover it with foil and bake it for 30 minutes, remove the foil and continue to bake until the mac and cheese is heats through. Finish by broiling.Do you need to use corkscrews?
I've made this many times now and corkscrews are good but so are traditional macs, mini penne, and rotini. Really any pasta shape you love will be just as good because this mac and cheese is so decadent it won't matter, the pasta is just the vehicle to transport the gooey cheesy deliciousness.Is this too rich/complicated/expensive?
Try this luscious homemade scratch Velveeta mac and cheese as an easy to make alternative that will hit all right notes too. Or for a more refined take, try this Pumpkin Sage Mac and Cheese from our noodle cookbook. Happy mac and cheesing friends! xoxo stephTini’s Mac and Cheese
If you’re a mac and cheese lover, this is the recipe you need
- 1 lb pasta (corkscrew/cavatappi preferred)
- 1 lb mozzarella cheese
- 1 lb colby jack cheese
- 1/2 lb cheddar cheese (sharp preferred)
- 1/4 tsp salt
- 1/4 tsp freshly ground pepper
- 1/2 tsp garlic powder
- 1/2 tsp smoked paprika
- 3 tbsp unsalted butter
- 3 tbsp all purpose flour
- 12 oz evaporated milk (~1 can)
- 2 cups heavy cream
- 1 tbsp mustard (Dijon preferred)
Preheat your oven to 350°F. Bring a large pot of salted water to a boil over high heat. Once at a rolling boil, add the pasta and cook it according to the package directions. When done, drain well.
While the water is coming to a boil and the pasta cooks, shred the cheese. Grate the cheese with the coarse side of a box grater. Once you finish grating, mix all the cheese together in a large bowl, then divide into two even portions and set aside.
Make the seasoning mix: in a small bowl, stir together the salt, pepper, garlic powder, and smoked paprika. Set it aside.
In a large pan, melt the butter over medium heat. When melted, add 1/2 of the seasoning mix. Stir, bringing out the aromatics. Add the flour and cook, stirring constantly, until everything bubbles slightly and looks incorporated.
Slowly stream in the evaporated milk while whisking to ensure there are no lumps. Next, add the heavy cream, whisking constantly. Whisk in the Dijon and remaining seasoning mix. Let the sauce come to a simmer and thicken, giving it an occasional whisk.
Add HALF of the cheese. Turn the heat to low (or remove it from the heat if needed) and slowly melt in 1/2 of the cheese, handful by handful, making sure the cheese melts before adding more.
Stir in the drained pasta, making sure to coat all the noodles in sauce.
Grab your casserole dish and add 1/2 of the mac and cheese to the bottom of the dish, spreading evenly. Layer on 1/2 of the remaining cheese then the remaining mac and cheese.
Finish by evenly layering on the last of the shredded cheese.
Bake in the preheated oven for 25-30 minutes or until the top melts and bubbles. Broil for 2 minutes to give it a crispy crust, the remove, let sit for a bit so you don’t burn yourself, scoop and enjoy!
Serves about 10 as a side or 5-6 as a main dish.

Latest Comment
“These are my favorite. Basically foolproof, so easy, and the sauce is delicious. I keep coming back here even 11 years l...”Cat on Spicy Thai Oven-Fried Chicken WingsPopular
 2015 Holiday Giveaway
  One-Pot Lemon Scallop Pea Spaghetti
  Beer Battered Onion Rings, Jalapeno Aioli
  2014 Holiday Gift Guide and a Giveaway
 Easy Gourmet Hot Wings and a Giveaway!
  The Ultimate Veggie Sandwich
  Vegan(!) Creamy Corn Soup Recipe
  Sunday Brunch: Grilled Cheese Eggs Benny