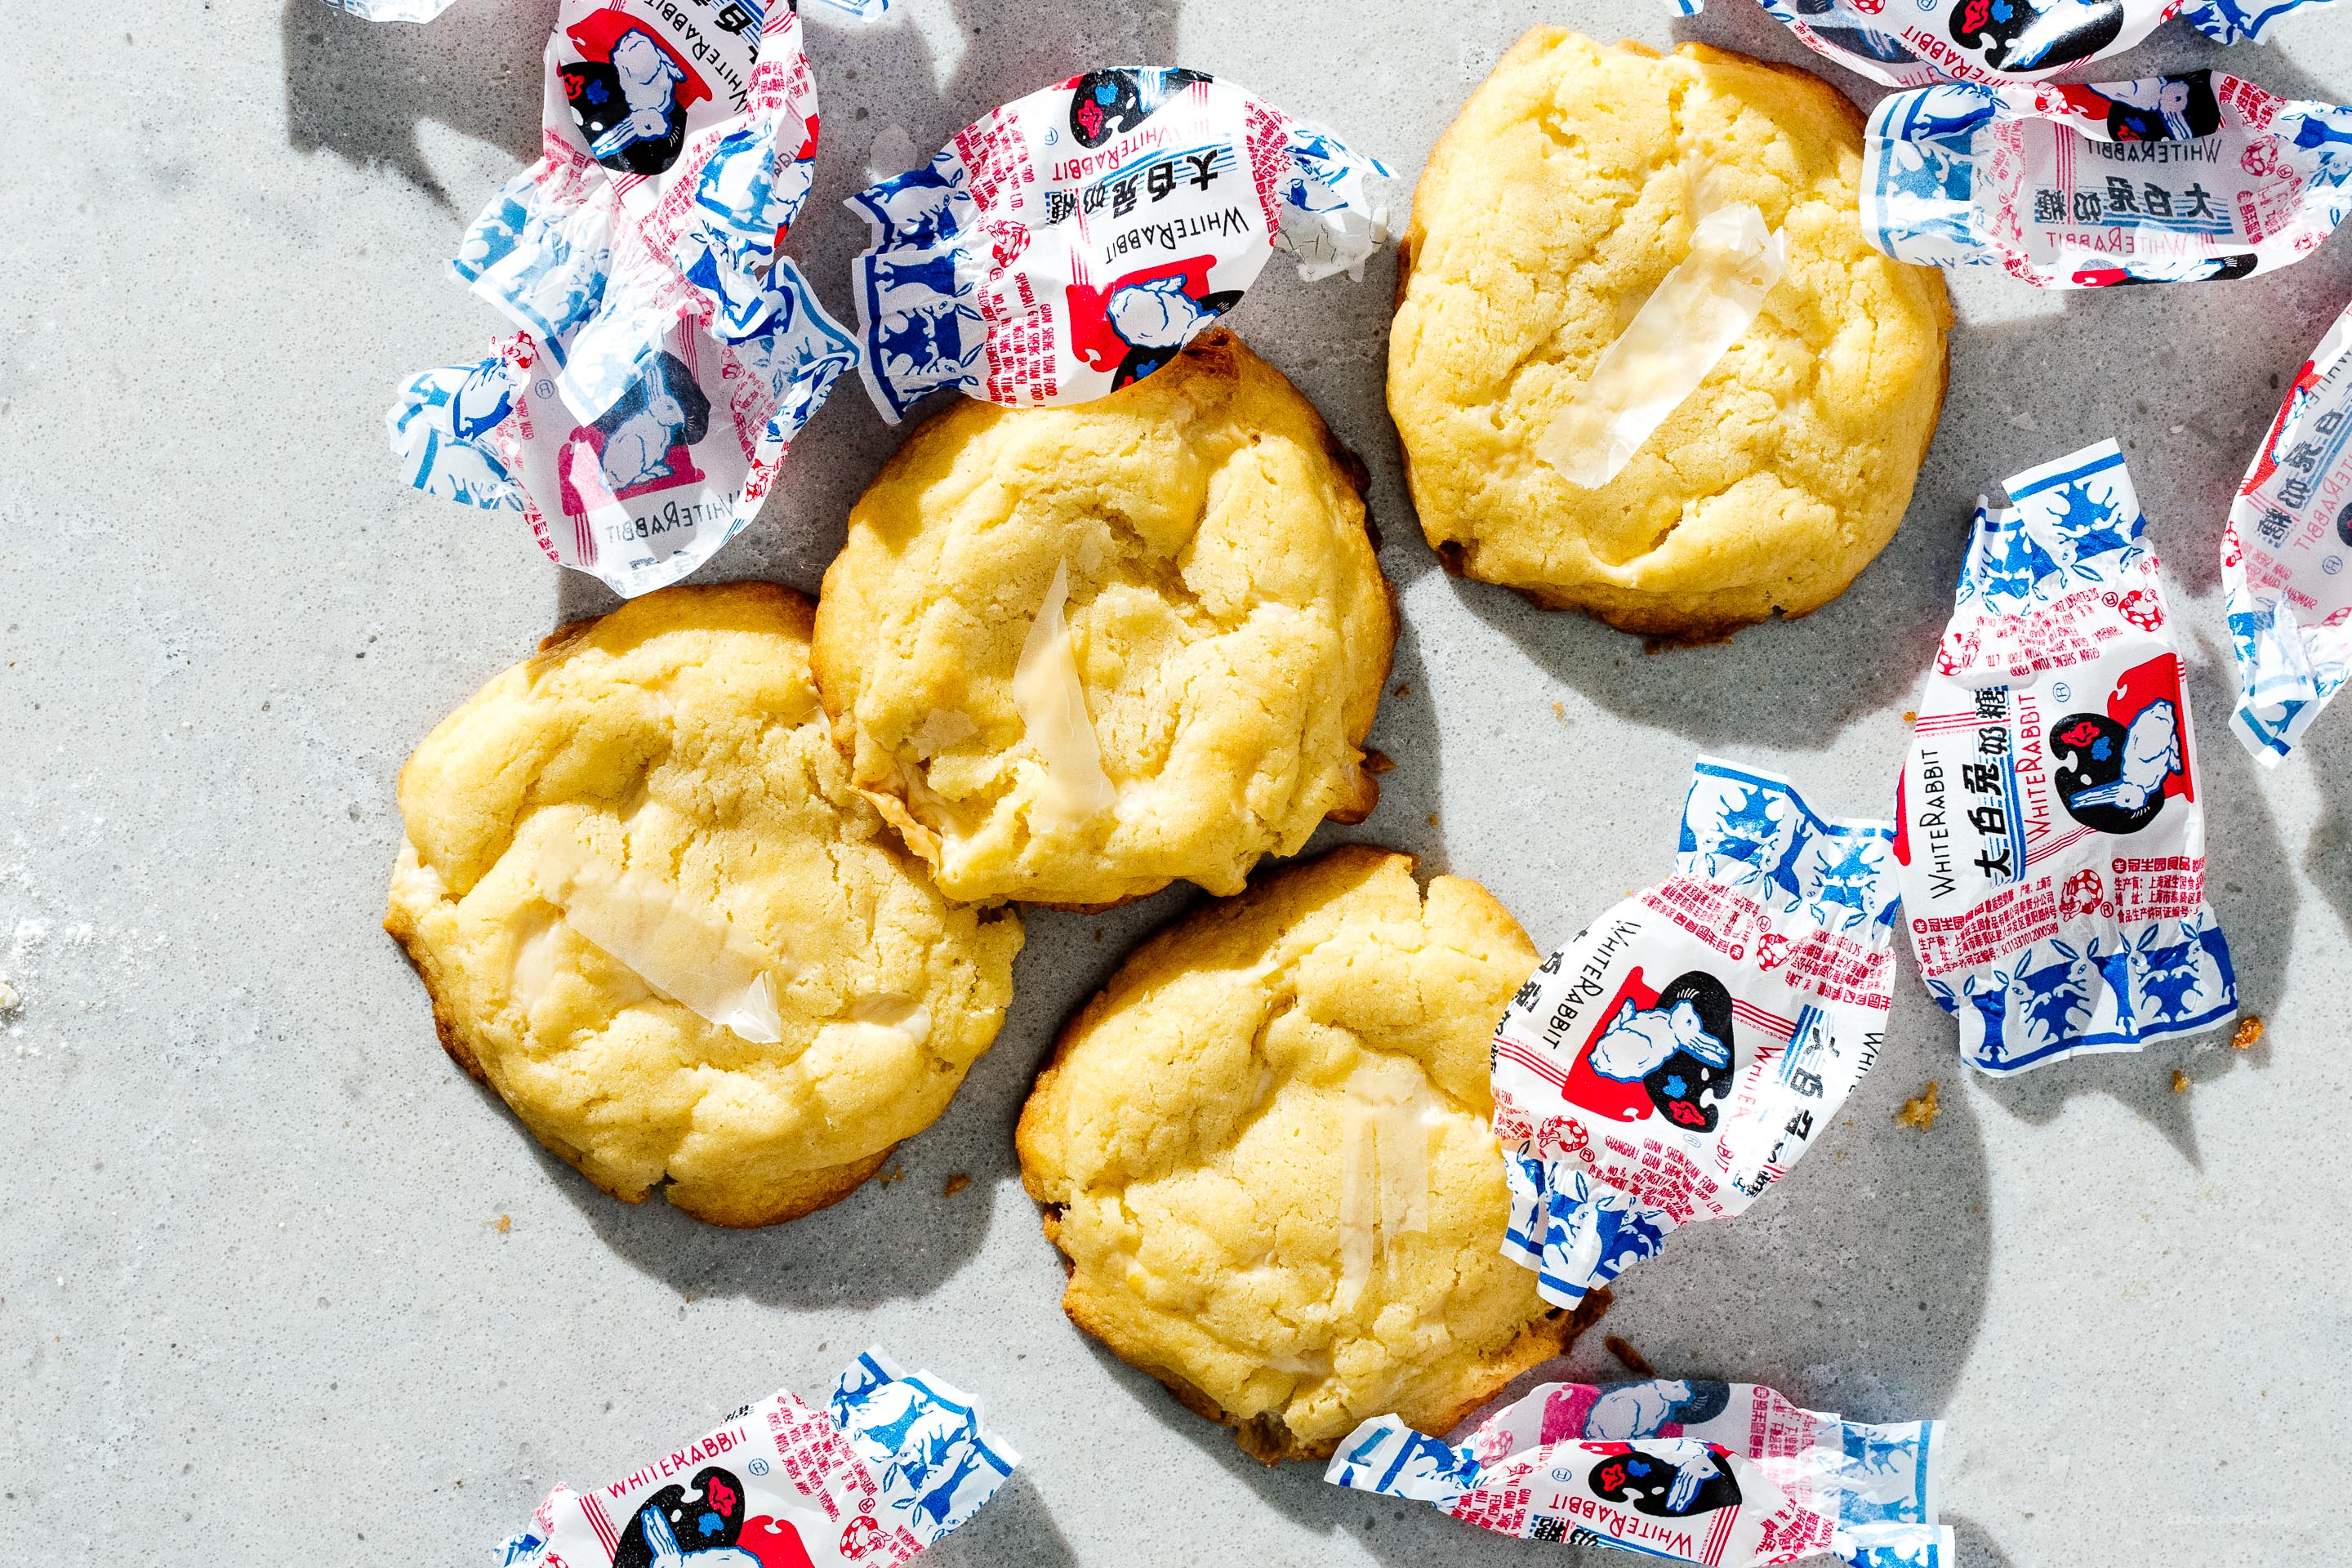
I Am... Small Batch White Rabbit Snickerdoodle Cookies
We are back from Japan and I’m not even jet lagged! Must have something to do with the fact that I spent most of the day and night yesterday sleeping, aside for a quick 3 am (dinner time-ish in Tokyo) snack of cheese toast made on straight-from-Tokyo hand carried on the plane shokupan.
Read More →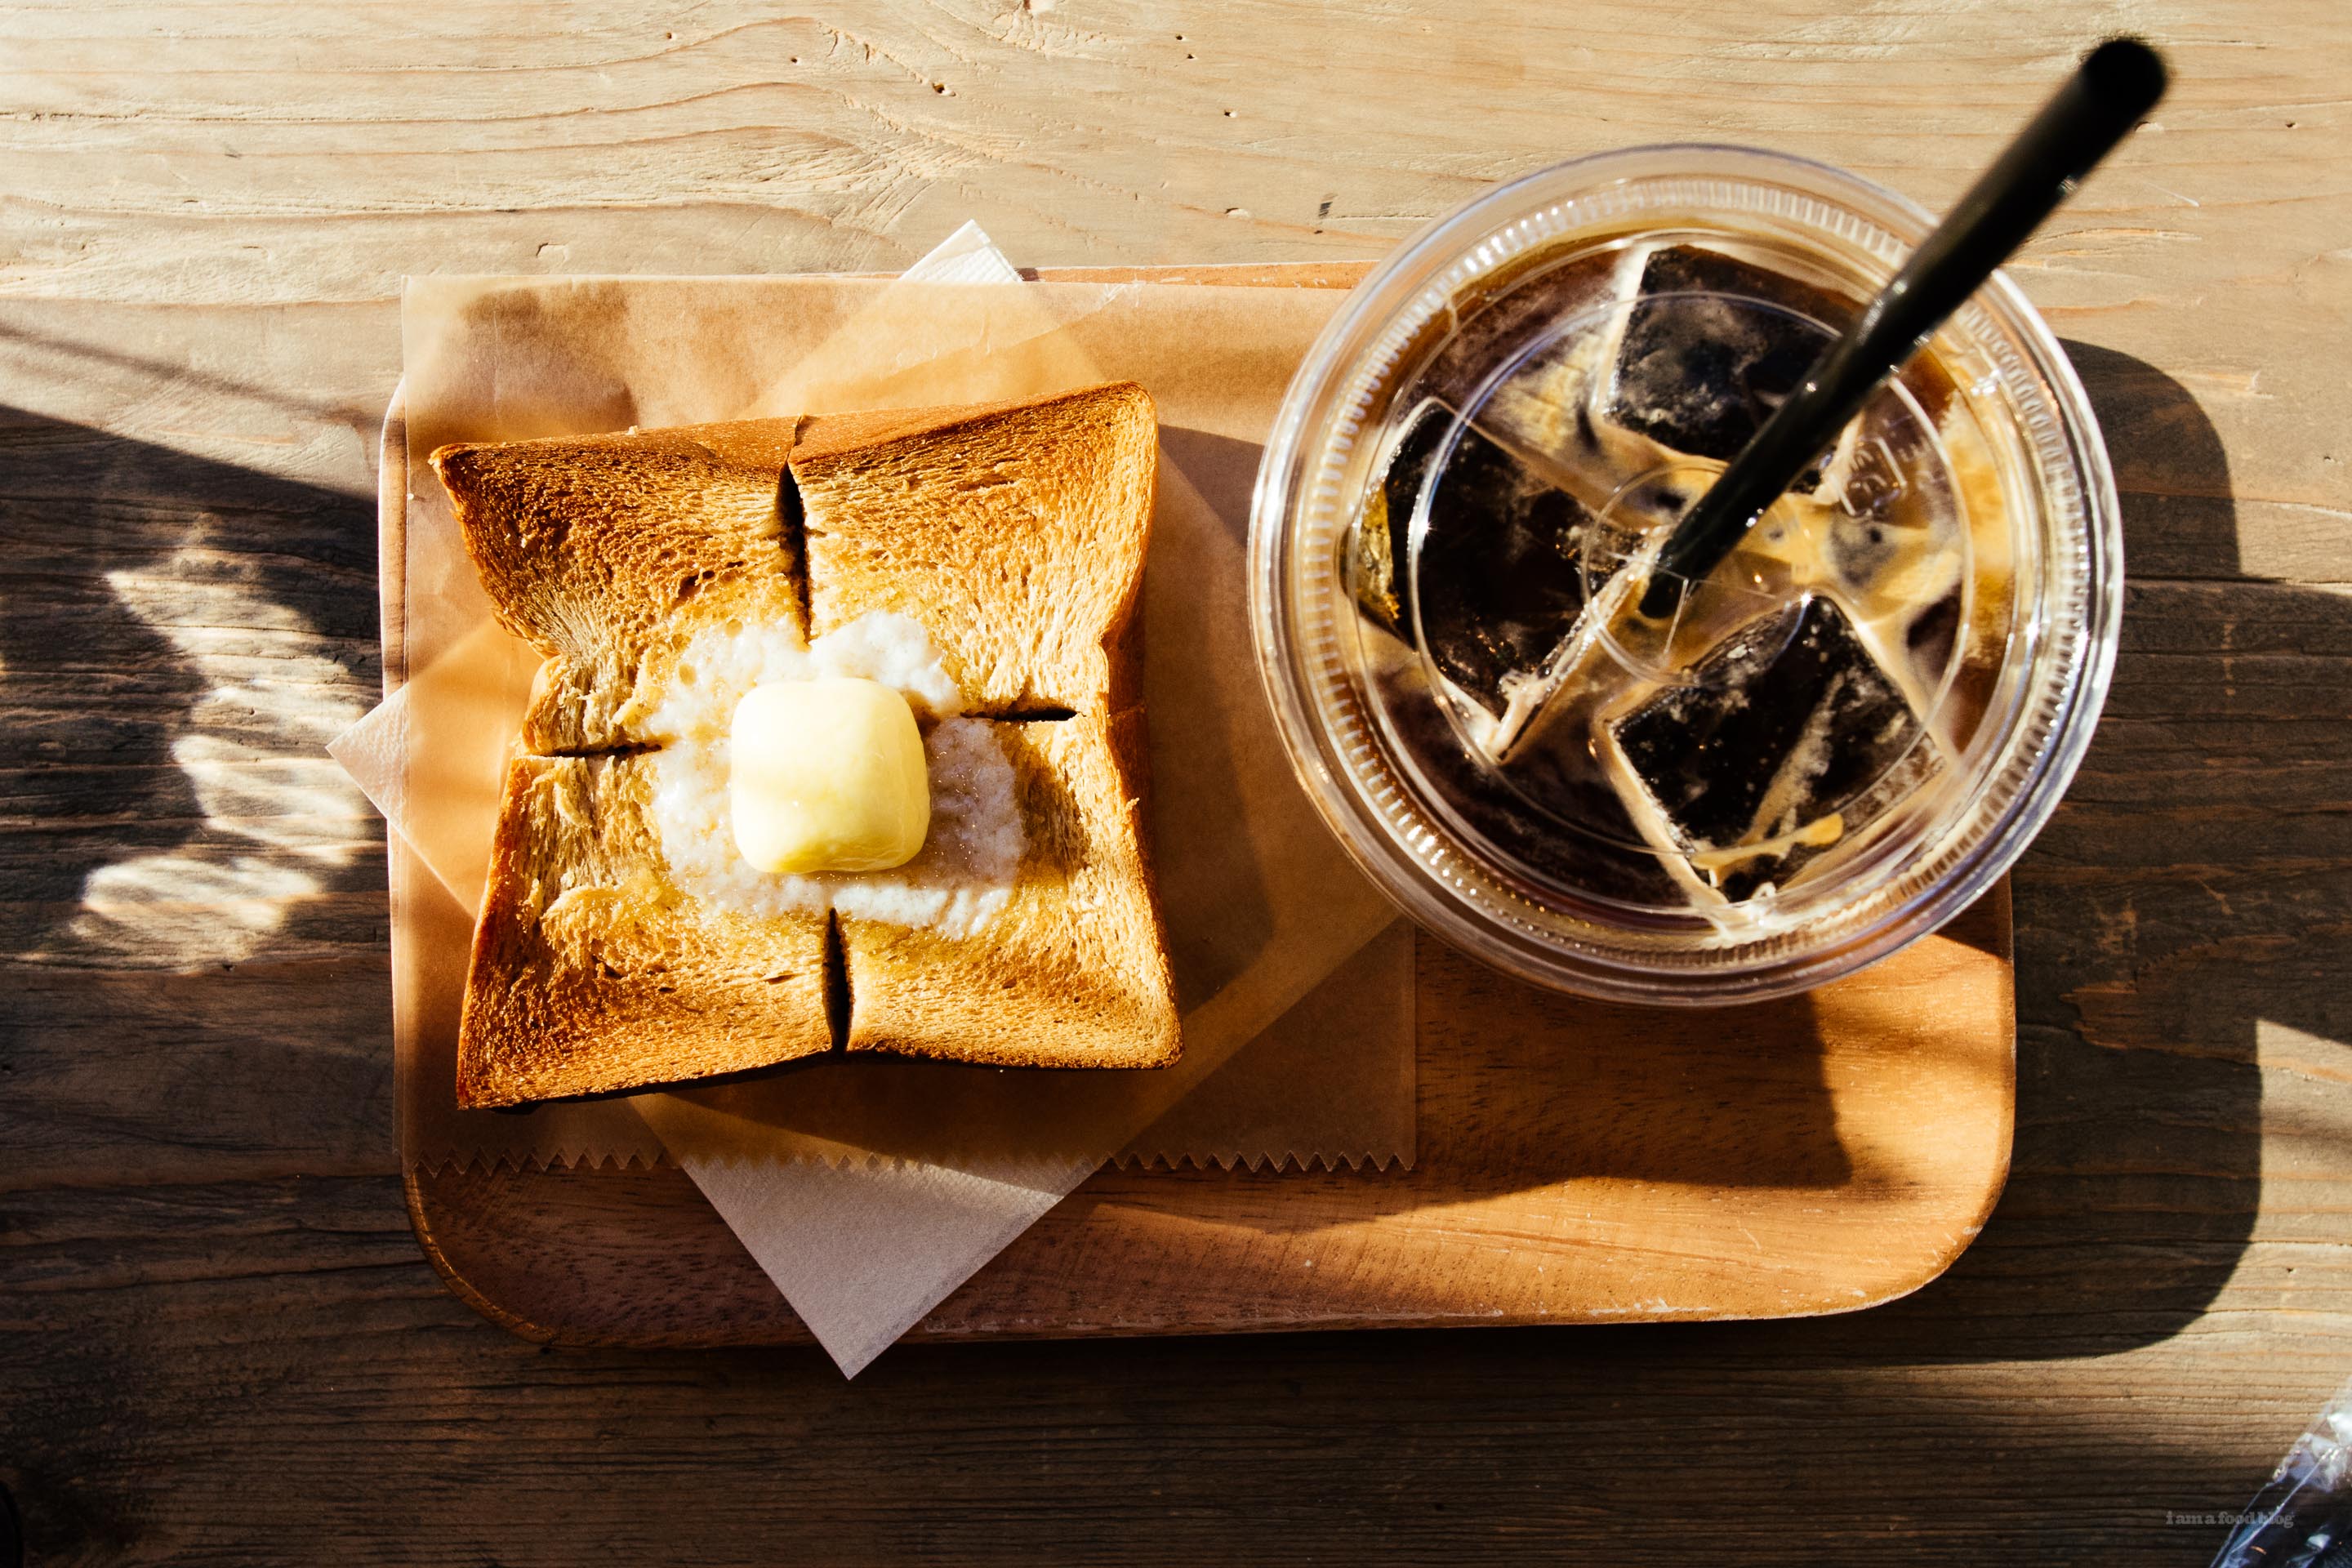
I Am... The Best Places in Tokyo for Fluffy Japanese Shokupan Bread
When you think of Japan, do you think of noodles or rice? There’s no doubt that there are a ton of delicious rice and noodle dishes, but maybe what you didn’t know is: Japan really excels at bread. Usually found in perfectly 90° square sided loaves, shokupan, as Japanese white bread is known as, is unbelievably fluffy, soft, and delicious. Milky cloud white with a tender crumb, it’s a loaf that will take you right back to childhood, conjuring up the images of the ultimate crustless white bread sandwiches you dreamed of your mom making. Of course, that’s a completely subjective view point – maybe I’m the only one who dreamed of crustless sandwiches made from the softest, whitest bread filled with salty smooth peanut butter and sweet strawberry jam. The truth is, Japan is as obsessed about bread as it is about noodles or rice. While shokupan is plain and unassuming, with none of the texture or intense flavors of sourdough, it makes the perfect neutral canvas, much like a plain bowl of rice. Just like how rice can have nuances, so can shokupan. Bakeries pride themselves on both ingredients and history. Much like how you can judge a French bakery by its baguettes, you can also do the same with a Japanese bakery and its shokupan. Here are Here arethree of my favorite places in Tokyo to get the fluffy white stuff! Just a heads up though, much like anything that’s popular in Tokyo, there maybe a line, don’t be surprised if there is, and be absurd be excited if there isn’t. Centre the Bakery Center the bakery has a delightful café where you can choose your own toaster. Choose your own toaster! I feel like that sentence is enough to make you want to go there but if you need more convincing, it also happens to be one of the best shokupan bakeries in Tokyo. They consistently have lines and often sell out of their whole loaves, especially their “European” and “American” style shokupan. If you’re not looking to buy a whole loaf, you can skip the long line on the right hand side of the bakery and line up on the left for the café. Try the toast set which will give you one slice of each type of shokupan, as well as different butters and jams. 365 Days 365 Days is literally open every day of the year, except for leap year days. The original bakery is near Yoyogi Park, on a side street in a somewhat quiet area. That doesn’t stop them from having long lines of bread fans lining up for their famous crunchy croquant chocolat, a bun filled with crunchy little chocolate bits. They do excellent mini shokupan that are made with Hokkaido milk – perfect fresh and even better when toasted and slathered with butter. They’ve opened a new store in the more central location of Shinbashi, so there’s no excuse to not go! Pelican Bakery Pelican Bakery has been around for about 76 years and is still going strong. They only make two items: shokupan and dinner rolls. When you visit their little shop in Asakusa, which is more of a mini store front for their baking facility, you’ll see rows and rows of bread lined up, but they’re not for sale – those are preorders that people have called in so that they aren’t disappointed when Pelican Bakery inevitably sells out of bread. They do have some loaves for sale though, so don’t be afraid to pop your head in and ask. And, if you’re not looking for a whole loaf, Pelican supplies bread to many cafes around town and also has their own, just down the street. Get the toast set, which comes with coffee or tea and a thick slab of freshly baked Pelican bread toasted over an open fire. Serious bread goodness. Anyway, I hope this has inspired you to seek out some Japanese bread. It’s truly one of my favorite things in the world to eat. I love it when it’s fresh and fluffy and chewy, just like what you’d imagine a cloud to taste like; I love it when it’s toasted, with a crisp and crunchy layer giving into soft insides; I just love it.
Read More →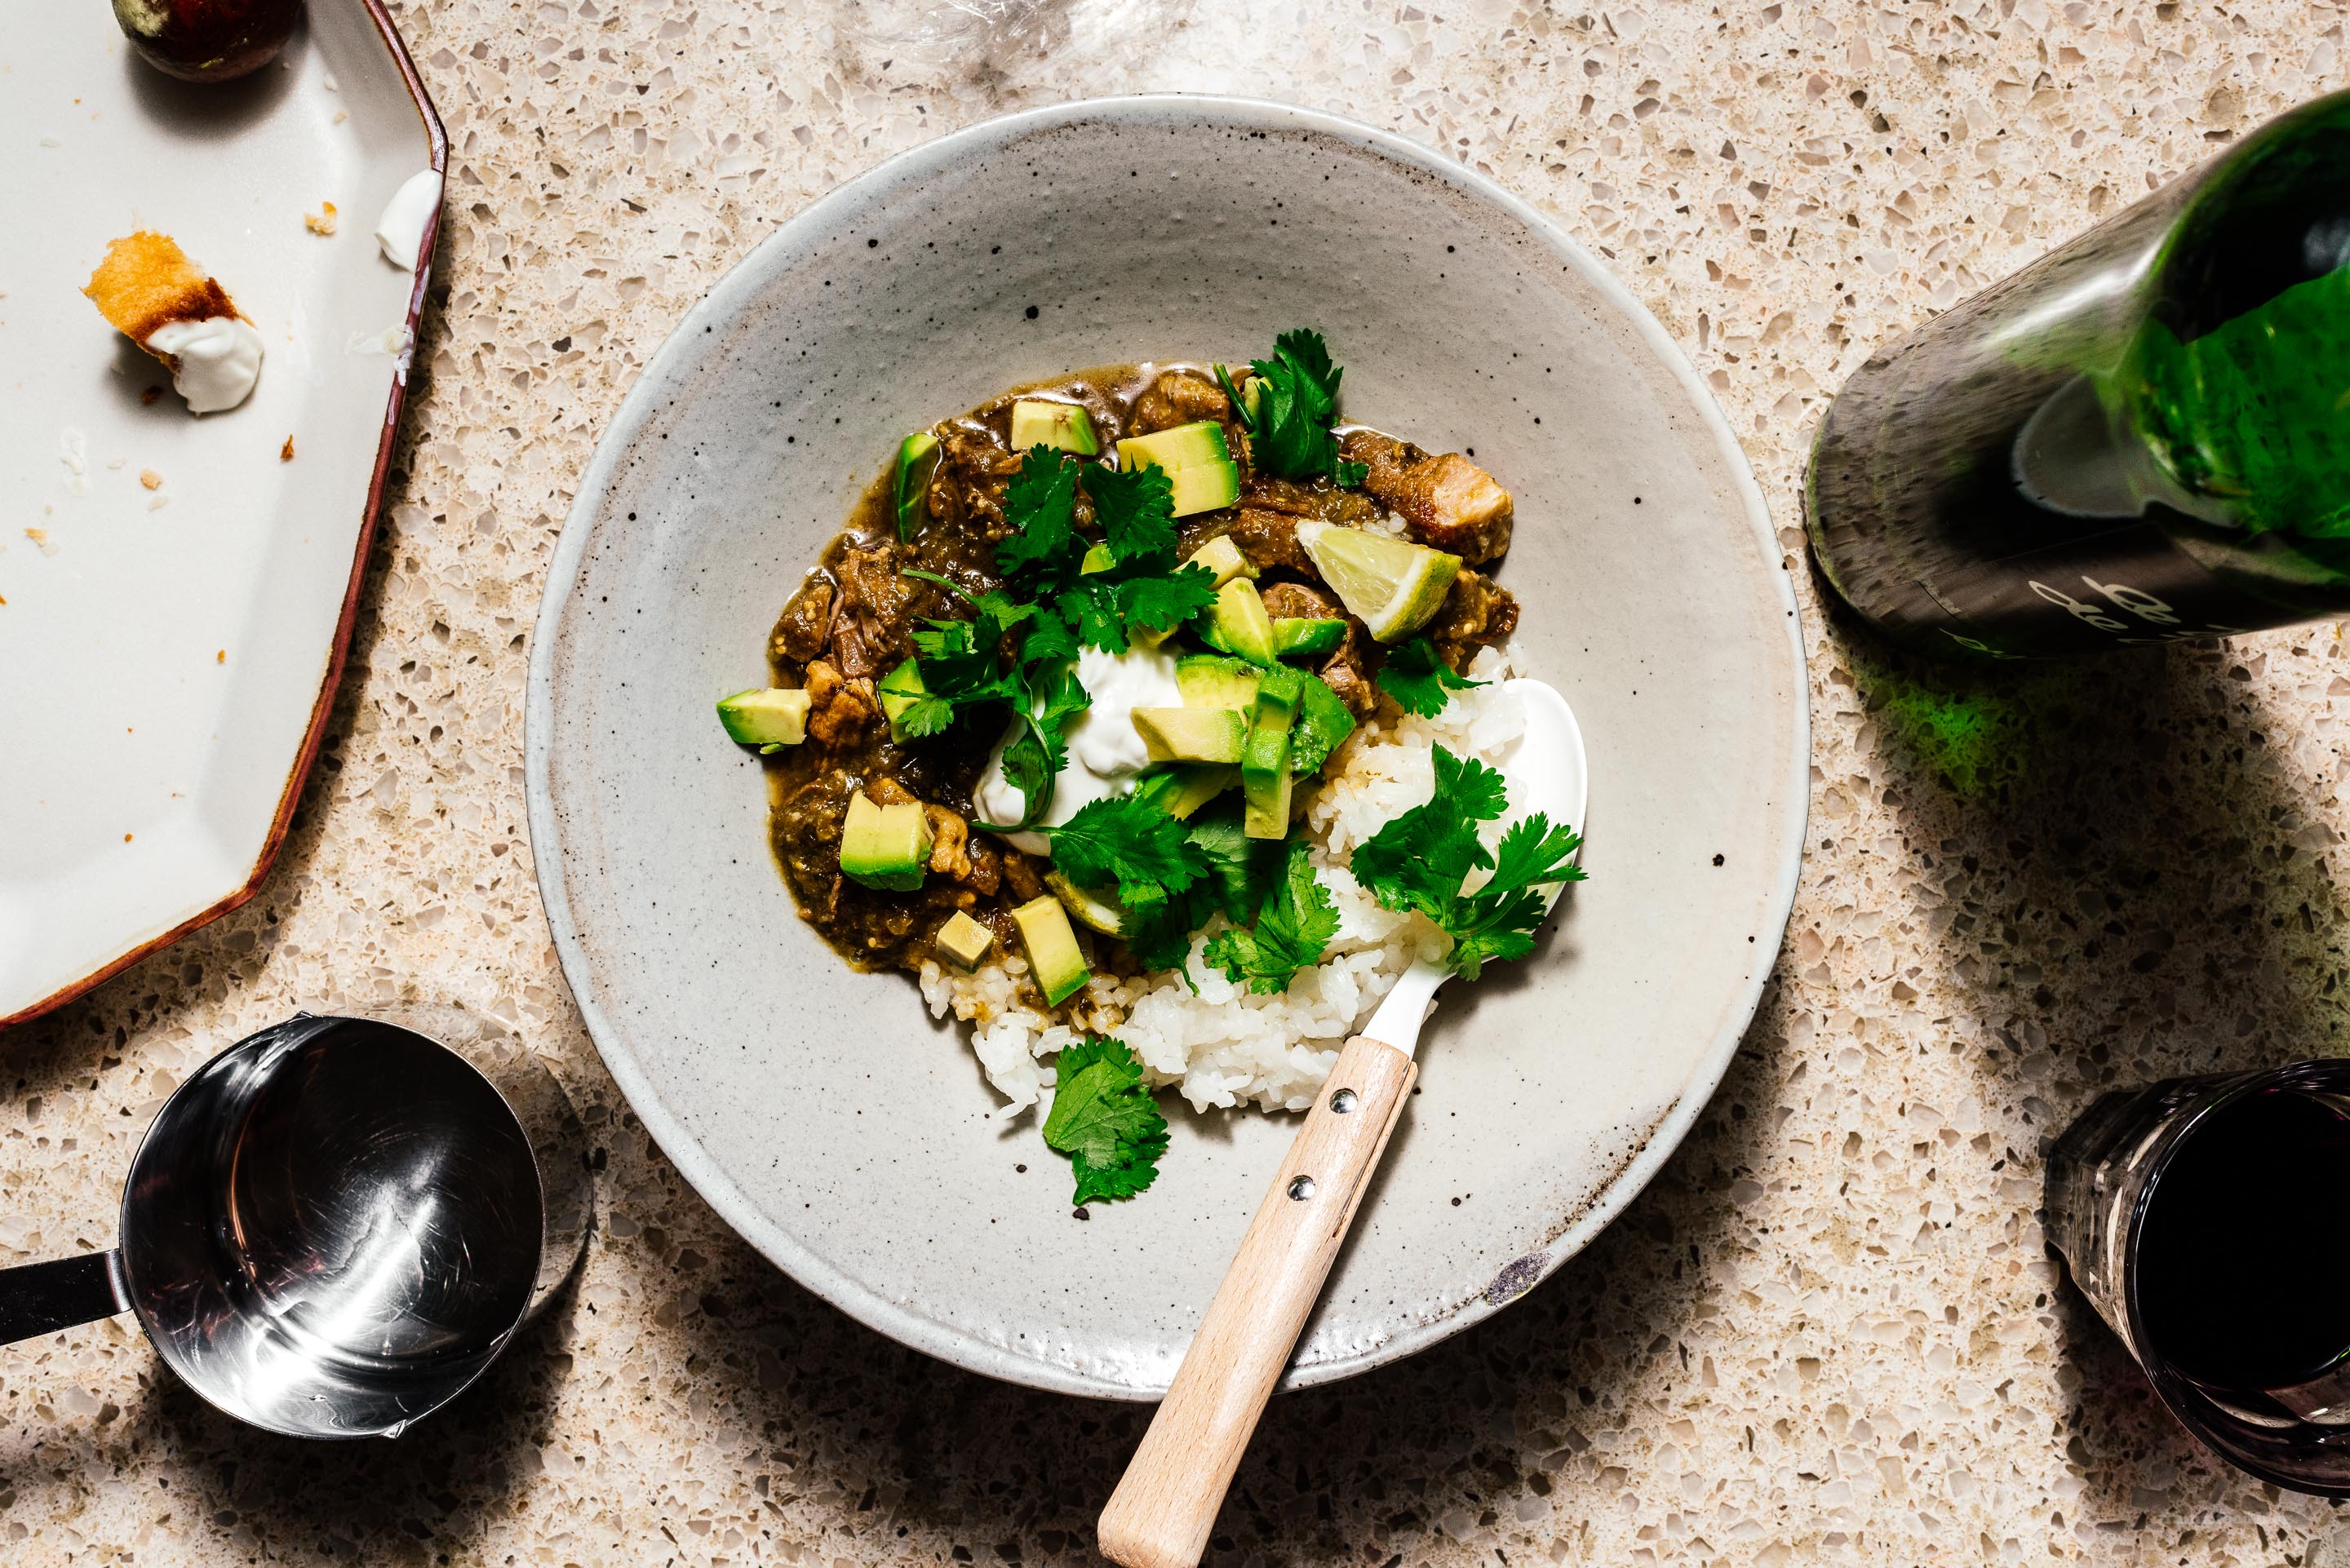
I Am... Instant Pot Pork Shoulder Chile Verde
It's a shame that not more people know about chile verde, aka green chili, because it's one of the greatest stews ever invented, in my opinion. Smoky roasted green chile peppers and tomatillos and super soft chunky pork shoulder come together to make one of the most satisfying meals you've ever had in your life. This version is super simple, removing everything you don't need and keeping only what you do. It's not the easiest dinner & chill recipe, but it's worth it! Cooking Notes Browning the meat is a completely optional step that you can do while you wait for the peppers to roast, but it's not necessary. You can also do a very lazy job of browning only one side which is what I do. Anaheim chiles are actually Hatch chiles that were smuggled out of New Mexico and planted in California. They don't have anywhere close to the smoky heat that real Hatch chiles have, but they are close enough in the middle of winter. If you can't find either, sub any large green chile, such as poblano or any other pepper roughly 6" long. In a pinch, combine jalapeno and bell pepper. This recipe is for 1 pound of pork shoulder, but honestly Steph and I never find it enough. We double the recipe when we make it for dinner. What do you need? An instant pot, a blender, and a baking sheet. If you don't have a blender, crush the garlic and mince the cilantro to the best of your ability and just throw the rest into the pot, it'll dissolve. If you don't have an instant pot, this recipe will also work in a slow cooker, dutch oven, or regular pot, just double the cooking time. How do you serve it? Serve with tortillas, rice, or just eat by itself. Topping with avocado, lime, and cilantro highly recommended.
Easy 7 Ingredient Instant Pot Green Chili Recipe Serves 21. Preheat your oven to broil/500ºF. Using cooking spray or neutral oil, coat the peppers and tomatillos and roast for 10 minutes, then flip and roast for another 10 minutes. 2. Season your pork with salt and pepper. While the peppers are roasting, with your instant pot on saute high mode, roughly brown your pork shoulder in 1-2 tablespoons of oil. It’s not really necessary to get every side browned. 3. Add the onions. Reduce the heat to saute low and continue cooking until the onions are soft and translucent. 4. When the peppers are done, remove them and transfer just the 3 peppers to a ziploc bag to steam. After they are cool enough to touch (5-10 minutes), remove and peel the peppers. 5. Discard the peels and transfer the peppers to a blender, along with the tomatillos, cilantro, garlic, and a pinch of salt and pepper. Puree and add to the instant pot. Add 1 cup of water to your blender and pulse a couple of times to get the last bits, then add to the instant pot as well. If you like your chili on the thicker side, only add 1/2 cup of water. 6. Cook on high pressure for 30 minutes. Quick release when done. Add the cumin, stir well, and adjust the seasoning with salt and pepper. Top with lime, cilantro, and avocado, and enjoy!
- 3 green chiles (ideally anaheim)
- 3 tomatillos
- 1lb pork shoulder, cubed
- 1/2 onion, roughly chopped
- 2 garlic cloves
- 1/2 cup cilantro (half a bunch)
- 1 teaspoon cumin
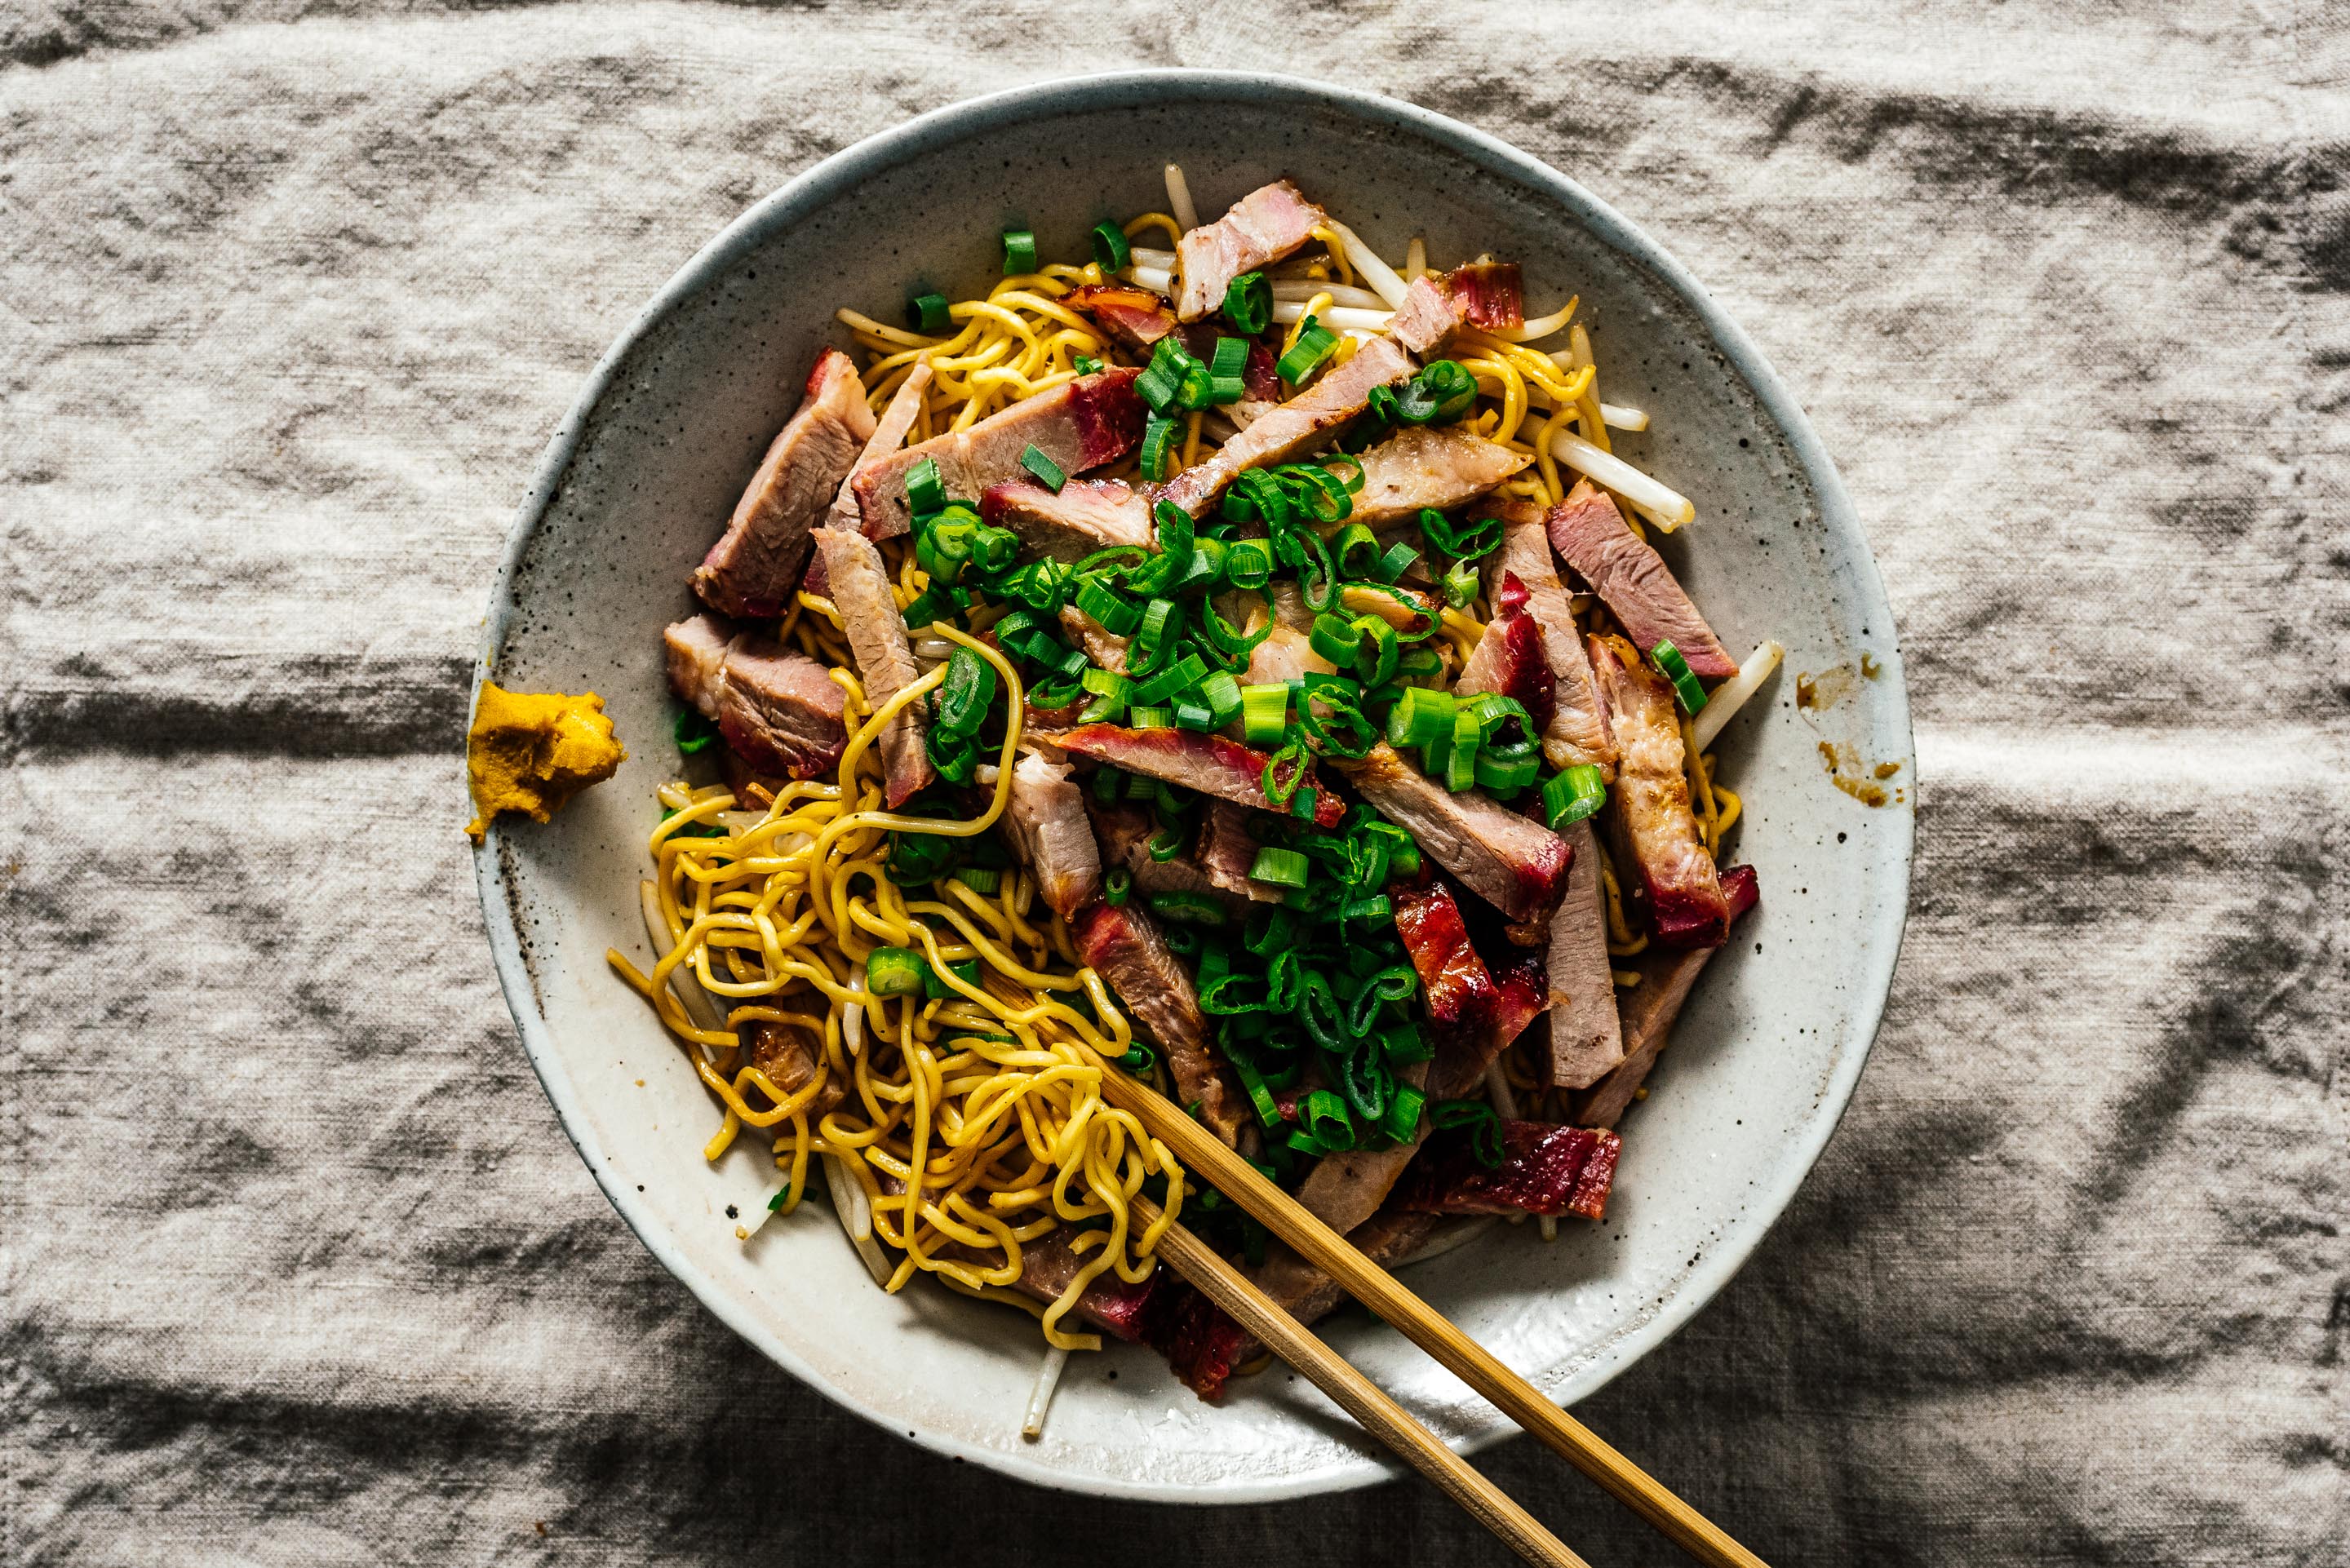
I Am... Dry Mein Recipe from Aloha Kitchen
Do you dream of Hawaii? Its brilliant blue waves, soft sandy beaches, and lush green forests? When you think of Hawaiian food, do you think of pizza? Well, if you do, Aloha Kitchen is here to blow your mind. Aloha Kitchen, by my dear friend Alana of Fix Feast Flair, is a gorgeous collection of all the foods that Hawaii calls near and dear – nary a pineapple pizza in sight. I first met Alana years ago – I’m not even sure how we might have come across each other...oh wait, now that I’m thinking about it, I’m pretty sure I just wandered over to her little part of the internet where I was drawn in by stories of mochiko chicken, spam musubi, and butter mochi cake. I must’ve left a bunch of creepy stalker-ish gushing comments. Somehow we became good friends. We’ve made panda buns together, hung together, and even have been to Hawaii together. It was amazing having Alana show me her hometown. We ate all the things but somehow missed out on dry mein?! If you know anything about me, it’s that I’m a noodle lover. So even though every single recipe in Aloha Kitchen called to me (shave ice! malasadas! plate lunch!), it was the dry mein that really caught my eye. Dry mein is somewhat similar to a lo mein, in that it’s essentially noodles tossed in sauce. Alana’s Hawaiian version is tossed with a soy-oyster sauce, with slivers of Chinese char siu, crunchy bean sprouts, and fresh sharp green onions. I love how just a couple of ingredients come together to create something amazing. I wish I could say that we went all out and made the char siu recipe from Alana’s book, but the truth is, that Mike made these noodles the day before we left for Japan and we didn’t have time to make the char siu. Instead, we went to our favorite Chinese bbq joint to pick up some of the best char siu in town. It’s always insanely busy – the little sit in area is always packed and the line ups are usually out the door. I love having a little Chinese bbq place and according to Alana’s book, so do people on Hawaii! Anyway, this dry mein was awesome, especially with the suggested hot mustard. So noodley and good. I hope you get a chance to make it, and if you don’t, I hope you get a chance to pick up Alana’s book. Flipping through the book is like visiting Hawaii. You really get a sense of that friendly aloha vibe. The photos are vibrant and gorgeous and Alana’s writing makes you feel like a close friend is giving you the best private food tour you could ever imagine. It’s like you’re in Hawaii without the plane ride :)
Dry Mein serves 4-6Read More →via Aloha Kitchen Bring a large pot of water to boil over night heat. Rinse the noodles under the kitchen faucet to remove any excess cornstarch. Place the bean sprouts in a large colander and set in the kitchen sink. Cook the noodles in the boiling water until they begin to float to the top, about 1 minute. Do not overlook the noodles; you want them to be al dente. Pour the noodles into the colander with the bean sprouts. Give the colander a good shake and transfer the noodles and bean sprouts to a bowl. Toss them with the oil, soy sauce, oyster sauce, and black pepper to taste. Toss in the char siu and green onions. Serve with a dash of hot mustard.
- 1.5 lbs fresh noodles
- 6 ounces bean sprouts
- 1/4 cup neutral oil
- 1/4 cup soy sauce
- 2 tablespoons oyster sauce
- freshly ground black pepper
- 1 lb char siu pork, julienned
- 6 green onions, green parts only, chopped
- hot mustard, to serve
I Am... The Ultimate Guide To Sanuki Udon In Kagawa: The Birthplace of the Best Noodles Ever
I have a deep and abiding love for udon. Soba and ramen get all the love, but the humble, unassuming udon noodle is my favorite. Thick and chewy in the best way, super slurpable udon noodles don’t get enough love. They’re just the right amount of firm, with a smooth supple bite. Perfect hot, cold, or anywhere in between. Much like the wine regions in France, many of the prefectures in Japan have their own type of regional udon, differing in thickness, shape, and preparation. There are three ultra famous udon types in Japan: 1. Inaniwa Udon from northwest Akita: thin, chewy, and smooth. Inaniwa udon take up to four days to make and used to only be eaten by the Imperial family. 2. Sanuki Udon from Kagawa, Shikoku, the smallest island in Japan: square cut, firm, and supple. 3. Kishimen Udon from Nagoya, the fourth largest city in Japan: thin and flat. There are many more udon types, but perhaps the most well known both in Japan and abroad, thanks to food tourism, is sanuki. Kagawa is said to have the highest udon consumption rate in Japan - they even refer to themselves as the udon prefecture. As a noodle lover, it just didn’t feel right that Mike and I have never been to Kagawa. So, with empty bellies and open hearts, we boarded the Shinkansen towards the land of broth and udon. We arrived in Takamatsu, the capital city on the Island of Shikoku. It’s pretty small as cities go and we chose it more as a home base, rather than a city that we really wanted to explore. Nonetheless, that first night we managed to have a disappointing mediocre bowl of udon as well as their city specialty: chicken baked on the bone. Neither were anything to write home about. I was still a bit jet lagged (okay, majorly jet lagged) so we called it an early night so we could go udon trekking bright and early the next day.
Gamou Udon
We started off our udon itinerary by hopping on a local train heading east through fields and fields of vibrant green wheat. Our destination was the tiny town of Kamogawa. We got off on the platform, crossed a river, and walked through quiet residential streets until we saw an incongruous parking lot full of cars. The cars were there for the same reason we were: udon. Well, at least their drivers were. There was a line made up of what looked to be udon pilgrims and locals, quietly waiting to get inside for their bowl of udon. There’s barely a menu and all you need to know is if you want your udon hot or cold and how many bundles of udon you’re hungry for. After you let the chef know, he hands you a bowl of udon. Then you get your toppings, pay, and head to the giant pot of dashi that’s on a soft simmer. Fill your bowl and top it off with some green onions and then head outside to eat on a bench. Part of the fun was slurping outside on a sunny day with everyone else doing the same thing. There were construction workers, families, and us. The noodles were just the right amount of firm and chewy – mochi mochi as the Japanese like to say. We got a bowl of both cold and hot so we could compare. The cold udon was a touch more firm and the warm udon soaked in a bit more of the dashi flavor and was just the tiniest bit more supple. A pure and simple bowl. Seriously, nothing beats the combination of udon and tempura. If you love udon, you’ll appreciate the udon here, like much the rest of Japan. Gamou is one of the highest rated udons in Japan.Jotou Udon
After our bowl at Gamou, we headed back on the train towards Minoura Station, a tiny station that consists of a platform by the Seto Inland Sea. We got off the train – we were the only ones who did – and headed across the train tracks towards a tiny little shop by the sea. Looking towards the Seto inland sea you can see the concrete blocks breaking the tide. Looking back towards the tracks, there’s a sun worn blue noren fluttering in the wind to let you know you’re at the right place: a for-the-love-of-udon shop opened by a husband-wife team that runs Japan’s number 6 udon shop according to the ever popular Tabelog – Japan’s definitive restaurant rating catalog. Order your noodles from the friendly proprietress – she’ll hand you a bowl and gesture you towards a vat of boiling water where you heat them up briefly yourself. Top it off with dashi, green onions, and little bits of tempura crunchies. Choose from the small selection of tempura, pay, and find a seat. We sat down at a counter seat next giant window facing the train tracks. There was a small grove of Sakura trees in full bloom. The sun was streaming through the blossoms and a gentle breeze blew soft pink petals through the air. It was like something out of an anime: the warm spring sun, a train rumbling by, the sound of Japanese talk radio murmuring in the background, and the laughter of the husband and wife chatting with each other. I was deeply deeply content, me by Mike's side, the both us of lost in our bowls, slurping in silence. The noodles were thick and slippery and chewy in the best way possible and the experience just couldn’t be beat.Nagata in Kanoka
Nagata in Kanoka is rated the second highest udon in Japan. People travel from far and wide for a taste of their udon. As we got off at the train station, we even noticed another udon fanatic walking towards the restaurant at the same pace we were. When you get there, you’ll see a giant parking lot filled with cars. Cars are definitely a thing in the Japanese countryside - it’s a lot easier to go on an udon tour if you have a car. And for some reason, all the tourists going around eating udon are local Japanese people. Nagata in Kanoka had the feel of serious udon place with a bunch of udon heads, plus some local grandmas and grandpas thrown in. Anyway, much the same as the other udon places, all you can do here is order hot or cold. There aren’t even any toppings to be had. This place is ALL about the udon, nothing else. And the thing is, it didn’t disappoint. We ordered a hot and a cold, of course. The hot came in a bowl its own cooking liquid and a huge jug of hot dashi. You pour the hot dashi into a cup, add some green onions and ginger, then grab some noodles from your bowl and dip it into the soup. The first bite of udon was SO GOOD. Very chewy and slippery but not too soft. The hot ended up being just a touch more soft/supple compared to the cold, as per usual. The cold was beautifully firm yet chewy. It’s the kind of udon you want to eat over and over again. The first bite of the hot udon is very impressive, but the cold is what you’ll go back to time and time again.Ippuku Honten
We visited Ippuku the next day, fresh from a good night’s sleep. It’s only a couple of stations away from Takamatsu, the capital city of Kagawa, so it’s a very easy udon destination, especially compared to some of the other udon shops that we visited. After a short walk from the station, we came across a cute little neighborhood udon shop full of families, young couples, and groups of friends. Ippuku is a casual sort of udon place, the kind where you grab a tray, then head down the cafeteria style line. First you pass by a selection of onigiri, then you let the udon chef know which noodles you want, then you pick up your toppings, pay, find a seat, and slurp away. Ippuku has the most extensive menu of all the udon shops we went to. They have the classics of course, but they also have kama tama, a sort of carbonara type situation with a raw egg; curry udon featuring that classic thick Japanese curry sauce; and niku udon, udon with dashi and thinly sliced beef, kind of like a gyudon beef rice bowl, but on noodles. I was going to go for kama tama, but ended up getting niku udon because that’s what Mike always gets and I always covet his bowl. It was a good move. The beef was tender and sweet, the dashi perfectly seasoned and the noodles...oh my goodness, the noodles were intensely good. Even though they were slightly thinner than some of the other udons we visiting, they still had heft and chew. So slurpable and completely satisfying. It was probably the best udon shop to end on. Fun and friendly, with a room full of laughing udon eating locals. My udon heart was so full. Note: it’s actually unclear which three udons are the top three famous udon in Japan, because there’s some discussion on what the 3rd udon is. Some say it’s Kishimen, some say it’s Mizusawa, some say Himi udon is the third. I guess we’ll never know, but in my heart, sanuki is number one. Read More →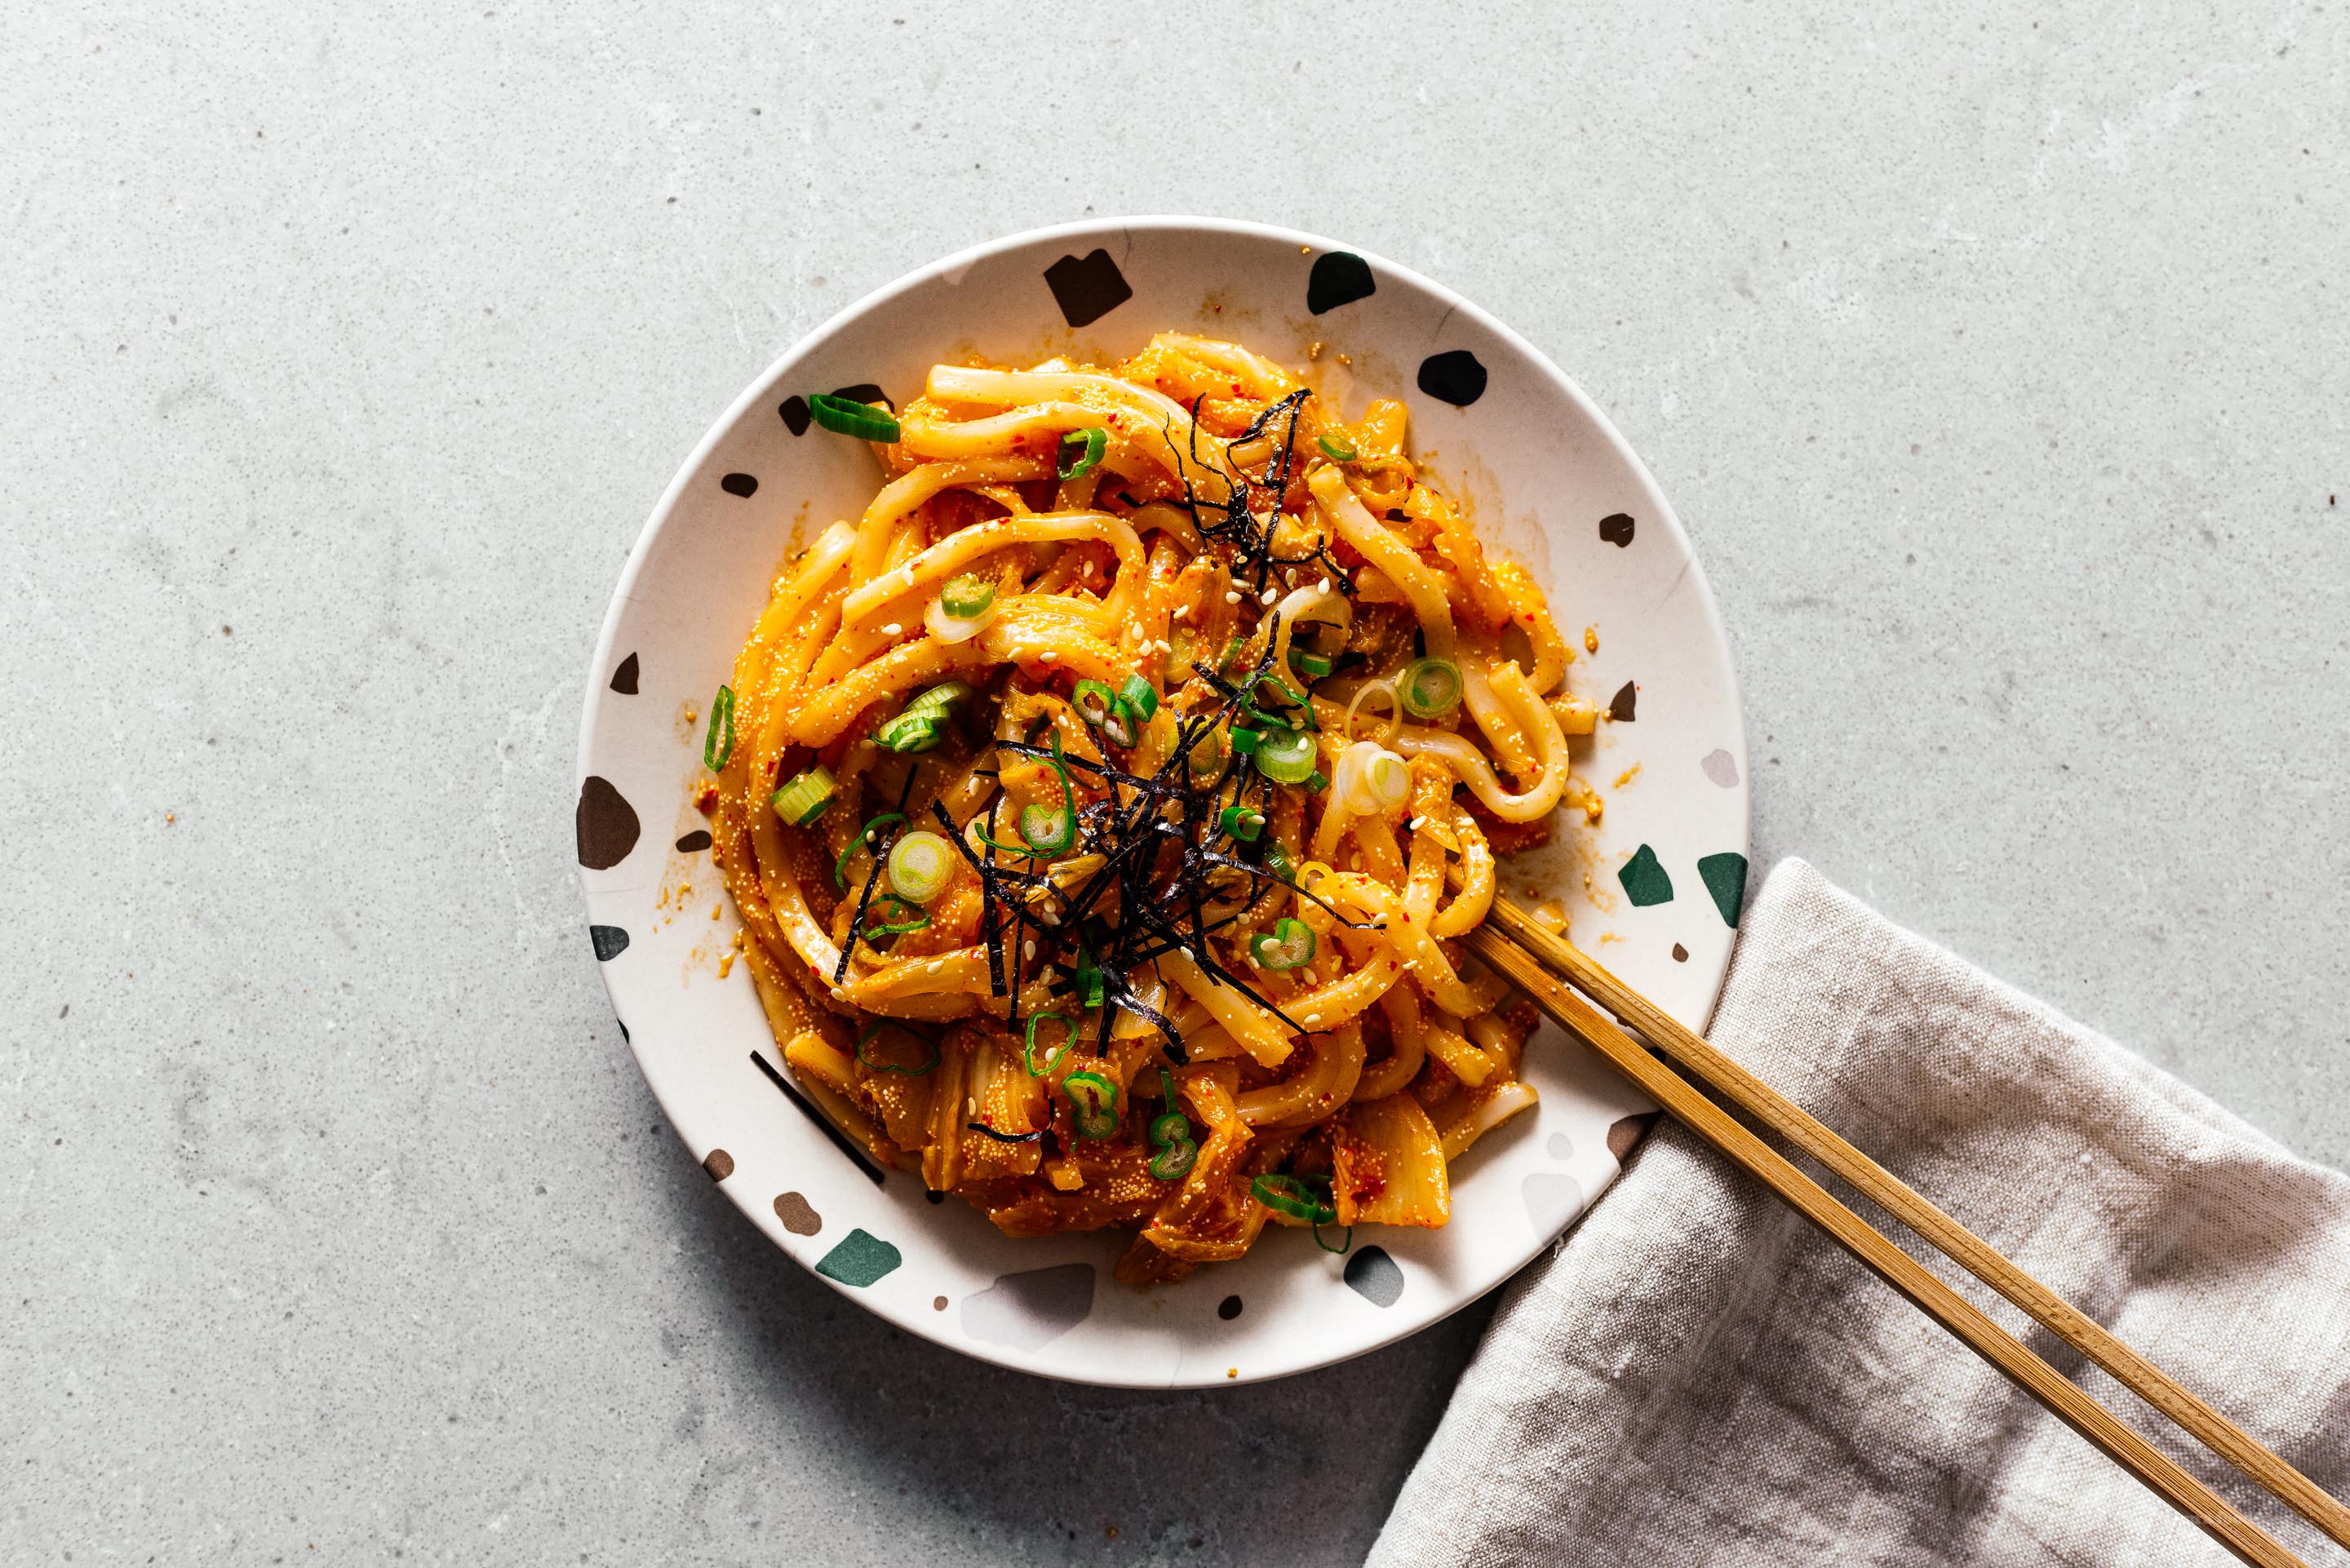
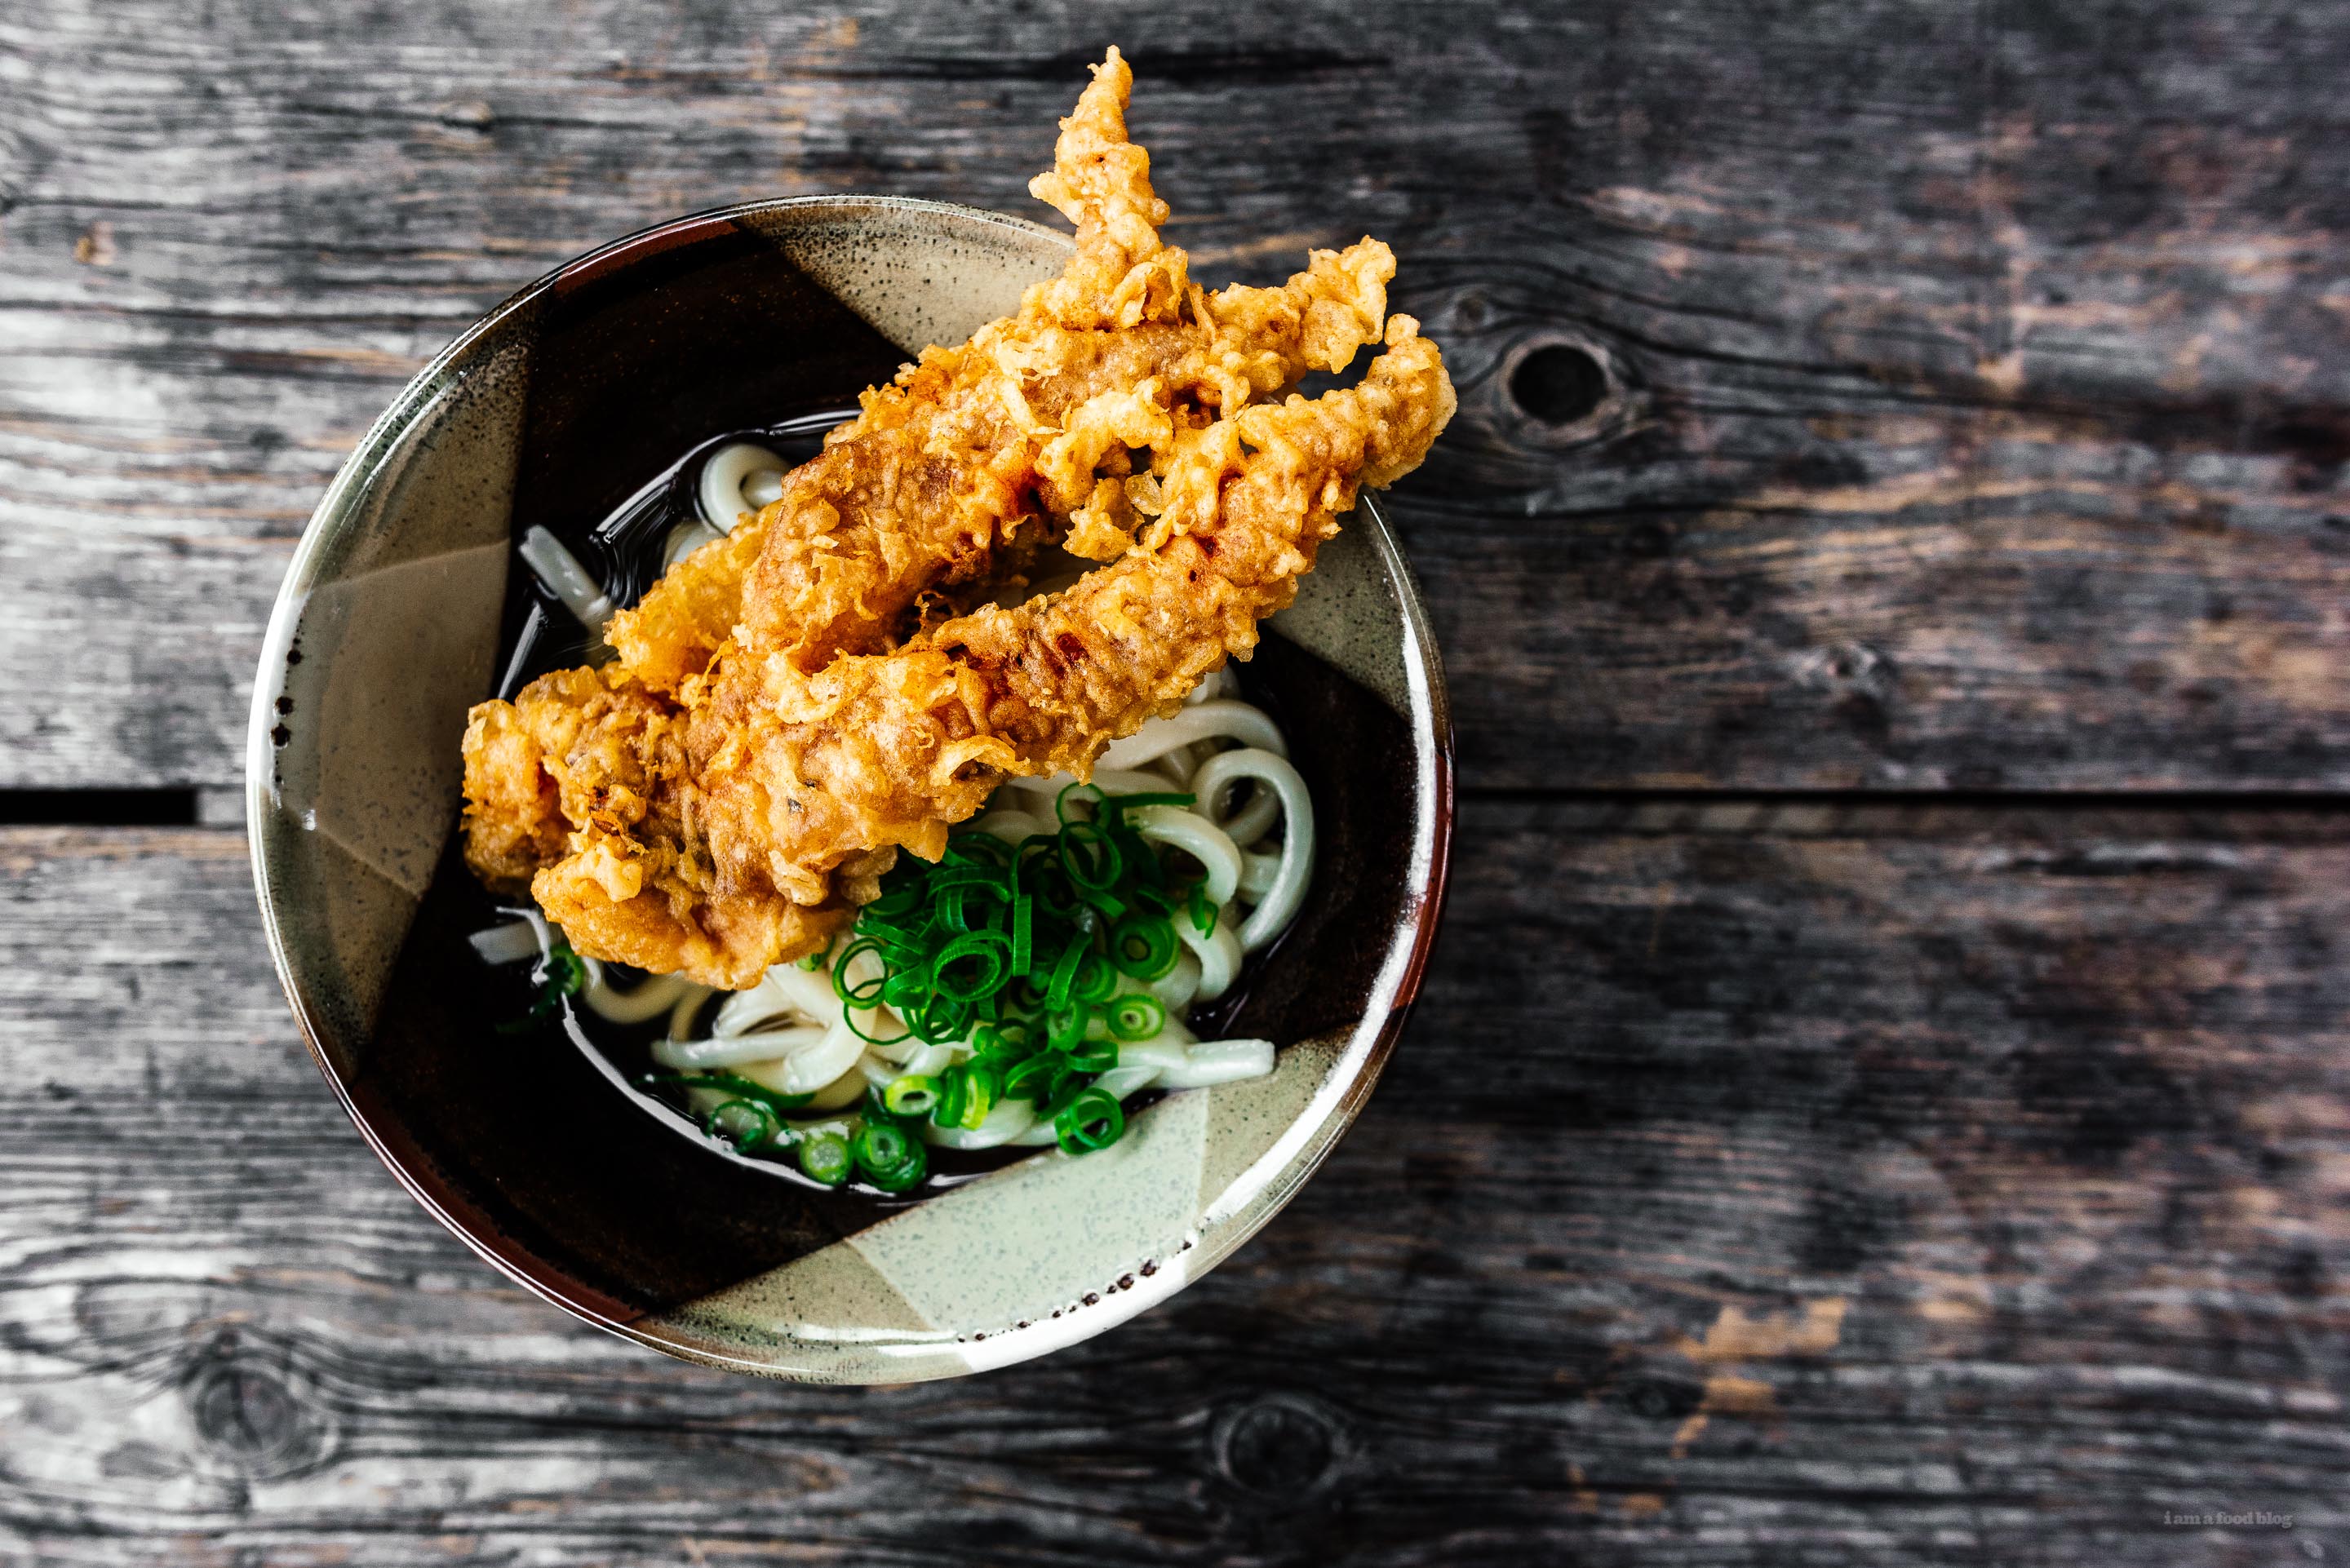
I Am... Spicy, Savory, and Completely Addictive Mentaiko Kimchi Udon
Hi from Niigata, a little town on the Western side of Japan. It’s not a huge must visit for most first timers to Japan, but if you love rice, sake, and seafood, it’s great! Still, even people in Japan will find it hard to believe that you’re going. I mentioned to one of my Japanese friends that we were headed there and she said, “Wow, that’s the real countryside!” It’s true, there are fields and fields of rice and it is decidedly less cosmopolitan than the other major cities in Japan, but it has a charm all its own. The people are friendly and the food is good – what more could you want? The first place we ate at was a little izakaya that kind of reminded me of home. We have a ton of great izakayas in the city and one of our faves does this crazy delicious kimchi mentaiko udon that I love. You’ll see plate after plate of it head out of the kitchen: a tangle of firm, yet chewy udon noodles coated in a butter, kimchi, spicy cod roe mixture. Have you had mentaiko before? It’s a Japanese take on a Korean spicy salted cod roe – basically spicy fish eggs that add a huge hit of flavor to rice, noodles, eggs...essentially anything and everything you can think of. It goes exceedingly well with kimchi and even better with noodles. This has got to be one of the easiest noodle dishes you’ll ever make. The payoff compared to the effort you put in will blow you away. Of course, you have to go to the Asian grocery store to get the mentaiko, which might be a pain, but hey, while you’re there, you can stock up on the snacks, am I right? And, if you absolutely can’t make it to the store and only have kimchi and butter in the fridge, that’s pretty darn good on it’s own. Kimchi butter noodles are where it’s at, the mentaiko just takes it over the top. I hope you guys have a chance to try these noodles! I’m going to head out now – we’re planning on finding some yakitori :)
Spicy, Savory, and Completely Addictive Mentaiko Kimchi Udon Recipe serves 1-2Read More →Cook the udon according to the package and drain well. Melt the butter over low heat and add the kimchi, frying slightly. Remove the roe from the sac by cutting open with a knife and using a spoon to scrape out the eggs. Add to the butter and kimchi. Toss in the udon and mix until well coated and glossy. Top with green onions and nori. Enjoy hot!
- 1 brick of frozen udon
- 1/2 cup kimchi, plus a bit of kimchi juice
- 1 tablespoon of butter
- 1 sac of mentaiko
- sliced green onions and nori, to finish
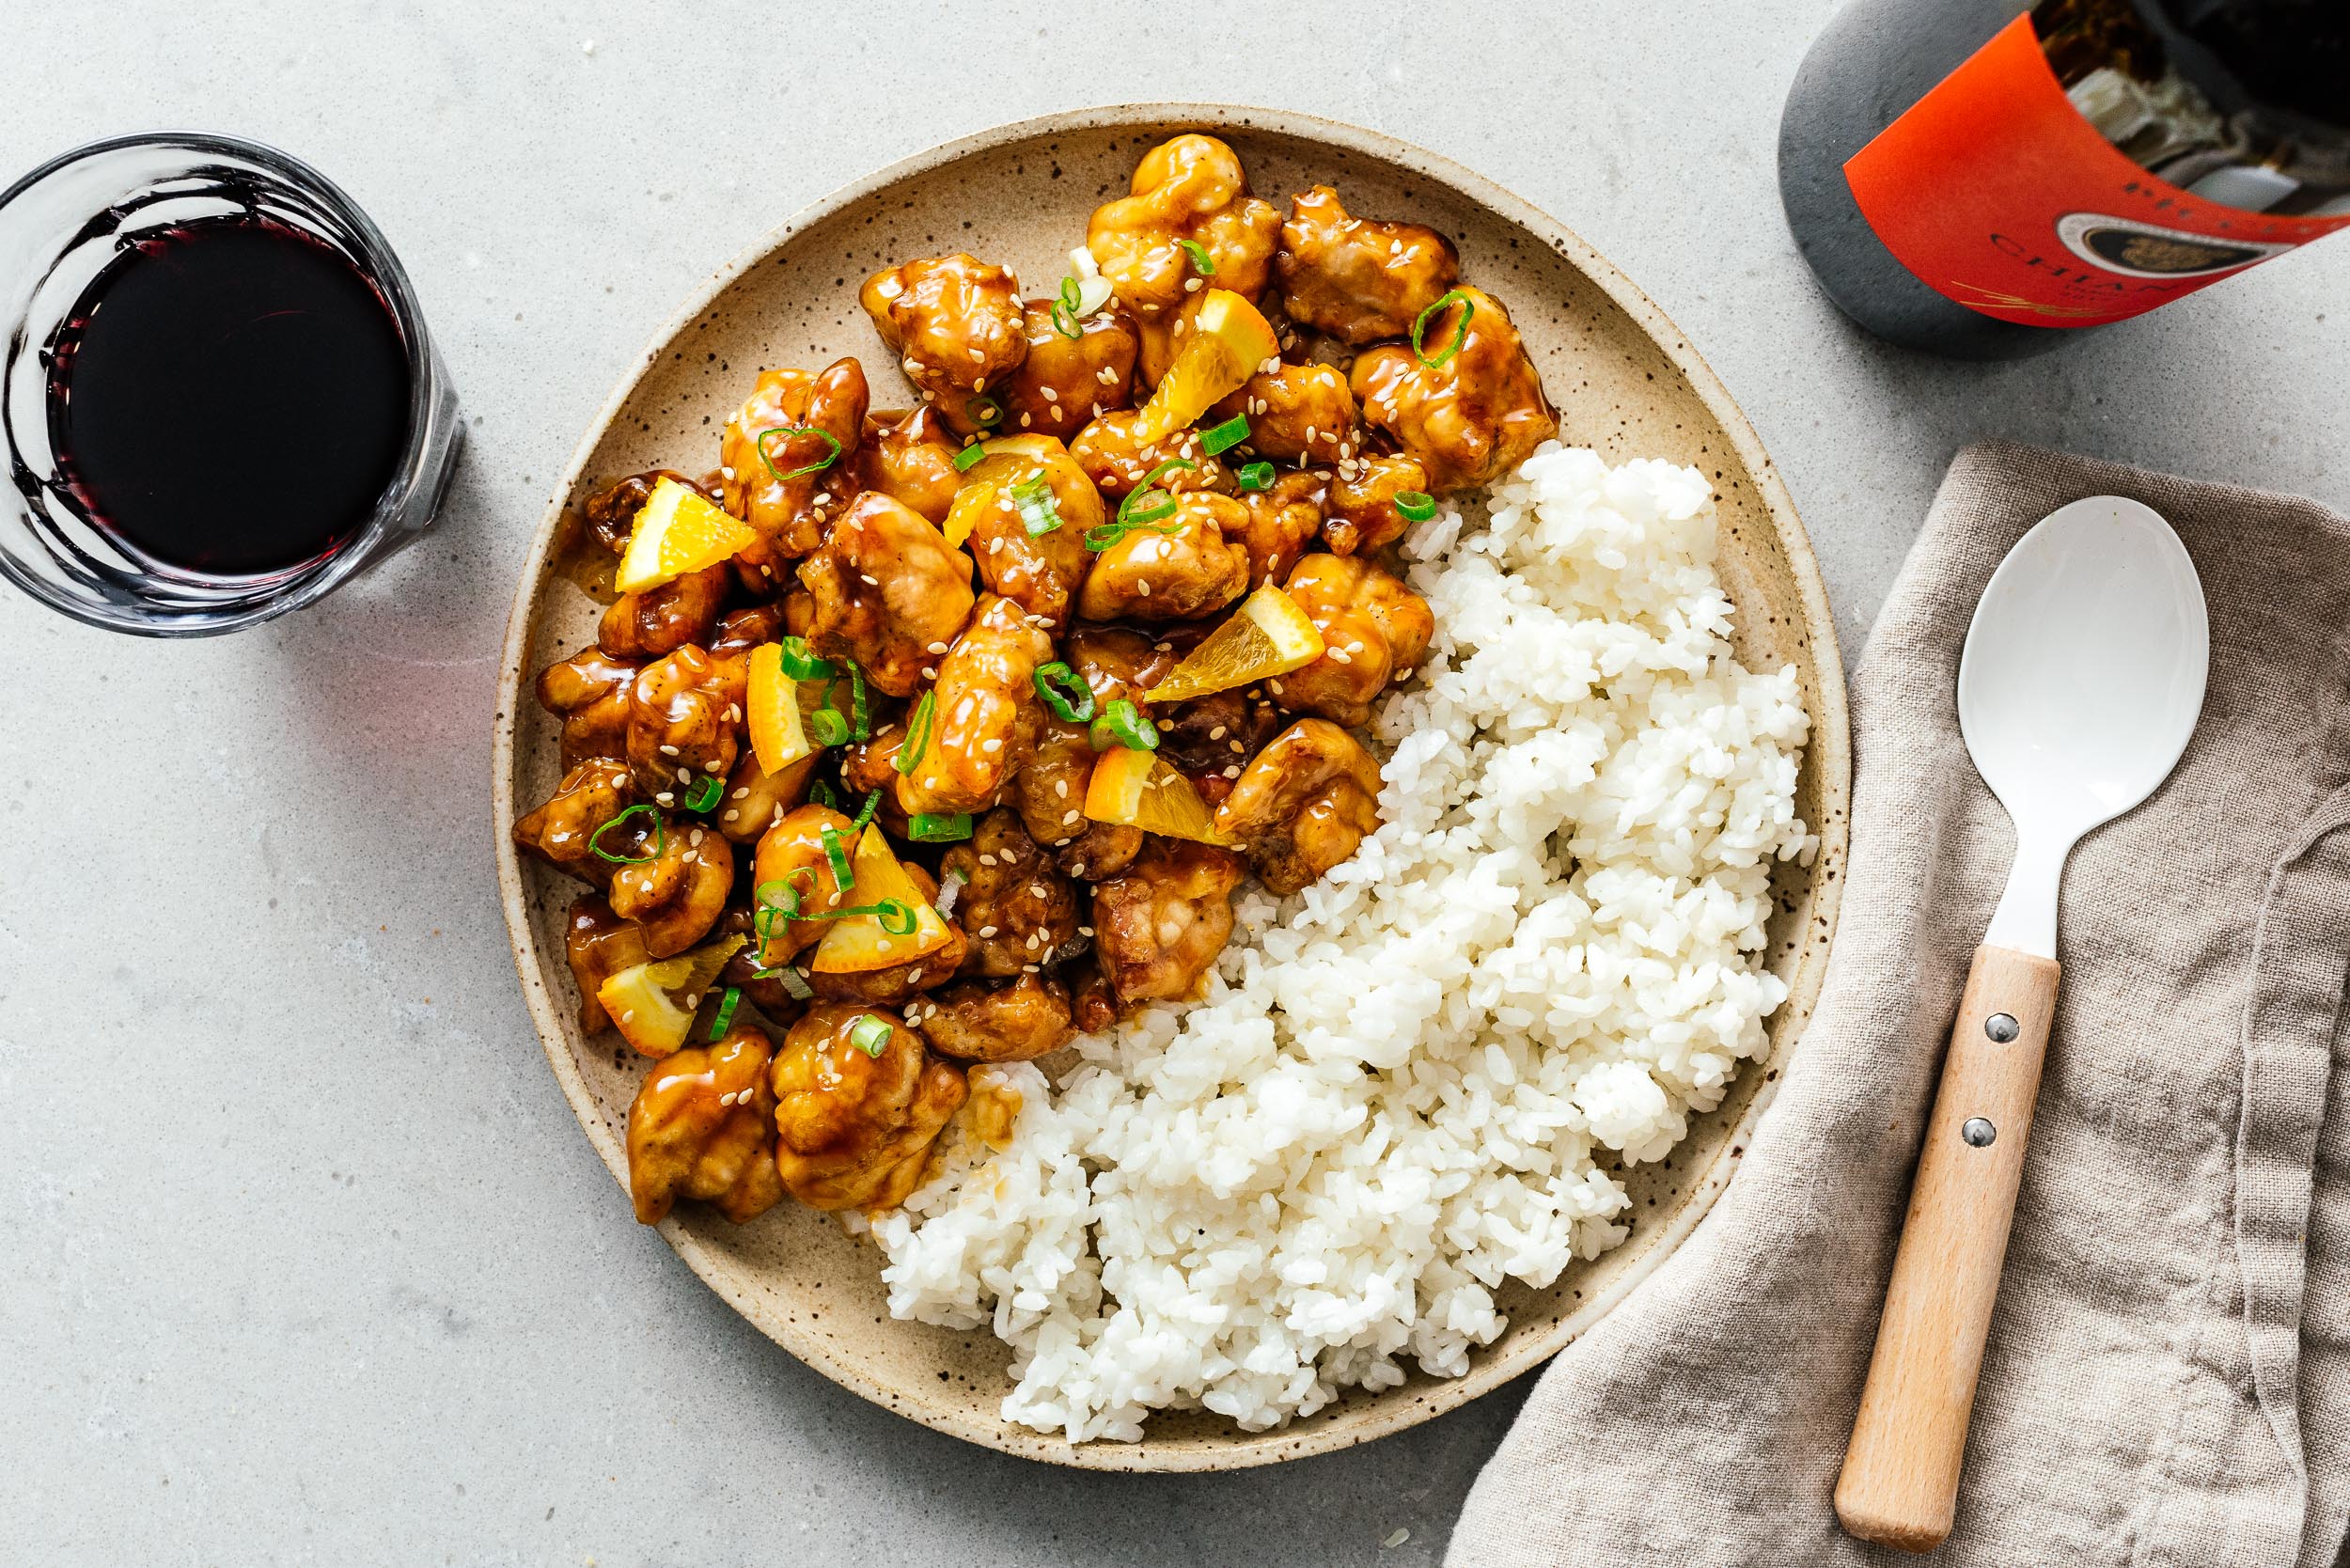
I Am... Easy Baked Chinese Orange Chicken Recipe
Pretty much everyone knows and loves orange chicken, the dish upon which a panda empire was started. While the Panda Express orange chicken isn't all that authentic these days, a lot of people don't know that it's based on an actual Chinese dish. Orange chicken seems like it shouldn't be terrible for you, but it's pretty terrible: deep fried chicken and a high sugar sauce. This easy healthy version tastes every bit as good as the deep fried version and it's not only way better for you, it's more authentic too.
What is Chinese orange chicken?
This is a healthy, not-quite-copycat, more authentic version that you can feel good about eating every night if you want. It's not deep fried, oily, or difficult, and it's utterly, utterly delicious. A tangy, bright, and slightly sweet sauce comes together with lightly crispy chicken and forms something that's far more than the sum of its 6 ingredients worth of parts.Cooking notes
You may need to adjust the sugar content to suit you because it's not possible to predict the sweetness of the orange you end up with.What do you need to make orange chicken?
A non stick skillet and a baking sheet with a rack that fits. Cooking spray is highly recommended. It puts less oil on the rack than brushing (and you need the oil or you'll tear your chicken).How do you make baked orange chicken?
- Coat the chicken. Season it with salt and pepper, then toss it in corn starch. I like to use a plastic bag as I find the corn starch is finer and fluffier than using a bowl, but it's not important.
- Bake your chicken. Place your chicken on an oiled rack (optional) and bake your chicken at 450ºF for 30 minutes. Flip the chicken halfway through for even browning.
- Make your sauce. While your chicken is cooking, now is the time to make your sauce. Add cornstarch to a little bit of water and mix well, then combine along with the other sauce ingredients in a nonstick saucepan until a glossy sauce forms. Taste and adjust as needed.
- Toss to coat. Once your chicken is done, remove from the rack and toss it in the sauce until it's well coated.
- Serve. Serve with rice and little pieces of orange if you would like. I think they add a lot to the final dish.
What do you serve orange chicken with?
Serve with fluffy white rice, fried noodles, and maybe a healthy side salad. Check out our better than takeout section for even more ideas.Easy & Healthy Oven Baked Orange Chicken Recipe
This healthy oven baked orange chicken comes together faster than delivery or running to the nearest strip mall, and is way better for you.
- 1 lb boneless skinless chicken thighs (1" cubed)
- 3 tbsp cornstarch
- 1/4 cup orange juice (about half an orange)
- 1/4 cup soy sauce
- 1/4 cup sugar
- 1/4 cup rice vinegar
Preheat your oven to 450ºF and season your chicken with salt and pepper.
Transfer your chicken to a ziplock/plastic bag along with 2 tablespoons of corn starch and shake well. Arrange the chicken onto an oiled tray on a foil lined baking sheet.
Bake your chicken for 30 minutes at 450ºF, flipping once after 20 minutes.
While the chicken is baking, add the remaining 1 tablespoon of cornstarch to 1 tablespoon of water in a cup and stir into a smooth slurry.
Make your sauce by combining orange juice, soy sauce, rice vinegar, and sugar. Add the corn starch slurry to it and bring to a boil, then take off the heat and stir until a smooth and glossy sauce forms. Set aside and relax with a glass of wine until the chicken is done.
When your chicken is crispy and brown, toss it in the sauce until everything is evenly coated. Top with sesame seeds and chopped green onions with a side of rice, and enjoy!

I Am... Small Batch Triple Coconut Bread
If you love coconut, you’re going to love this coconut bread! Mike and I are currently on a shinkansen, speeding through the Japanese countryside. We just spent the last two days eating at tiny udon shops tucked away in little residential towns and on the sides of the train tracks. I’m so deliriously happy to be back in Japan! Before we left, I made this little triple coconut cake as a sweet treat to welcome in spring. I’ve really come to love our new tradition of baking a mini loaf every Sunday. Loaves come together so quickly and there’s nothing better with a cup of coffee (which I’ve started drinking again after a long hiatus from caffeine) in the morning. Are you guys slow starters in the morning or do you like to just get up and go? I’m pretty much the worst in the morning – I need quite a bit of time to wake up properly, otherwise I end up being grumpy mcgrumpface. I like the whole ritual of grinding up coffee beans, making pour over, and lingering over coffee and cake. But really, it’s not always possible, especially when there’s work to be done. So, more often than not, it’s a grab and go kind of situation. And cake in a grab and go situation is always a good thing. This little loaf gets it’s coconuttiness from three sources: shredded coconut, coconut yogurt, and coconut oil. There’s a tiny bit of coconut extract in there too, but you can skip out on that if needed, it’s plenty coconutty without. Bake this at the beginning of the week and you’ve got cake for days! It’s super moist and keeps well.
Small Batch Triple Coconut Loaf Cake makes one mini loafRead More →Heat the oven to 350°F. Lightly oil and flour pan a mini loaf pan (6×3 inches or a pan that fits 2 cups liquid) or line with parchment paper. In a bowl, whisk together the flour, coconut, baking powder, and salt. In another bowl, whisk the sugar together with the yogurt, oil, egg, and coconut extract. Fold the dry ingredients in, just to blend. Pour the batter into the prepared pan and bake for 50 minutes to an hour, or until the top is golden brown and a skewer inserted into the center comes out clean. Let cool in the pan on a wire rack for 30 minutes, remove from the pan and let cool completely on the wire rack. Enjoy!
- 3/4 cups (90 grams) all-purpose flour
- 1/4 cups shredded coconut
- 1/2 teaspoon baking powder
- 1/4 teaspoon salt
- 1/2 cup (100 grams) sugar
- 6 tablespoons whole-milk coconut Greek yogurt
- 1/4 cup coconut oil or vegetable oil
- 1 large egg
- 1/4 teaspoon coconut extract, optional

I Am... Sakura Season in Tokyo
Being in Japan during sakura or cherry blossom season has always been on my bucket list. Still, it took Mike and I nine years of going to Japan before we actually got to see sakura. Not because we kept missing the season, or because we didn’t want to. To be honest, I’m not sure why it too us so long to get here. I think it was partially because I was scared of the stories about how cherry blossom season was the busiest season in Japan and partially because, well, we have Japan down pat. We know what we like and we know which season we like it in. Even so, this year is the year we broke our rut. This year is the year we finally made it to Japan to see the sakura! We almost didn’t because I told Mike that it wasn’t really a top priority of mine, but he insisted, saying that if we were going to go around the season, why not try to plan it for the peak. Cherry blossom season varies from year to year, depending on the weather, but it’s usually somewhere near the beginning of April. There are websites and calendars dedicated to telling you when the trees are blooming and when they will be at full bloom. Full bloom is what you want: a gorgeous, generous canopy of fluffy white pink blossoms that are incredibly delicate and fleeting. Their fleeting quality is what makes sakura so popular in Japan. In a culture that celebrates things in season and nature in general, they would of course, celebrate a natural phenomenon a both as a herald of spring and as an excuse to get drunk and eat delicious food. Somehow Mike and I (okay, it was really all Mike) managed to book our flight into Tokyo right at the start of the peak season. Our plan was: check out the blossoms in Tokyo for just one day before heading on a mini train trip to see some other lesser known parts of Japan. We landed in the afternoon after a very long flight (I managed to watch 4 movies!), quickly dropped off our luggage at the hotel and headed out to one of the top cherry blossom spots in Tokyo: Nakameguro. Nakameguro, even without sakura, is a very fun neighborhood. There are a ton of cute little eateries, hipster cafes, and shops all around the station. And, of course, there’s the Meguro river, which is lined with a dense population of sakura trees. The trees, next to the river, along with pink lanterns, is probably something you’ve seen on Instagram. It gets super busy, both day and night, with everyone politely (sometimes not so politely in tourist cases) jostling for the best photos. We loved the Nakame sakura (what locals call Nakameguro for short) so much that Mike dubbed it Naka Bae. Since we arrived in the afternoon, before most people got off work, it wasn’t absurdly busy. As the afternoon went on, it did get increasingly busier, but it was nothing like what I was scared it would be. If you don’t like crowds, this probably won’t be the place for you, but it wasn’t as busy as the time we went to see the winter illuminations – now that was intense. The best part of Nakame, after the blossoms, which were absolutely delightful, was the street food. There were a bunch of vendors set up on both sides of the river, selling sakura themed food and drinks. Think: strawberry everything, pink champagne, and all your classic Japanese festival foods. I had a grilled mochi covered in a thick, sweet, garlicky sauce. It was crisp and chewy at the same time and seriously so good. We also had some classic Japanese festival street food: yakisoba. I wanted to eat all the things, especially the long fries and the tornado sausage, but we wanted to visit another sakura site so we didn’t eat as much as we could have. But seriously, I love street food and there was SO MUCH! Some of the more popular things I saw people having were: strawberry drinks, strawberries on a stick, boba drinks, takoyaki, grilled mochi, and miso dango. After Nakame, we headed to Chidorigafuchi park, which is right near the Emperor’s place. Sadly there was no street food there. We got there right at sunset, when they started to light up all the sakura. It was very, very pretty, but it was also so BUSY. Busier than Nakame, and that was already bustling by the time we left. It seemed like there were more out of town tourists at Chidorigafuchi and more local young peeps at Nakameguro. I liked the way the sakura looked at night, but it wasn’t really what I think of when I think of cherry blossoms, so after a quick stroll and ten thousand pictures, we called it and decided to come again to visit in the morning. The next day there still wasn’t any street food, but it was a lot less busier. The canopy of cherry blossoms at Chiodorifuchi is gorgeous. As you walk along the moat, you can see people out on boats, and the color of the moat next to the pink of the blossoms is perfection. I’m so happy we came back during the day. We walked around most of the of moat and got to see all the people who were already staking out their claims for hanami viewing parties. Hanami is when groups of people picnic under the sakura trees. You get a bunch of friends, food, and alcohol and hang out, drinking and eating and enjoying the cherry blossoms. There were huge blue tarps laid out, with just one lonely guy or girl just hanging in the middle. Unfortunately, we didn’t get a chance to hanami because we were leaving Tokyo. But hopefully we’ll get a chance to in one of the other places we’re visiting. If we do, I’m pretty sure it’s going to be awesome. And that was it! An afternoon and morning of Tokyo’s best sakura. We’re literally on a shinkansen (bullet train) while I’m writing up this post. We’re headed down south and Mike and I are the only ones on the train. If you get a chance to be in Tokyo for sakura, here are our top 5 tips on how to hanami: 1. Bring a tarp. You’ll see giant blue tarps with one lonely person hanging out in the middle of them. They’re just waiting for their friends. Usually, one person will come early in the morning to secure a good spot and friends or office mates will trade off during the day to ensure that they have the best space to hanami. You can grab a cheap tarp at any 100 yen shop. 2. Grab some drinks. Alcohol is a big part of hanami, so if you’re going to do it right, you need to get your drank on! Visit a combini – 7-11 or Lawson’s is always a good choice – and grab some drinks. It’s perfectly acceptable and what everyone means when they say they are going to “see” sakura. 3. FOOD! You’ll need some snacks with your alcohol. Depending on where you hanami, they’re may or may not be food stalls. If there are, of course buy the food at the foods stalls. Otherwise, I’ve been seeing a lot of Uber Eats hanami ads where people literally uber their food to their tarps. Of course, convenience store food or food from a food hall works too! 4. Don’t be disheartened if you can’t sit down. It’s seriously competitive and well, you can just as easily enjoy food and drink while standing around near the food stalls. It’s just as pretty and the food will taste the same sitting or standing. 5. Bring some napkins/wet wipes. Most vendors don’t have them. Sometimes they do, but if you’re a messy eater, like me, just bring your own, you won’t regret it!
Read More →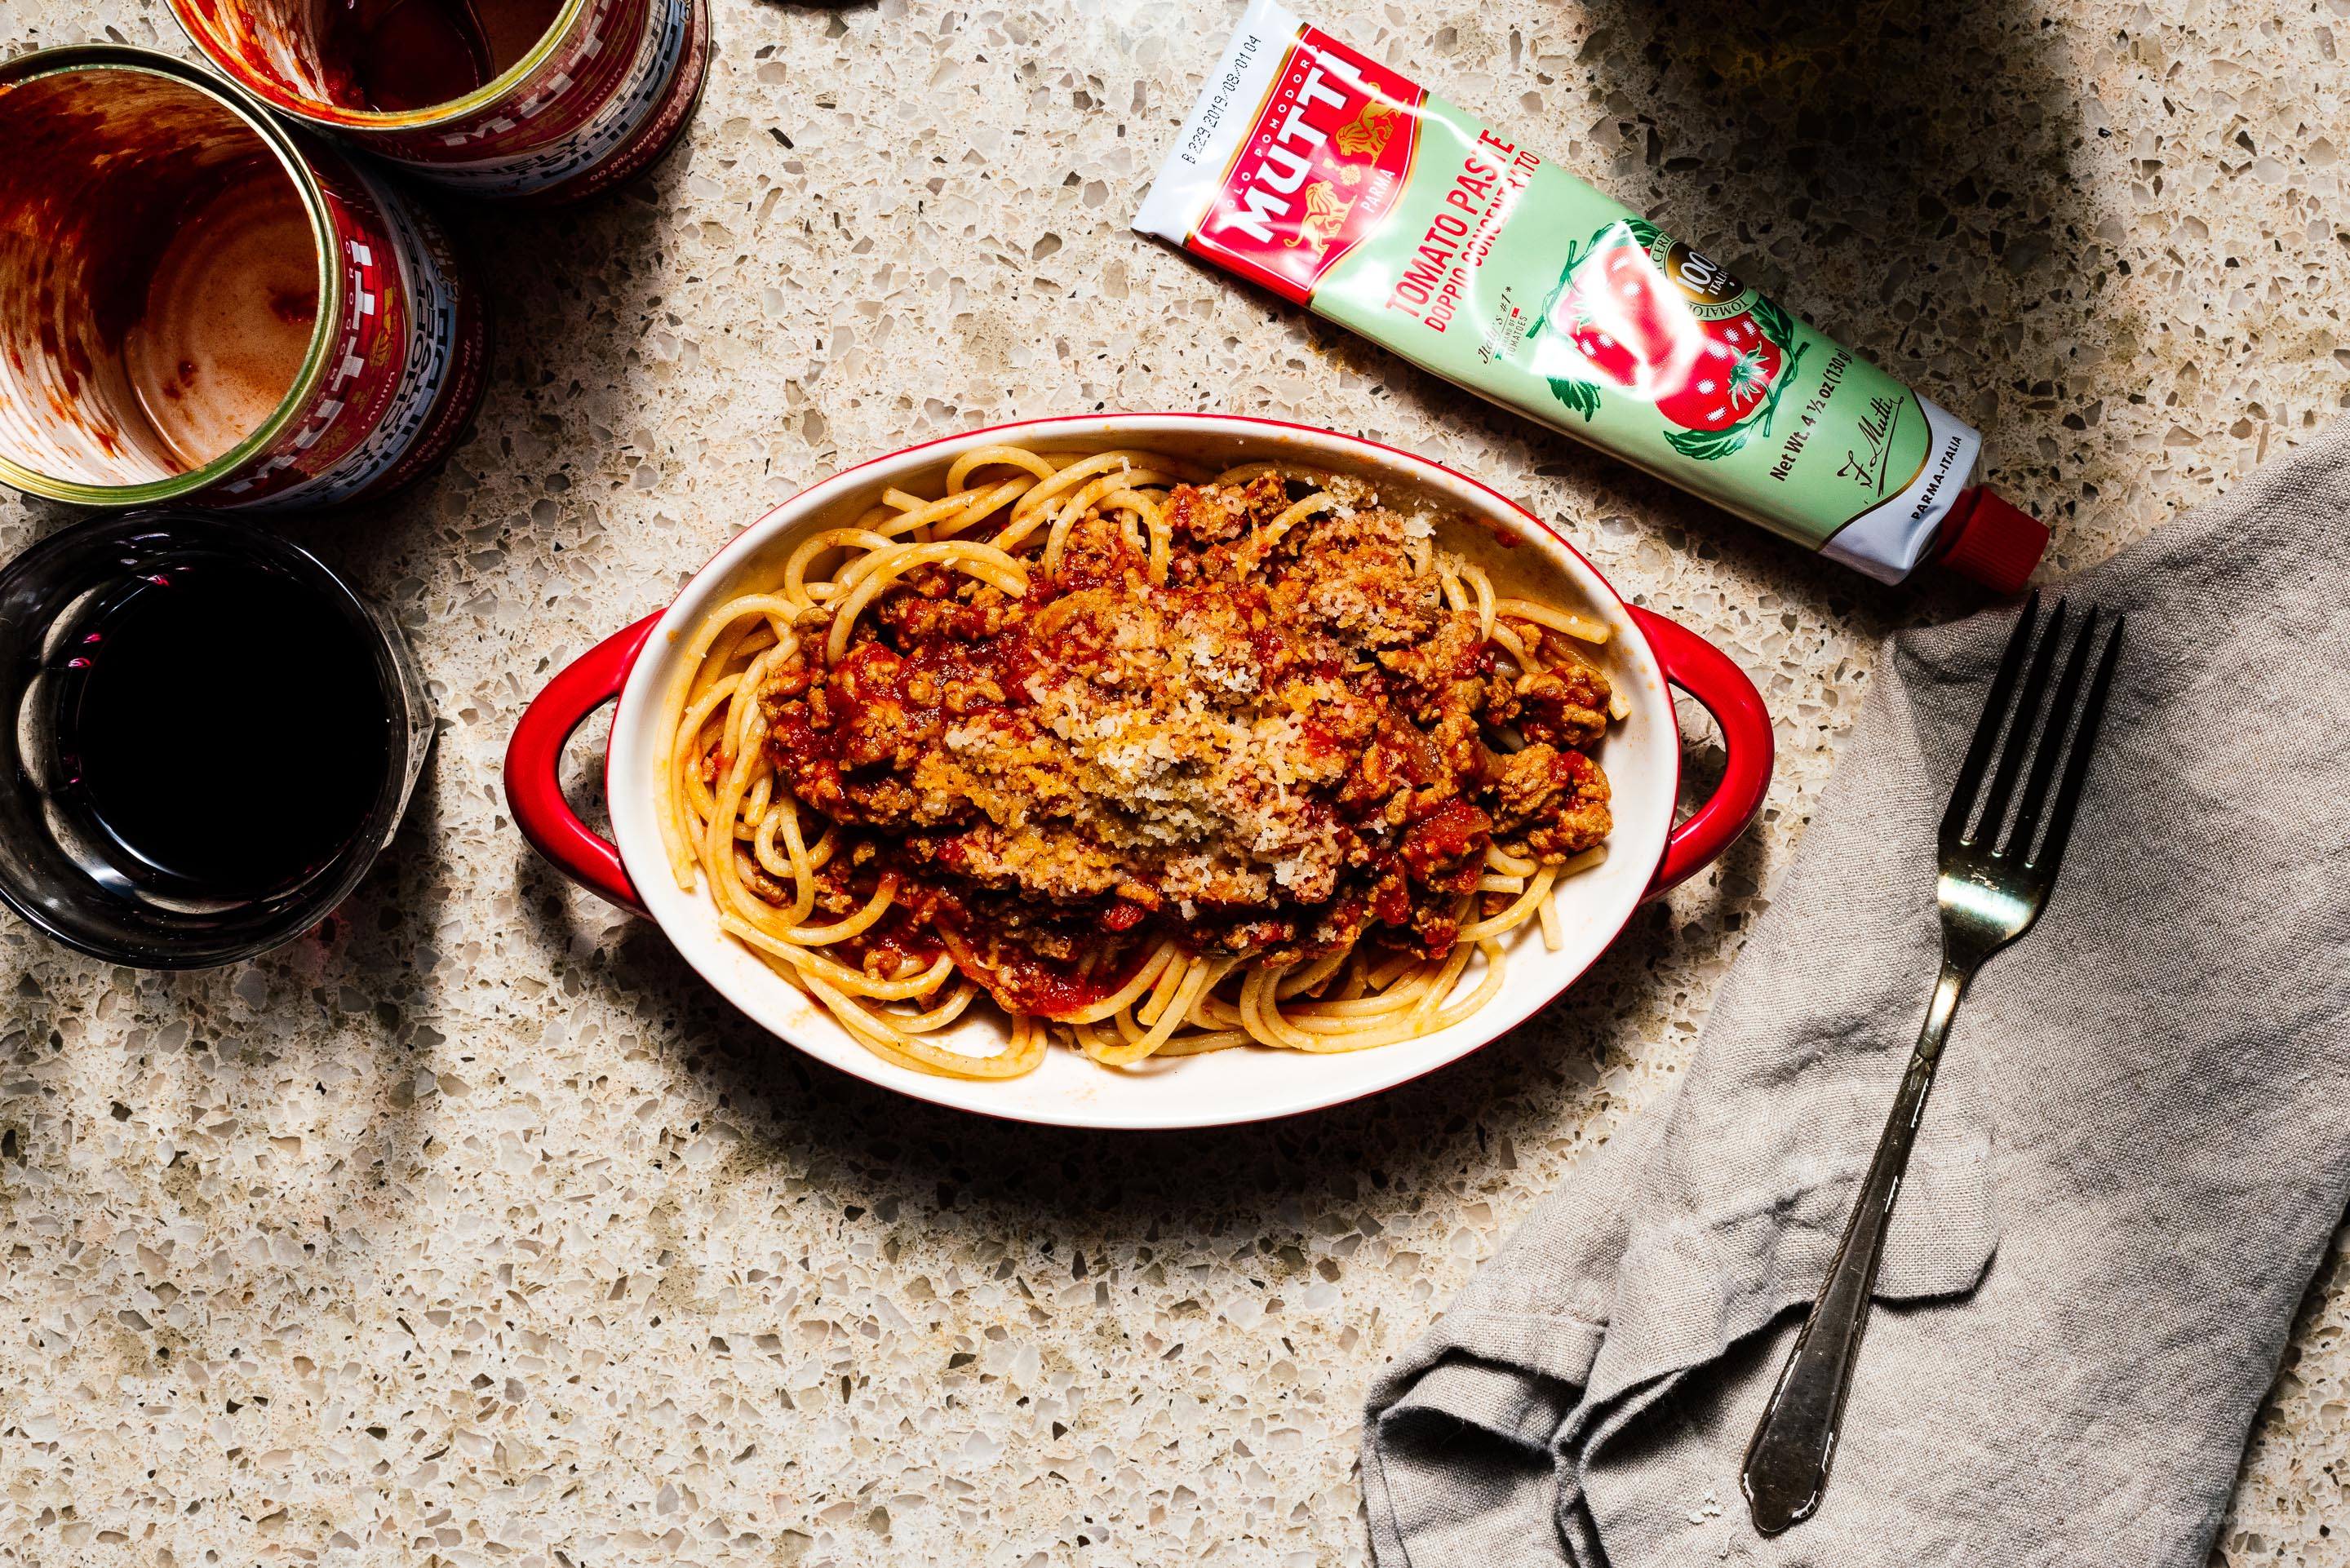
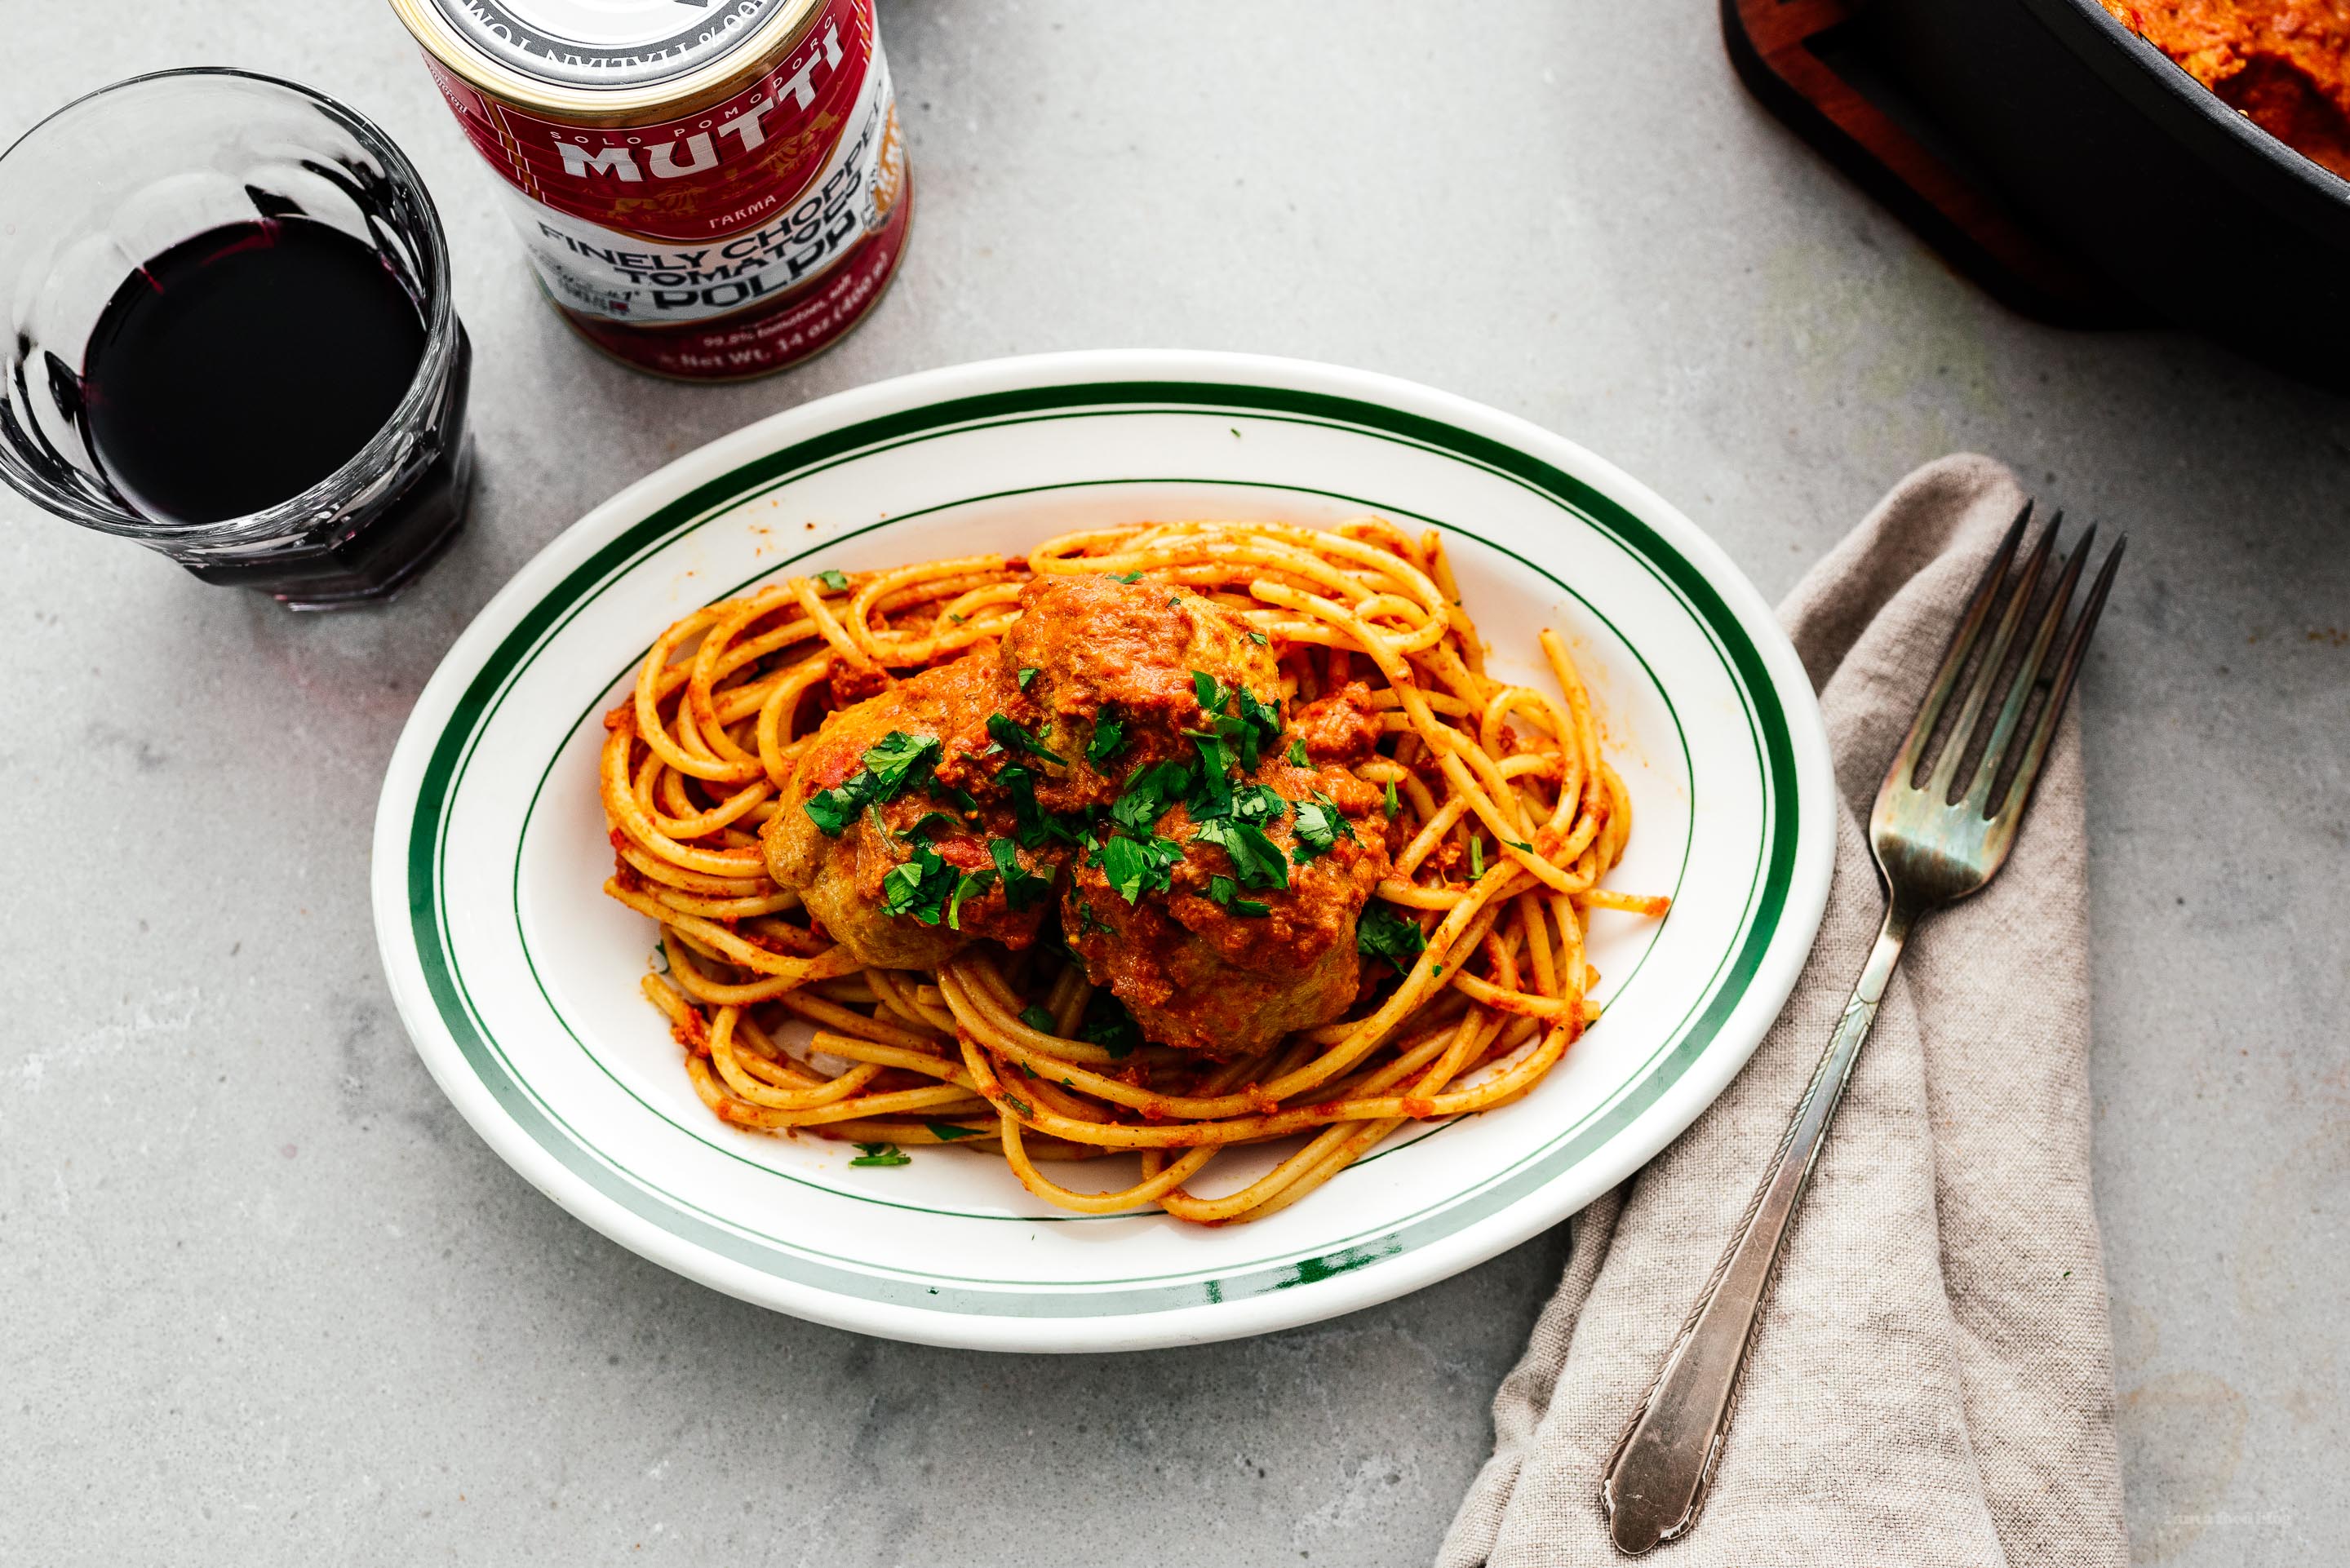
I Am... The Ultimate Easy Instant Pot Meat Sauce Recipe
I love sophisticated and authentic Italian pasta sauces as much as the next person - Steph and I have even made a pilgrimage to Bologna in search of the ultimate ragu Bolognese - but if I'm honest, sometimes I just want the stuff I grew up with - spaghetti with meat sauce. You know what it is: cheap overdone spaghetti and ground meat with red sauce. I'm an adult now and I recognize that stuff neither tastes as good as I remember nor is as healthy as I'd like these days. This version though is very healthy, very easy, and tastes just as good as your memories. The only difference is, instead of mom sweating over the stove for a couple of hours simmering, this sauce comes together quickly thanks to the power of pressure cooking and the freshness of Mutti tomatoes, which are our favorite -bar none- brand of tomato sauces and pastes. This post was done in collaboration with Mutti, but they were already our go-to anytime we needed passata or tomato paste: those tubes of double and triple concentrated pastes are genius. Cooking Notes Ground meat is unspecified because you can choose what you like. I prefer a 50% beef/pork mix, but you can do Italian sausage, ground lamb, ground veal, it's up to you. What do you need? An instant pot or other countertop pressure cooker. How do you serve it? Serve with pasta. Cook the pasta 3 minutes shy of al dente, then transfer to your sauce and finish in the sauce. Or, be nostalgic, and drop the sauce on top of the pasta. It won't be as good, but it sure looks nice. vs
The Ultimate Easy Instant Pot Meat Sauce Recipe Serves 2-41. Toast the fennel in your instant pot on saute medium mode. 2. When the fennel is aromatic, add butter, onions, and garlic and cook until onion is slightly translucent, about 3 minutes. 3. Add your ground meat and break up. When the ground meat is reasonably brown, add the Mutti Double Concentrated Tomato Paste (Doppio Concentrato) and stir. Cook for 1 minute to caramelize slightly. 4. Add Mutti Finely Chopped Tomatoes (Polpa) and close the lid. Cook on high pressure for 20 minutes. 5. Cook pasta 3 minutes shy of al dente, then drain and return to the same pan. When the sauce is done, quick release, then transfer 1/2 cup of sauce per serving of pasta to the pasta pan. With heat on medium, toss until a glossy sauce forms and pasta is completely coated. Enjoy with lots of grated parmigiano.
- 1 teaspoon fennel
- 1 tablespoon butter
- 1/2 onion, roughly chopped
- 2 cloves garlic, crushed
- 1 lb ground meat (see note above)
- 1/2 tube Mutti Double Concentrated Tomato Paste (Doppio Concentrato)
- 1 14oz can Mutti Finely Chopped Tomatoes (Polpa)
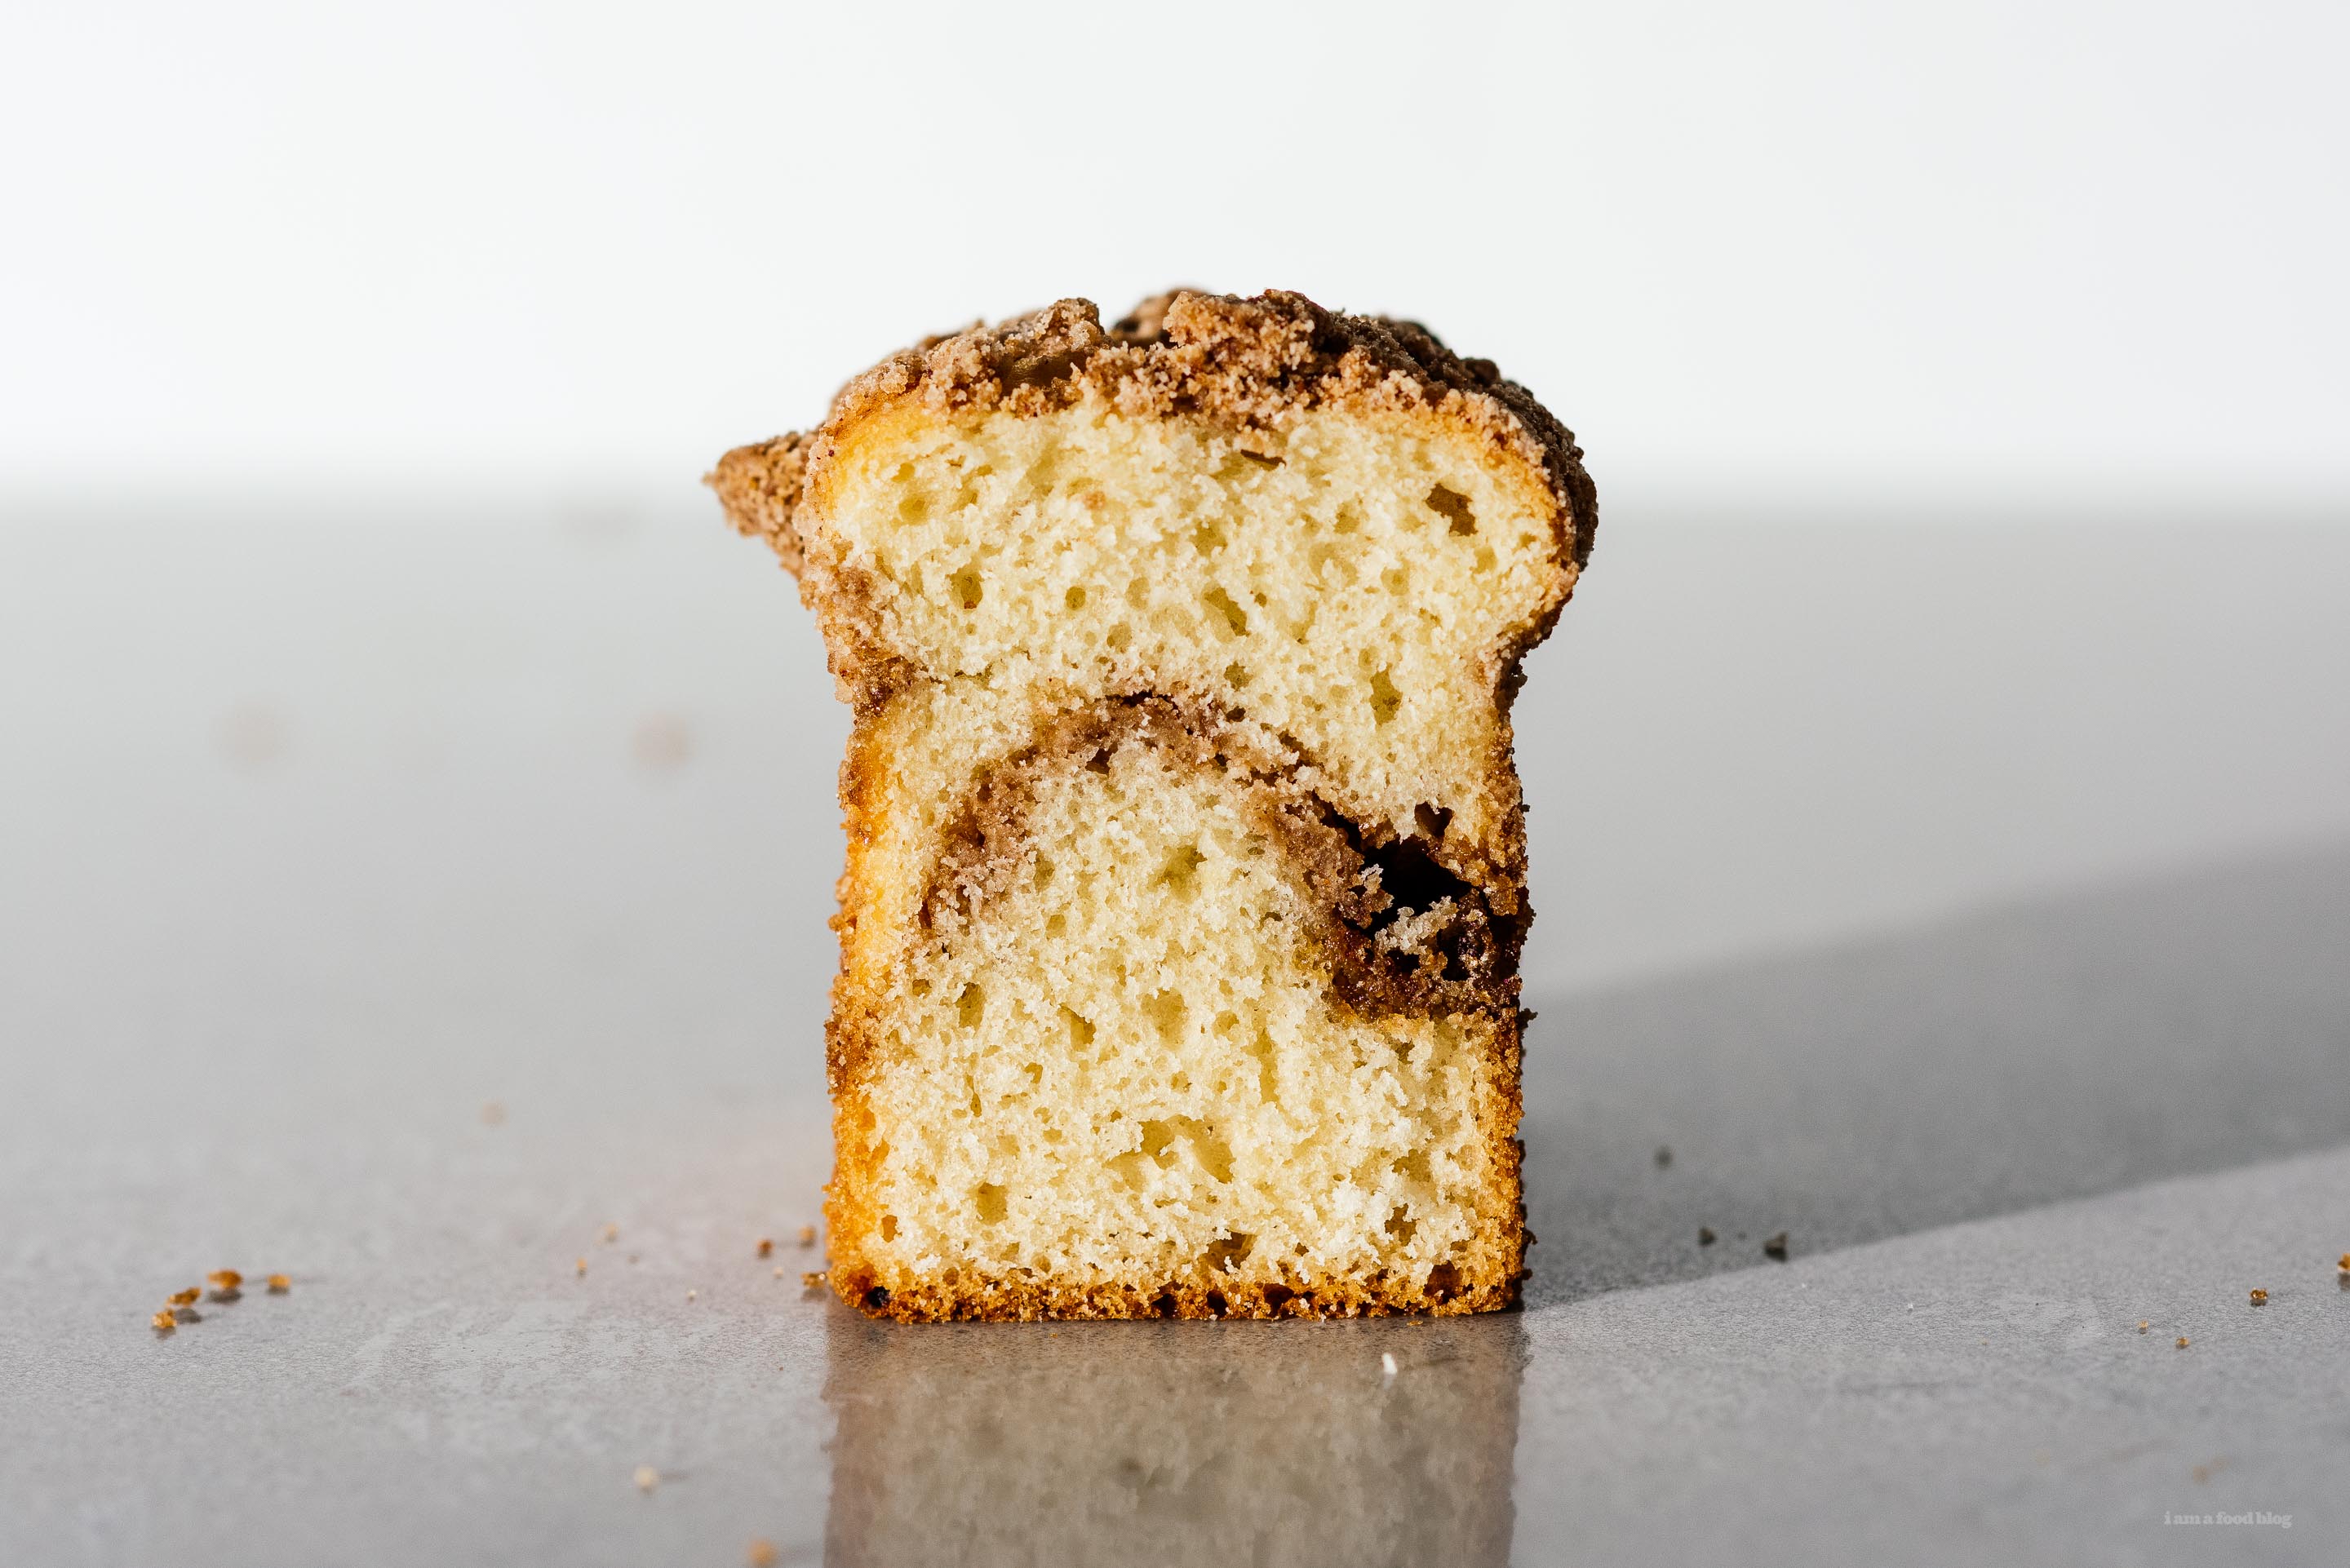
I Am... Small Batch Copycat Cinnamon Streusel Starbucks Coffee Cake Recipe
Back in university, I was obsessed with coffee cake. I’d grab my books, go to Starbucks, get one of the huge slices of coffee cake, and “study.” Back then I didn’t even really drink coffee, I just always had coffee cake and tea. It was the one thing that made studying ok, having something to nibble on. Anyway, me and studying are history, but I still love coffee cake with a passion. Especially when it has big ass cinnamon crumbs streaked throughout and on top. Seriously perfect with a cup of coffee. This recipe is a small batch recipe of course, so you can make it at the beginning of the week and have a tiny slice every day without feeling guilty. Think of it as cake meal prep! What I love about this cake, aside from the fact that it’s super fast to put together, is that it’s my idea of what a great snack cake it is. Just rich enough, with a tender crumb and almost doughnut-like cinnamon sugar crumbs, I could eat this cake for breakfast, lunch and dinner. It’s a standard recipe, but a goodie. Not so fancy unlike some of the hyped pastries that are around lately. What are your guys’ thoughts on hyped food? Are you willing to wait in line to discover for yourself if it’s actually good? I’m a sucker for hype, so I almost always want to try, but then I’m inevitably disappointed. It makes me wonder, how many hyped things are really, truly good? Hope you’re enjoying spring and that there’s cake in your future!
Small Batch Copycat Cinnamon Streusel Starbucks Coffee Cake Recipe makes one small loafRead More →Crumb Topping
- 1/4 cup all-purpose flour
- 1/4 cup light brown sugar, packed
- 1/4 teaspoon cinnamon
- pinch of salt
- 2 tablespoons butter, cold
Cake
Heat the oven to 350°F. Lightly oil and flour pan a mini loaf pan (6×3 inches or a pan that fits 2 cups liquid) or line with parchment paper. In a bowl, whisk together the flour, sugar, cinnamon and salt. Use your fingertips or a fork to work the cold butter into the mix until it starts to clump up into large crumbs. Set aside. In another bowl, whisk together the oil and sugar. Stir in the egg and vanilla. Whisk in the milk. Stir in the flour, baking powder, and a pinch of salt until just combined. Pour half of the batter into the prepared pan and top with half of the streusel. Pour in the remaining batter and top with the remaining streusel. Bake for 40-45 minutes, or until the top is golden brown and a skewer inserted into the center comes out clean. Let cool in the pan on a wire rack for 30 minutes, remove from the pan and let cool completely on the wire rack. Enjoy!
- 1/4 cup neutral oil
- 1/4 cup sugar
- 1 egg
- 1/4 teaspoon vanilla
- 1/4 cup milk
- 3/4 cups flour
- 3/4 teaspoon baking powder
- pinch of salt
I Am... Creamy Comforting 30 Minute Butter Chicken Meatballs
Sometimes, some things just come together serendipitously. Things like these delicious butter chicken meatballs. Recently, Mike and I went through a period where we were obsessed with Indian food. All the food we made for dinner parties was Indian. But at the same time, I also had a thing for meatballs. One day, we had both leftover in the fridge: a bit of butter chicken sauce and a bunch of meatballs. I looked at the containers, right next to each other, and I had the brilliant idea of combining the two. It was so good! This is spaghetti and meatballs like you’ve never seen before, and trust me when I say you’re going to love it. If you’ve never had butter chicken with pasta, you might think this is a bit of a strange combination. But hear me out: it’s really good – think of it like a basic tomato-based sauce with a bunch of spices and a touch of cream. You end up with a creamy, yet fresh tomato sauce bursting with flavor. Speaking of tomatoes, in this post we used Mutti’s signature tomato offering: Finely Chopped Tomatoes (Polpa). I’m a huge fan of Mutti so I’m absurdly excited to be collaborating with them on this post. I love their retro Italian branding, the fact that they're a family owned company and have been around since 1899, and just how fresh their products taste. With just perfectly sun-ripened tomatoes and salt – it’s like they’ve captured the feeling of being in Italy in the summer, without the flight. If you’re looking for a fresh, flavorful weeknight dish that comes together quickly, this butter chicken is tailor made for you. First up, you make the meatballs: a simple mix of ground chicken, breadcrumbs, eggs, and salt and pepper. The meatballs are baked, so there’s no fuss with frying them - they end up perfectly cooked through, and much healthier then pan fried. While they’re baking in the oven, you’ll have your hands free to make the sauce by opening up a can of tomatoes, and adding the spices. A quick simmer melds all the flavors together. When the meatballs are cooked through, combine everything together and you’re ready to eat! We love the meatballs with pasta, but of course you can have them with rice too. Either way, they’re delicious! They're just as good on basmati too!
Creamy Comforting 30 Minute Butter Chicken Meatballs serves 4Heat the oven to 450°F. Line a baking sheet with foil. In a bowl, mix together the chicken, egg, panko and 1/2 teaspoon each of salt and pepper. Wet your hands slightly and shape into meatballs, placing on the foil lined baking sheet. Bake for 15 minutes or until the meatballs are crisp and cooked through. While the meatballs are cooking, make the sauce by combining the Mutti Finely Chopped Tomatoes (Polpa), garlic, garam masala, turmeric, paprika, cumin, cayenne, and 1/2 teaspoon salt. Keep on a low simmer. When the meatballs are cooked, add to the sauce, along with the heavy cream and butter. let simmer together, string occasionally until the sauce thickens lightly, about five minutes. Remove from the heat, taste and adjust the seasoning. Finish with cilantro and enjoy hot!
- 1 pound ground chicken
- 1 egg, lightly beaten
- 1/4 cup panko
- salt and freshly ground pepper
- 1 can Mutti Finely Chopped Tomatoes (Polpa)
- 2 teaspoons garlic powder
- 1 teaspoon garam masala
- 1/2 teaspoon ground turmeric
- 1/2 teaspoon ground paprika
- 1/2 teaspoon ground cumin
- 1/4 teaspoon cayenne, or to taste
- 1/2 cup heavy cream
- 1/4 cup butter
- 1/4 cup chopped fresh cilantro

Popular
 2015 Holiday Giveaway
  One-Pot Lemon Scallop Pea Spaghetti
  Beer Battered Onion Rings, Jalapeno Aioli
  2014 Holiday Gift Guide and a Giveaway
  Easy Gourmet Hot Wings and a Giveaway!
  The Ultimate Veggie Sandwich
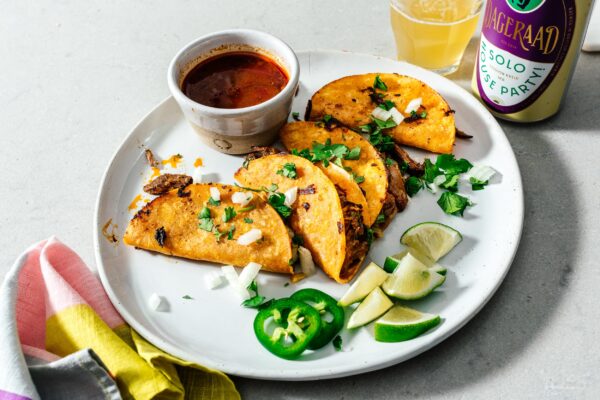
 Vegan(!) Creamy Corn Soup Recipe
  Sunday Brunch: Grilled Cheese Eggs Benny